44 guides covering the register, inventory, staff, payroll, reports, and hardware setup, organized by topic, not by video.
Or tap ☰ to browse by section.
01
Getting Started
Welcome to Tillr
Tillr is a point-of-sale that keeps working even when your internet doesn't. It's built for stores where the register can't afford to go down just because the Wi-Fi did.
Create your account with your email and your store's name. Takes about two minutes.
Tillr is in Alpha Test right now, so every Premium and Enterprise feature is unlocked and free, no card required.
Head to Inventory and add your first product: a name, retail price, cost price, and starting stock count. Tillr calculates your margin automatically.
Tillr runs three ways: in your browser, as a Windows desktop app, or on an Android phone or tablet, and all three stay in sync. Ring up a sale on your phone and it shows up on the desktop the moment it reconnects.
Finding your POS login
Your POS login is different from your Tillr Account email and password. Your Tillr Account is what you used to sign up and pay the bill; your POS login (a username and password, not an email) is what you and your staff actually type in at the register on Web, Desktop, or Android.
The moment your account is created, Tillr auto-creates one admin POS login for you: username admin, password admin. It's shown once, right there on screen, so you know where to find it — but it's the same default on every new Tillr account, so change it as soon as you can from Settings → Users.
Changed it and then forgot the new one?
If your store already has another admin signed in, they can reset any user's password — including another admin's — from Settings → Users. No need to know the old one.
If you're the only admin and you're locked out, there's no self-service reset for that yet. Email [email protected] from the same address you registered with and we'll help you back in.
Add your first product
Before you can sell anything, Tillr needs to know what you're selling.
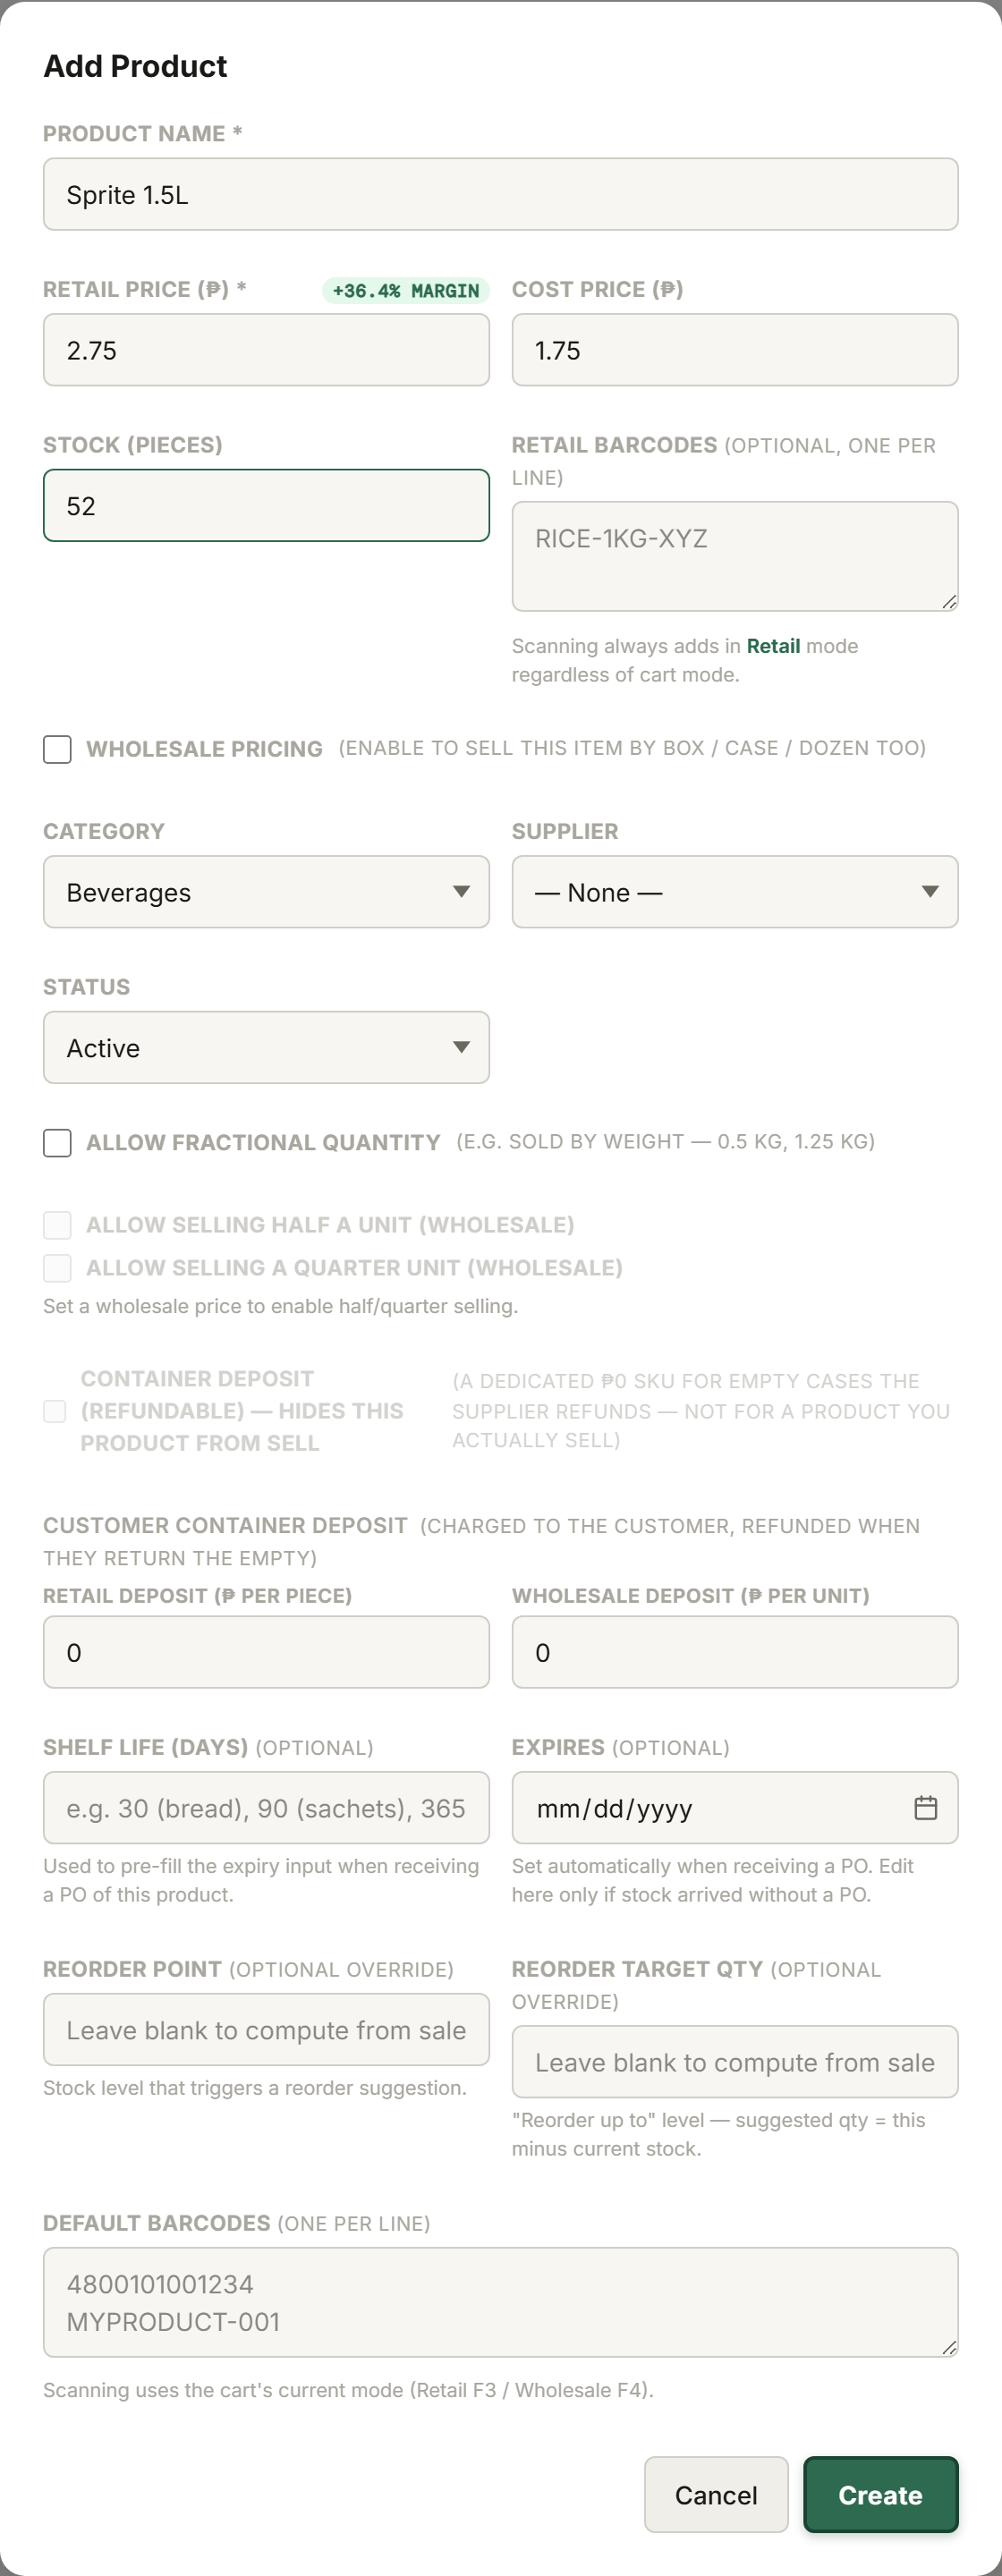
On the Inventory page, tap + Add Product.
Give it a name. If you have a barcode scanner, scan the item now and it drops straight into the barcode field.
Pick a category (e.g. "Canned Goods"). This drives your Inventory filters and sales-by-category reports later.
Fill in pricing: Retail price (what a walk-in customer pays), Wholesale price (your bulk rate, if you offer one), and Cost price (what you paid your supplier). Cost price is the one people forget: it's what lets Tillr show your real profit margin, not just your sales total.
Link a supplier if you have one on file, so this product connects to your purchase orders later.
Set your starting stock count. Every sale and adjustment from here on counts down from this number, so get it right on day one.
If this product can be sold by the half or quarter (a single-use sachet of shampoo, a partial case of soda), turn on Allow Half Pack and/or Allow Quarter Pack.
Tap Save. It's live and searchable at the register immediately.
The Add Product form: name, pricing, stock, category, and deposit settings in one place.
How to make your first sale
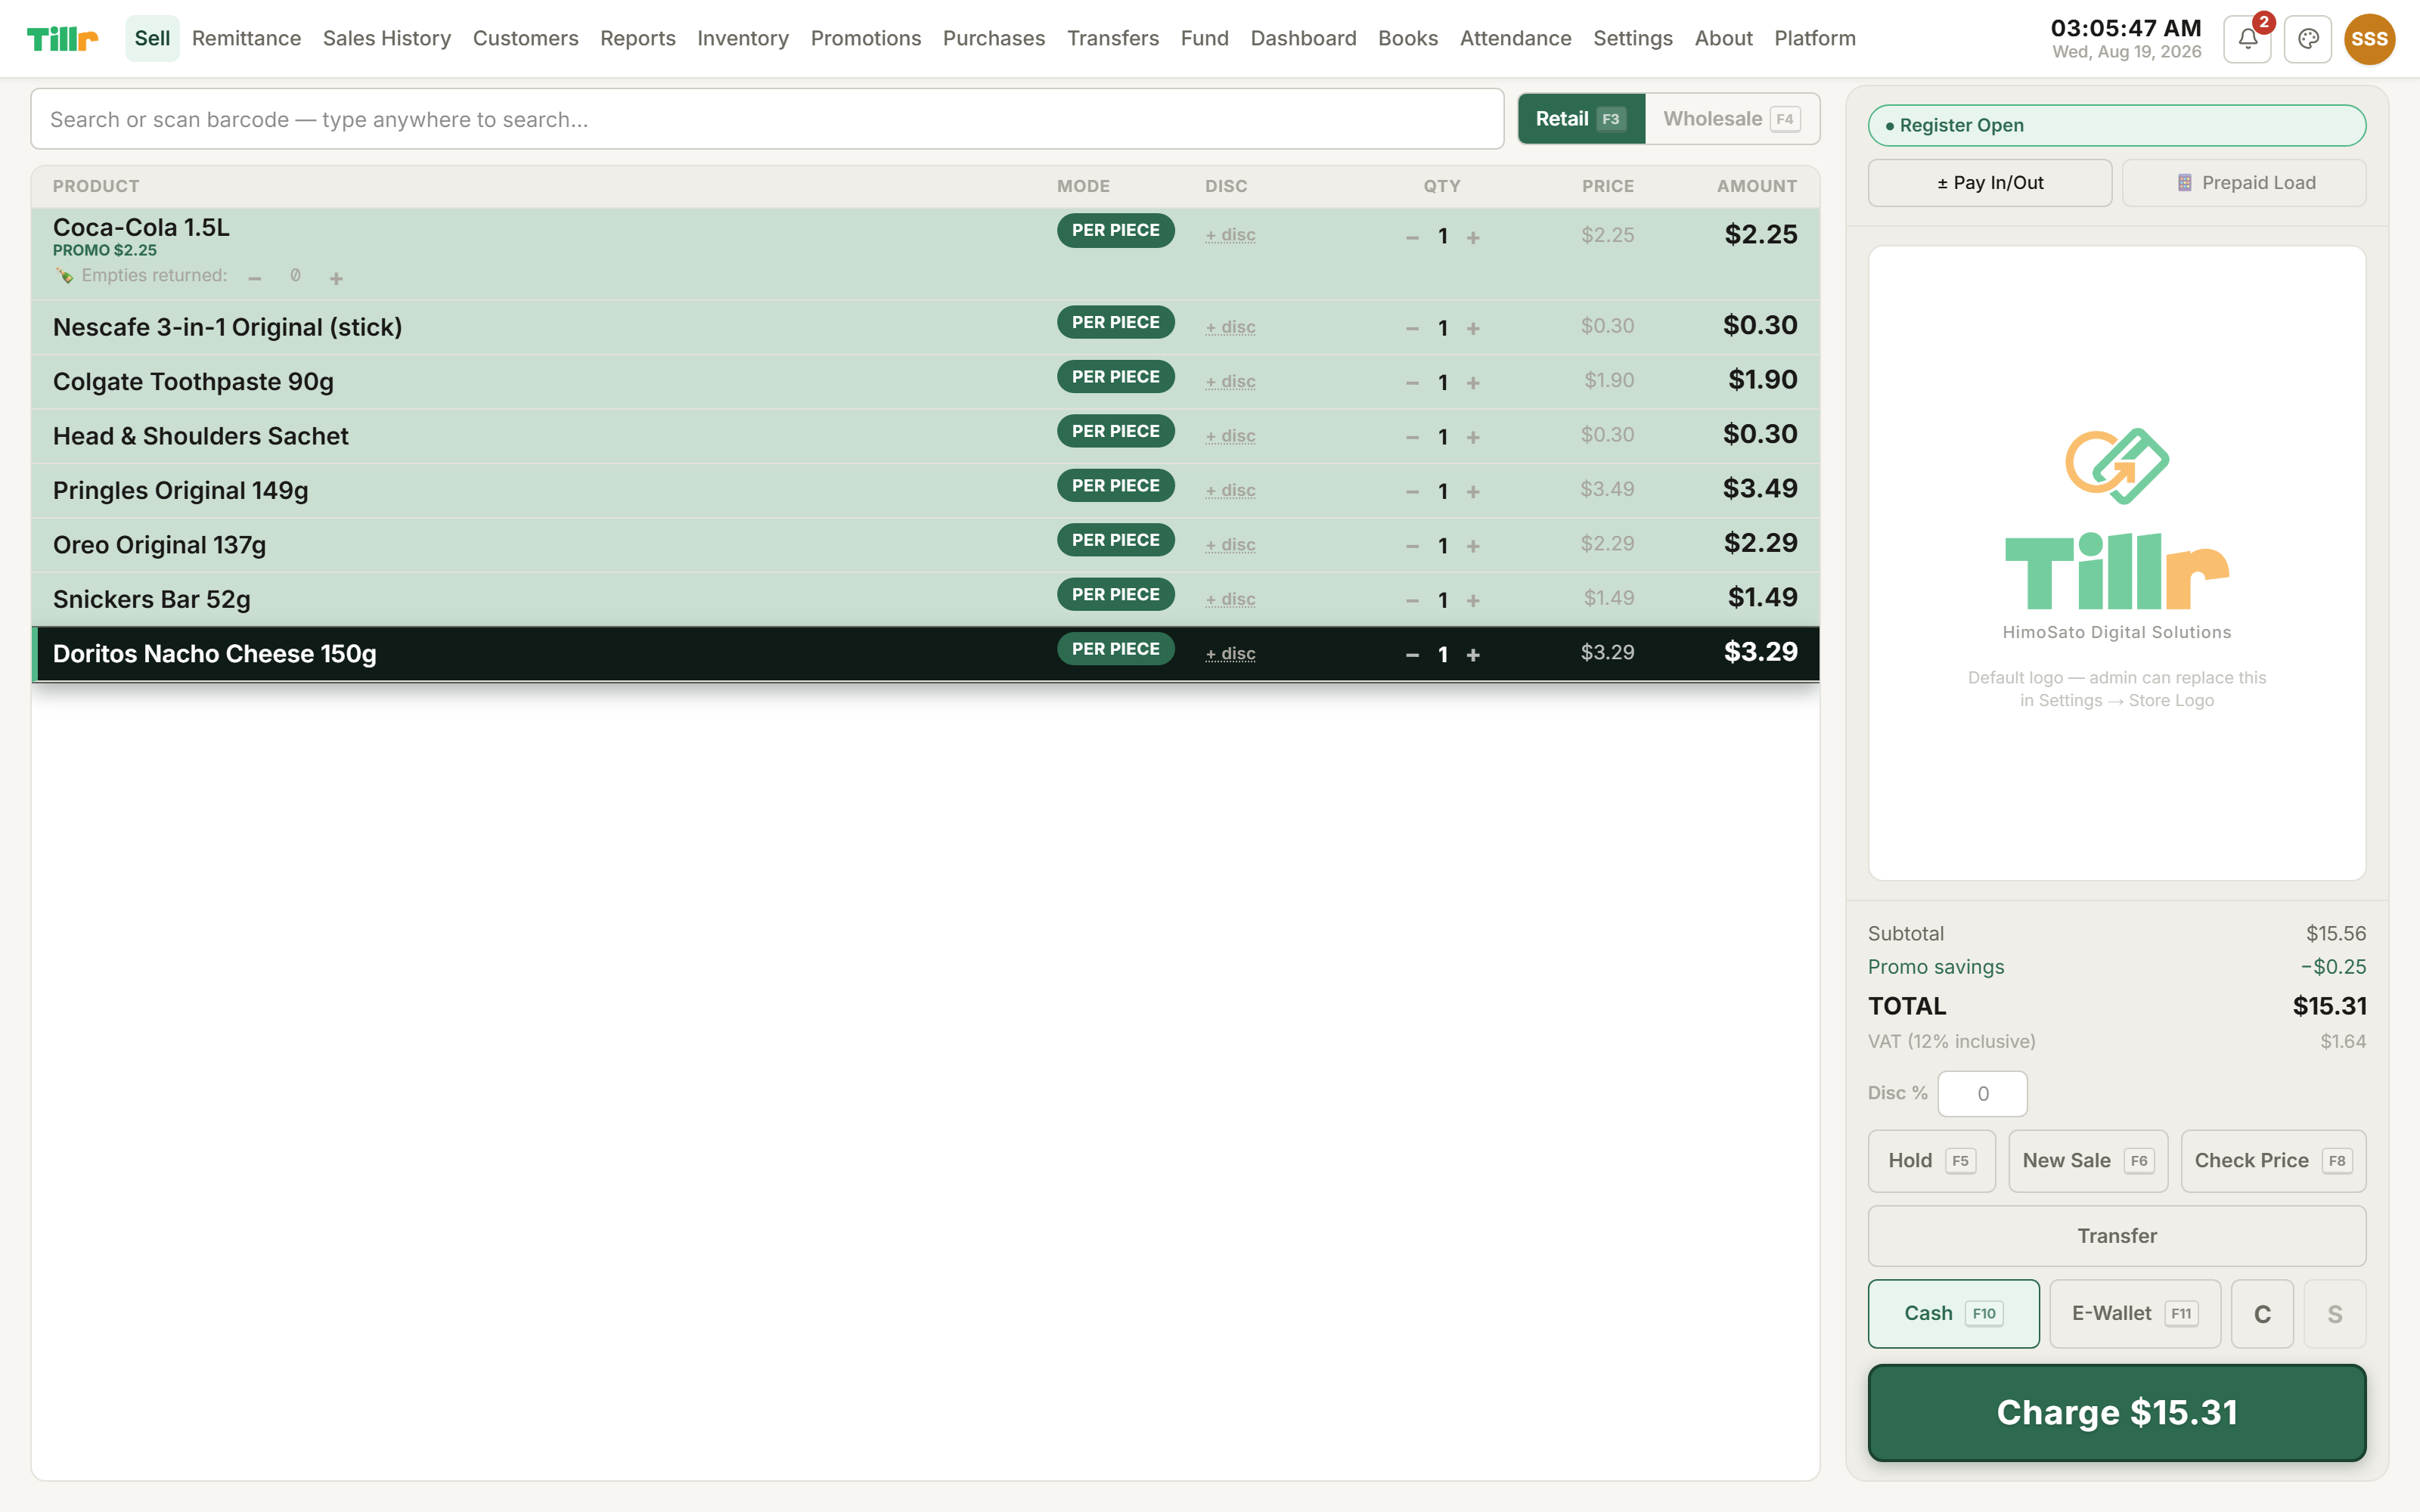
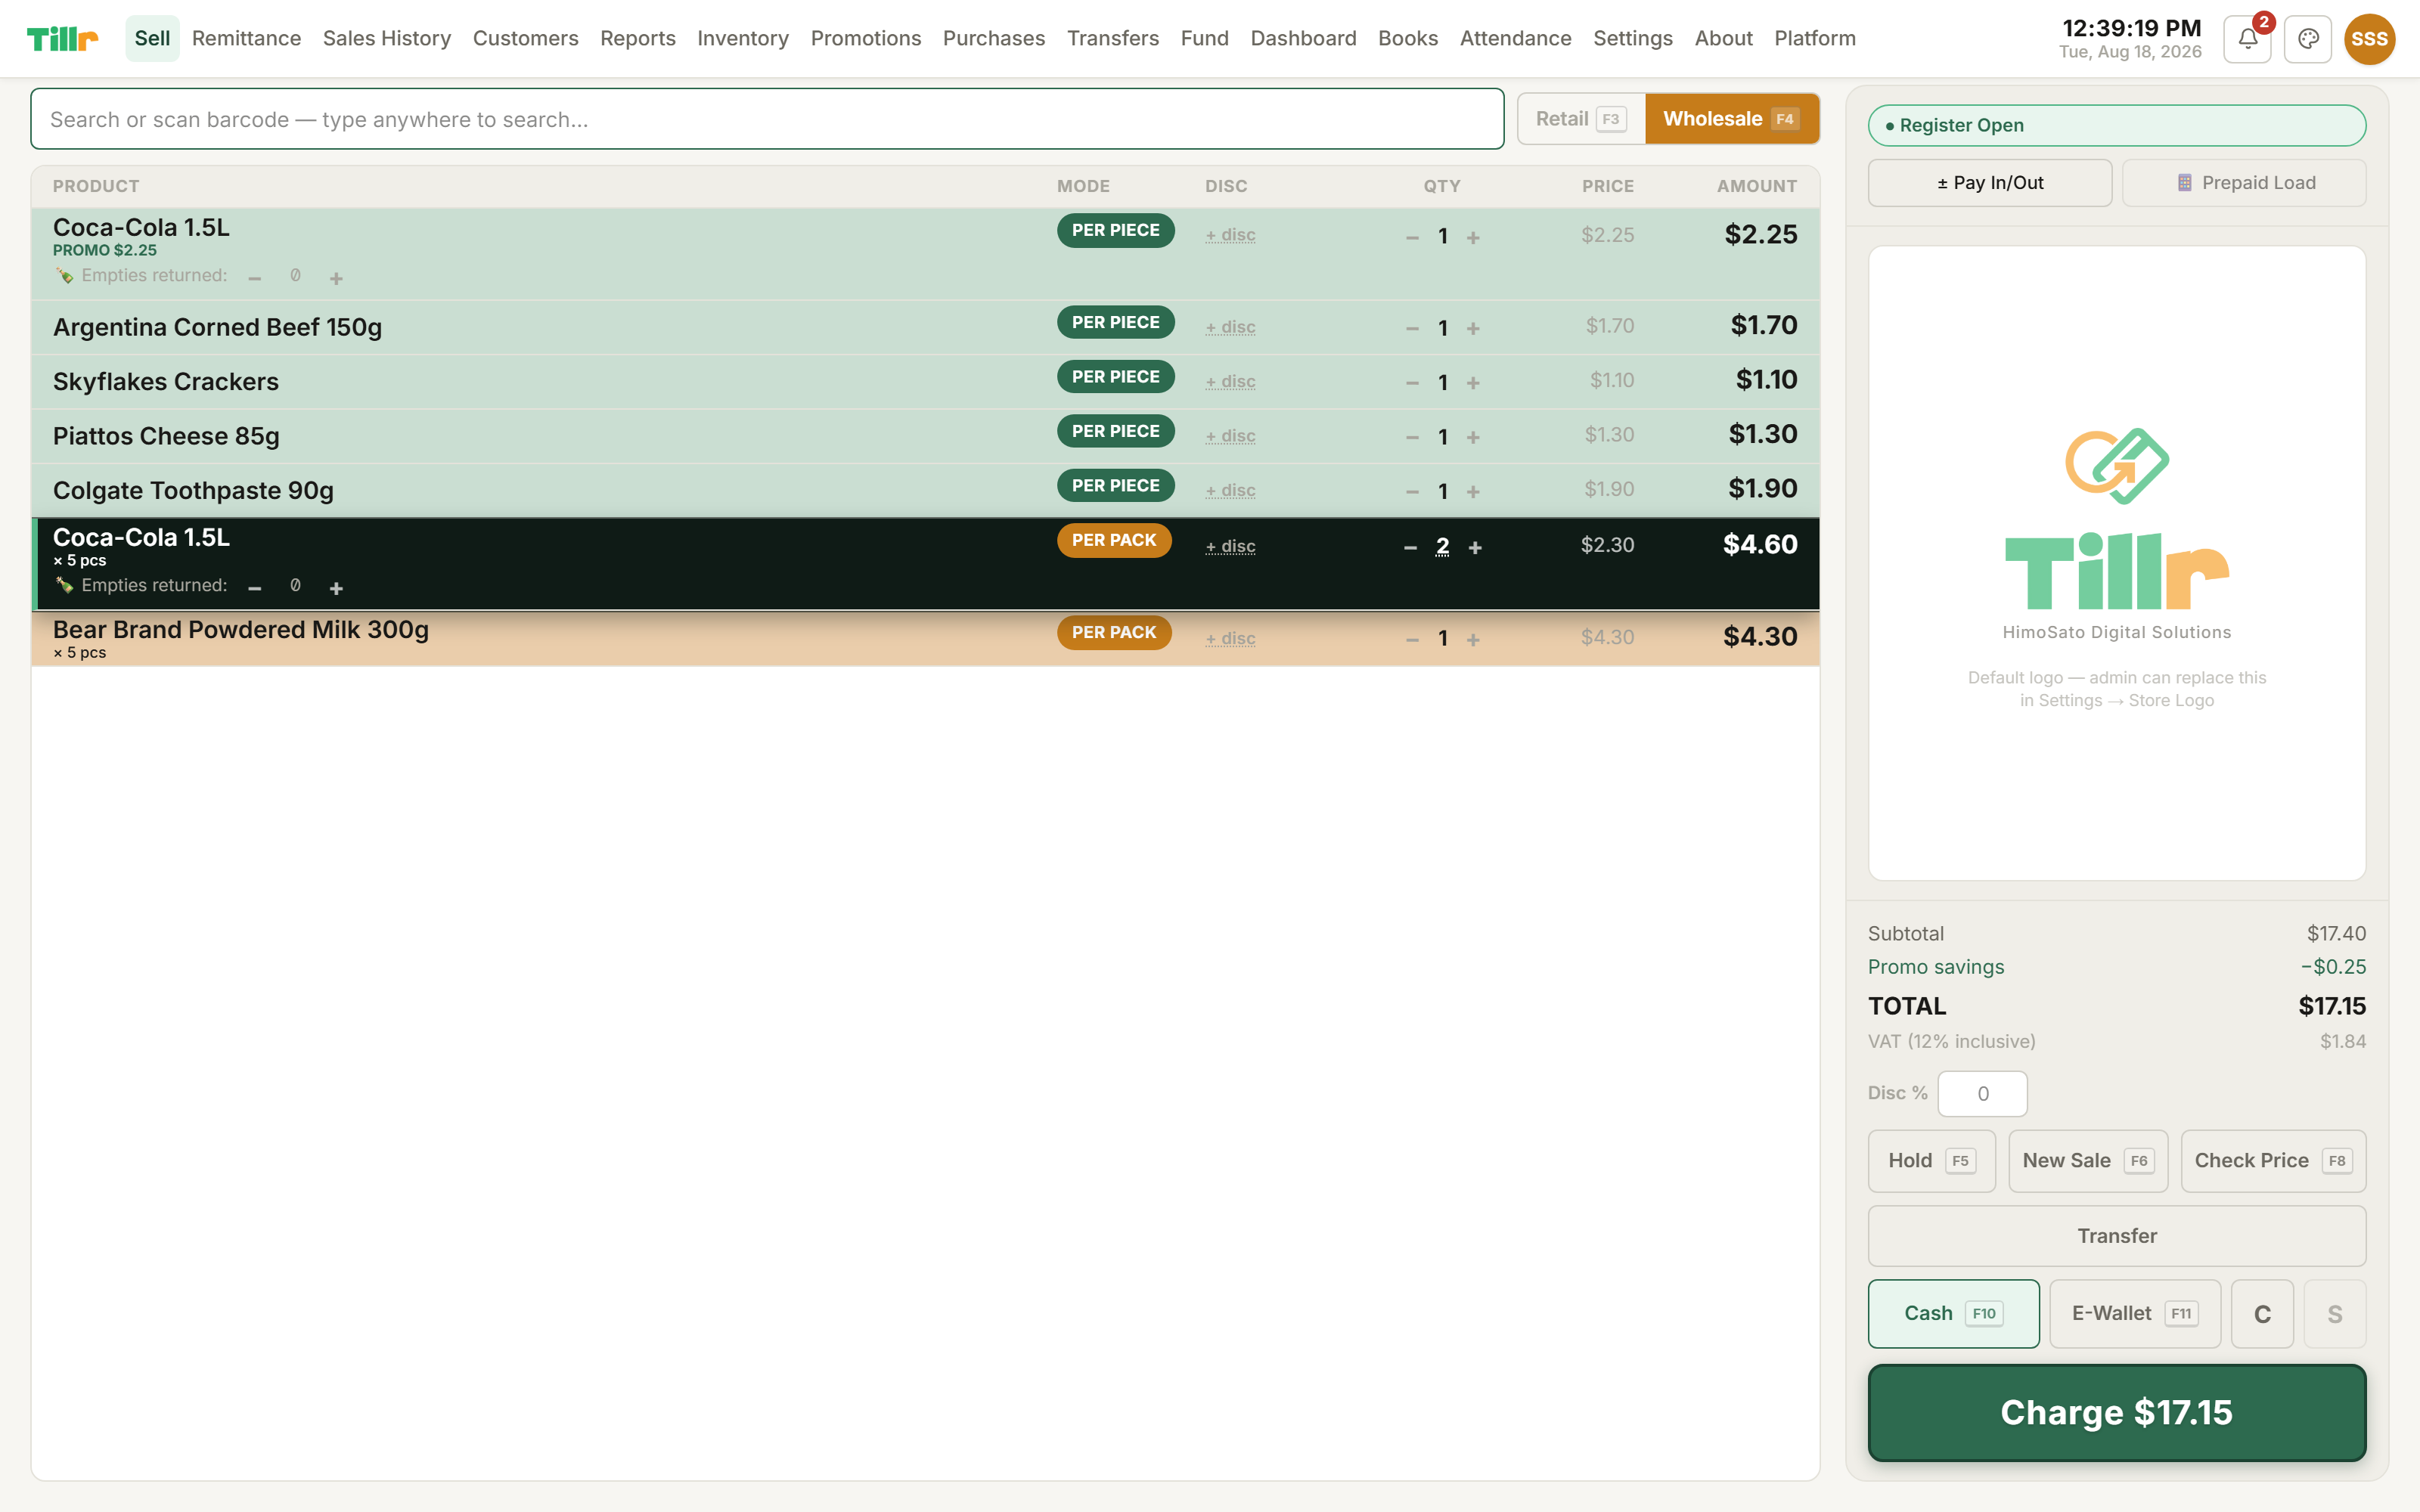
The Sell screen is where you and your cashiers will live all day.
Type a product name into the search bar, or scan its barcode, either way it drops into the cart.
Tap the quantity if the customer wants more than one. The price and running total update instantly.
Keep adding items: canned goods, a mobile top-up, some rice. It all lives in one cart, one total, one receipt.
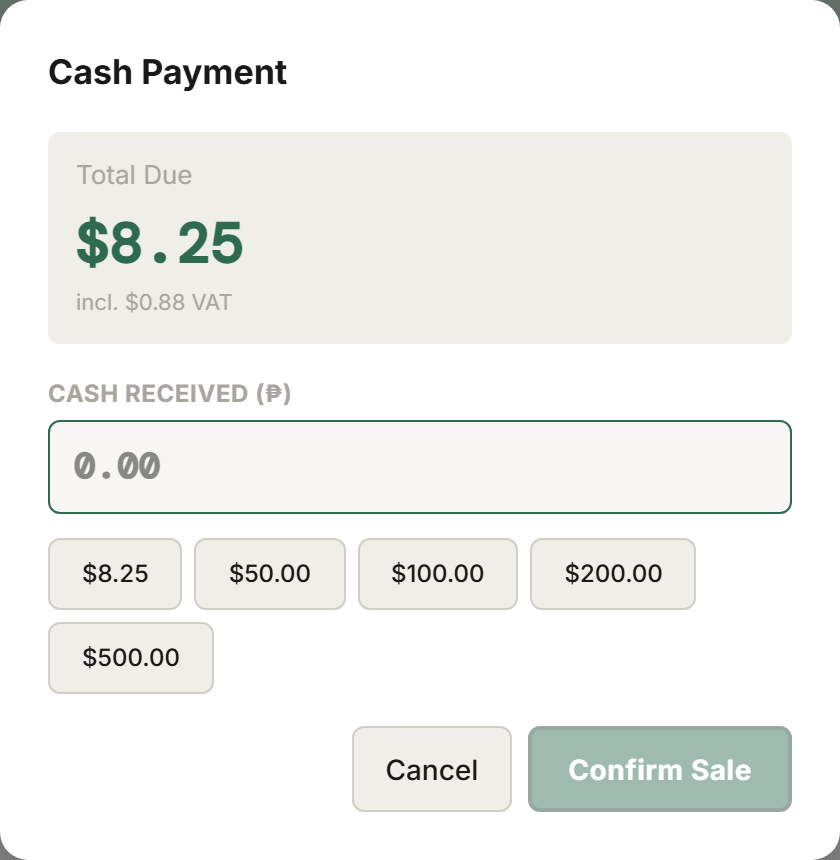
Tap Checkout. For straight cash, type the amount tendered and Tillr calculates change. Splitting the bill between cash and e-wallet? Enter each amount and Tillr balances the total.
Confirm the sale. Print the receipt on a thermal printer, or leave it digital (your choice in Settings).
The Sell screen mid-transaction: this is what your cashiers see all day.
Checkout: pick cash, e-wallet, or split the two, then confirm.
The moment a sale completes, stock counts for every item in the cart drop automatically, no separate step, no manual math.
02
Selling & the Front Counter
Switching to wholesale pricing Premium
If you also sell in bulk (a case of soda to a neighboring shop, a tray of eggs to another vendor), Tillr has a second pricing mode built into the register.
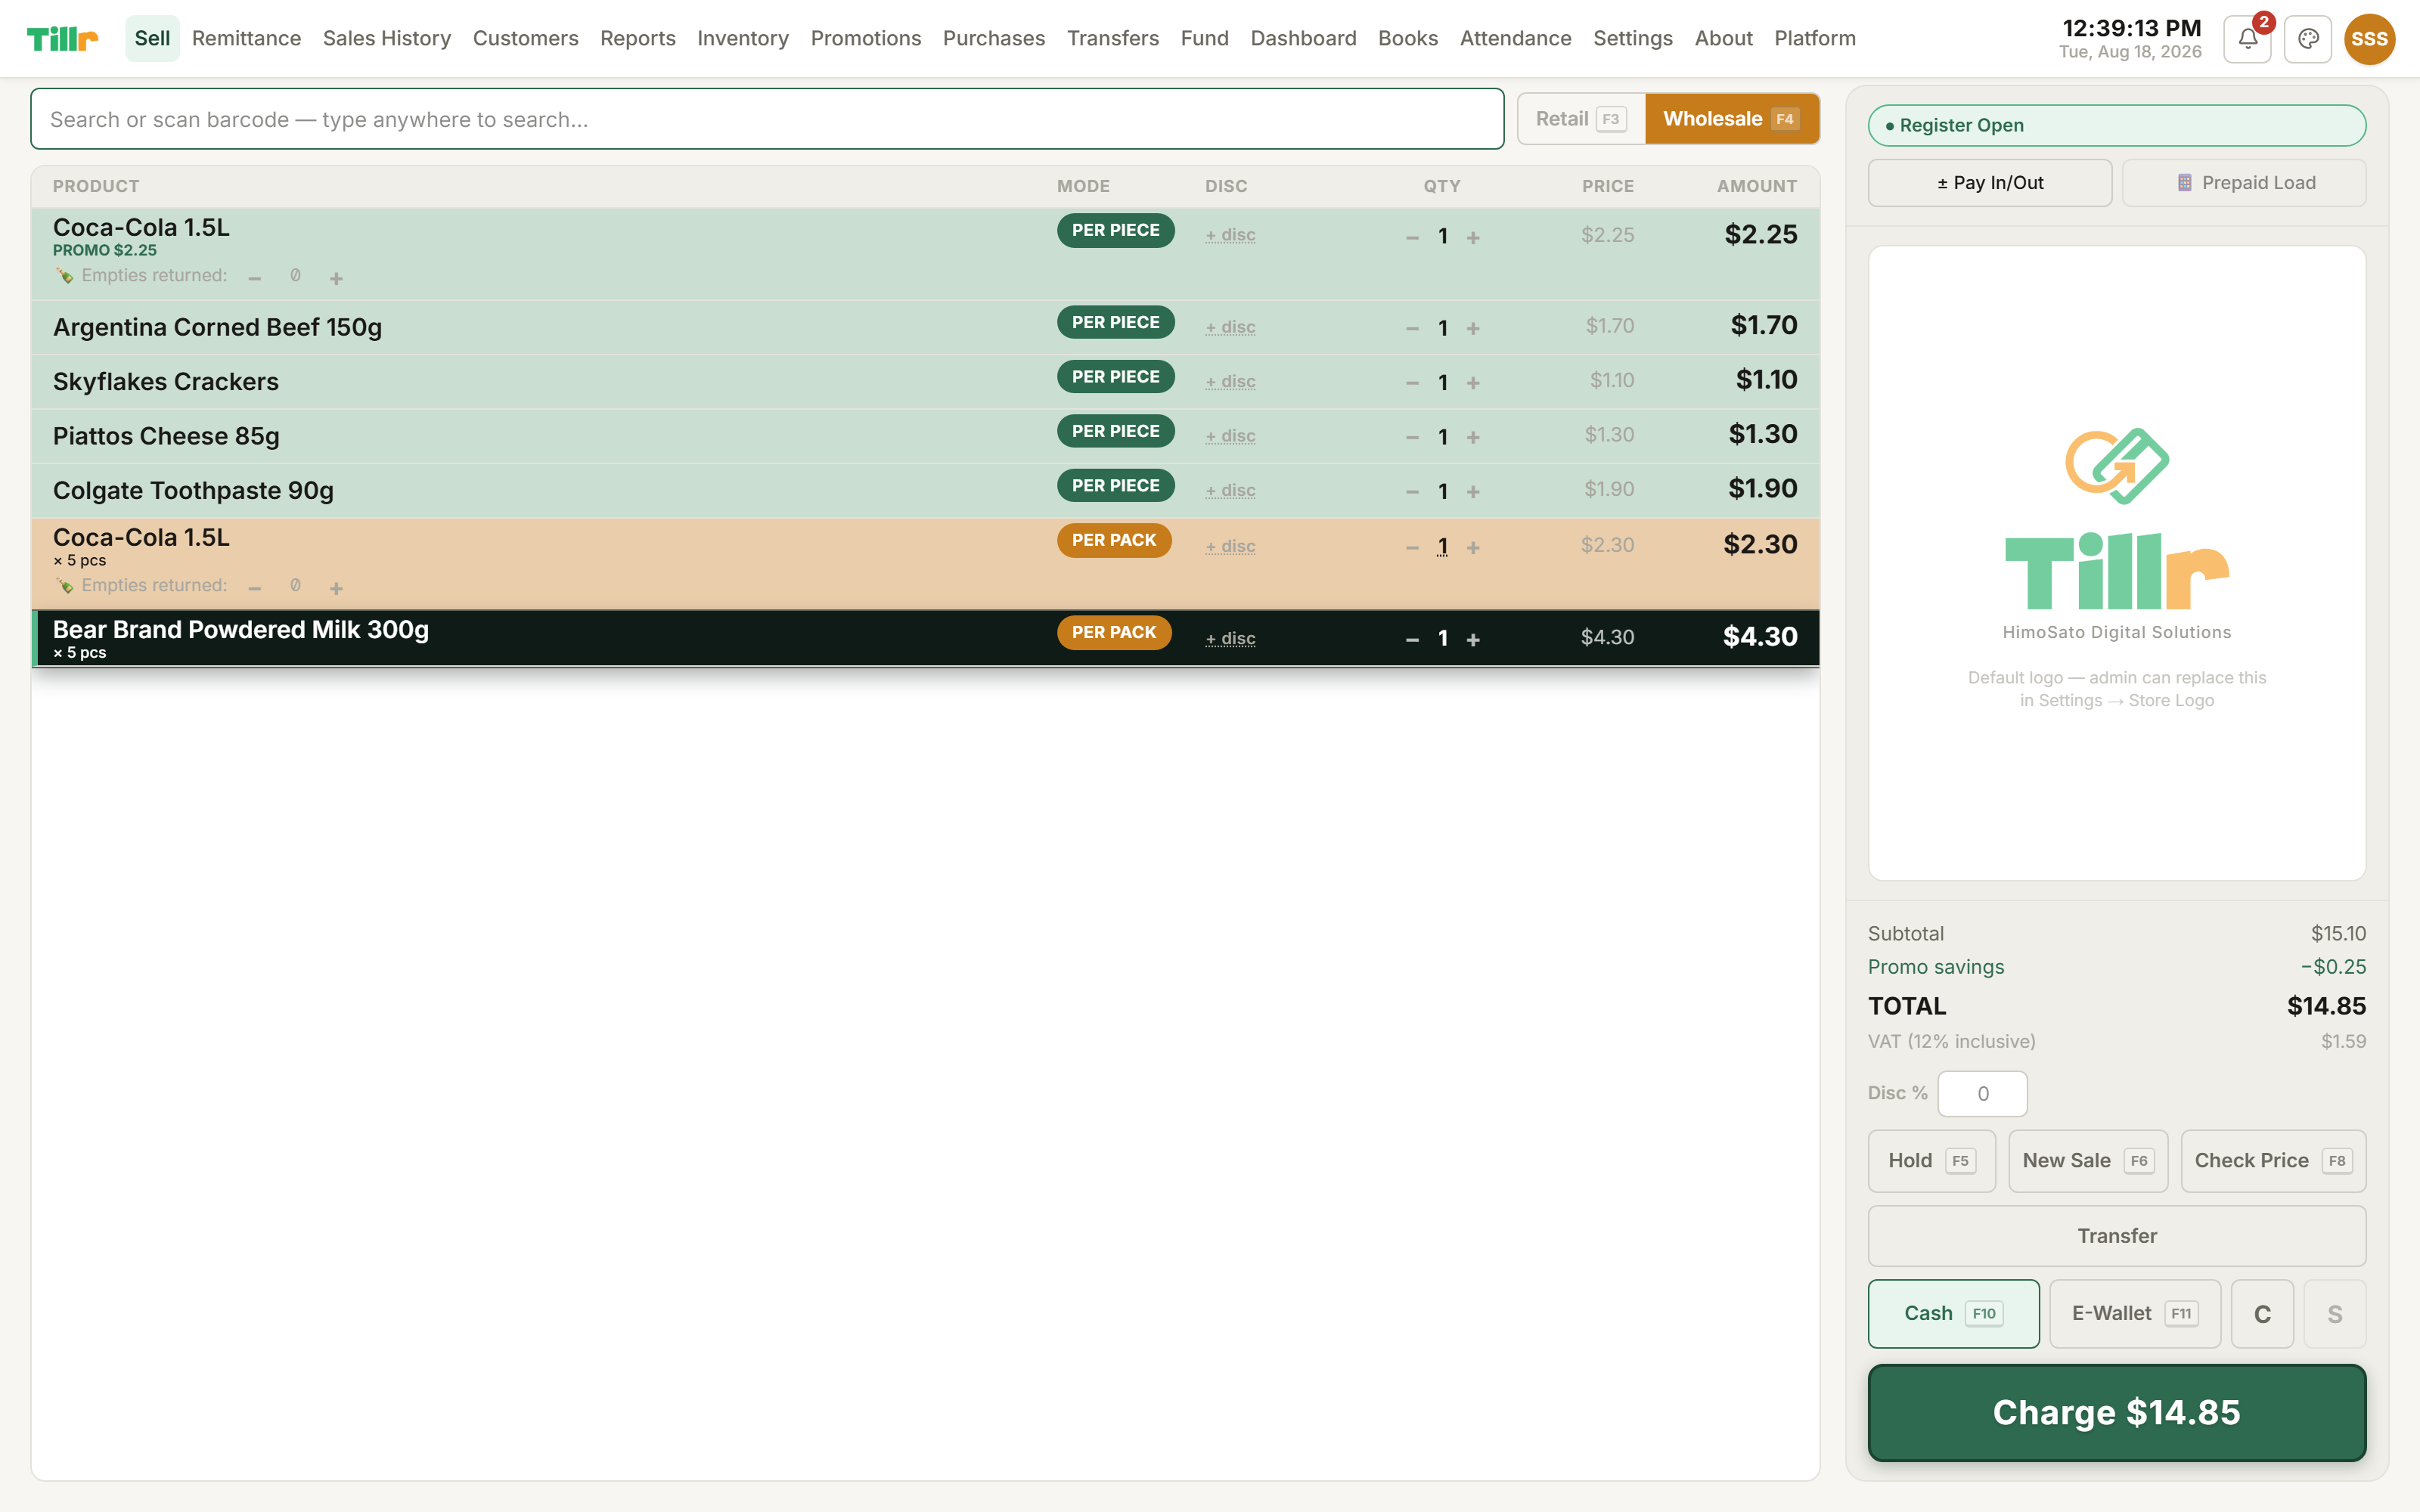
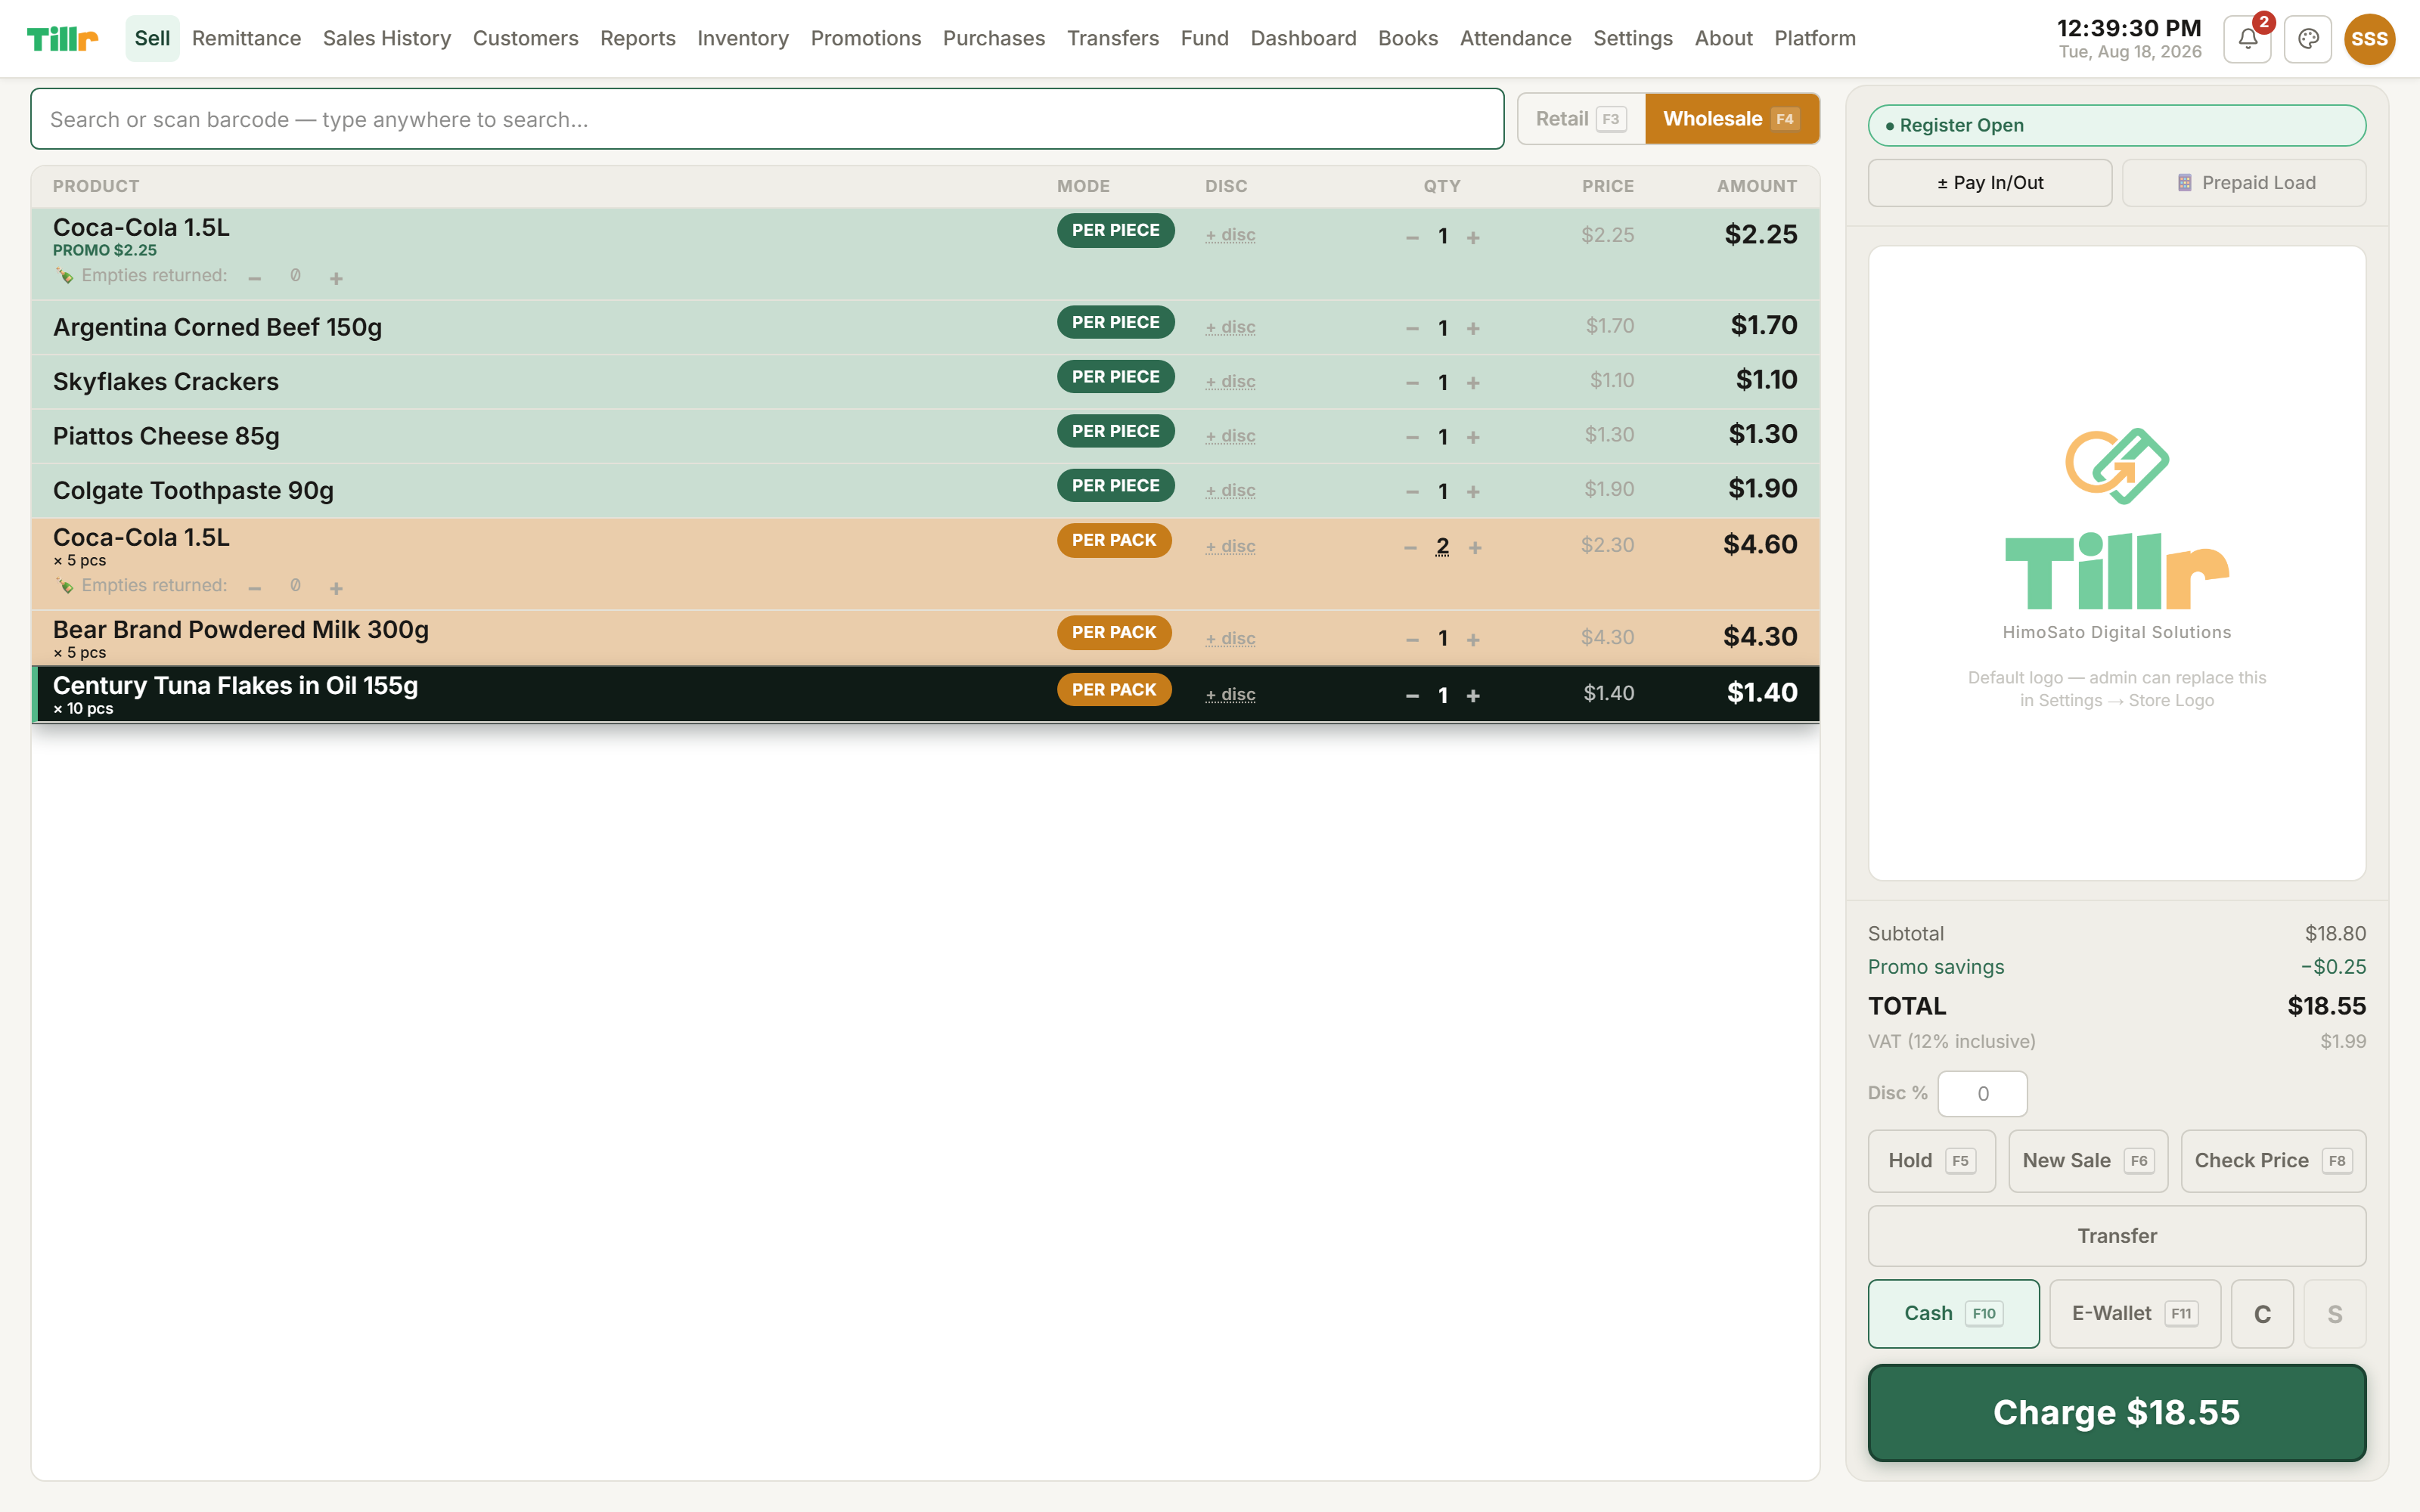
On the Sell screen, tap Wholesale (or press F4). Every product you add now prices at its wholesale rate instead of retail. Wholesale cart lines get a solid amber tint so you and the customer can see at a glance which items are priced which way.
If a product never had a wholesale rate set in Inventory, it won't add while you're in Wholesale mode: Tillr tells you to switch modes or set a price first. The reverse also works: leave a product's retail price blank, and it only ever sells wholesale, by the case.
Some products have a separate barcode printed on the case. Scan that one and Tillr switches to Wholesale mode for you automatically, then switches back to Retail the moment you scan a normal single-item barcode again.
One cart can mix both: ring up a walk-in customer's usual snacks at retail, then hand the next case to a reseller at wholesale, same transaction, same total.
Wholesale mode active: cart lines price and tint differently so nobody mixes them up.
Wholesale mode requires Tillr Premium. On the Free tier, tapping it shows an upgrade reminder. Your retail till keeps working exactly the same either way.
Selling half & quarter packs
Some things in your store don't sell one whole case at a time: shampoo sachets, a half-tray of eggs, part of a soda case.
Tap the product into the cart like normal. If half or quarter selling is turned on for it, you'll see small ½ and ¼ buttons right on that cart line.
Tap ½ or ¼ and Tillr automatically prices and deducts exactly that fraction of a unit from stock: a case that started at 10 and has half sold off it correctly reads 9.5, not rounded either way.
If a product doesn't show these buttons yet, edit it under Inventory and turn on Allow Half Pack or Allow Quarter Pack under pricing. It takes effect at the register immediately.
Tap the quantity on a flagged wholesale line to type a fraction like 0.5.
Container deposits & empties
If you sell in returnable bottles or cases, Tillr tracks the deposit automatically, no separate notebook for who owes what.
Set it up once: edit the product and enter a deposit price (e.g. $0.50 per bottle). Every sale of that product now adds the deposit to the total automatically.
When a customer returns empties along with today's purchase, enter how many on the cart line. Tillr nets the deposit against what they owed: a full return deducts it in full, a partial return gives a partial credit.
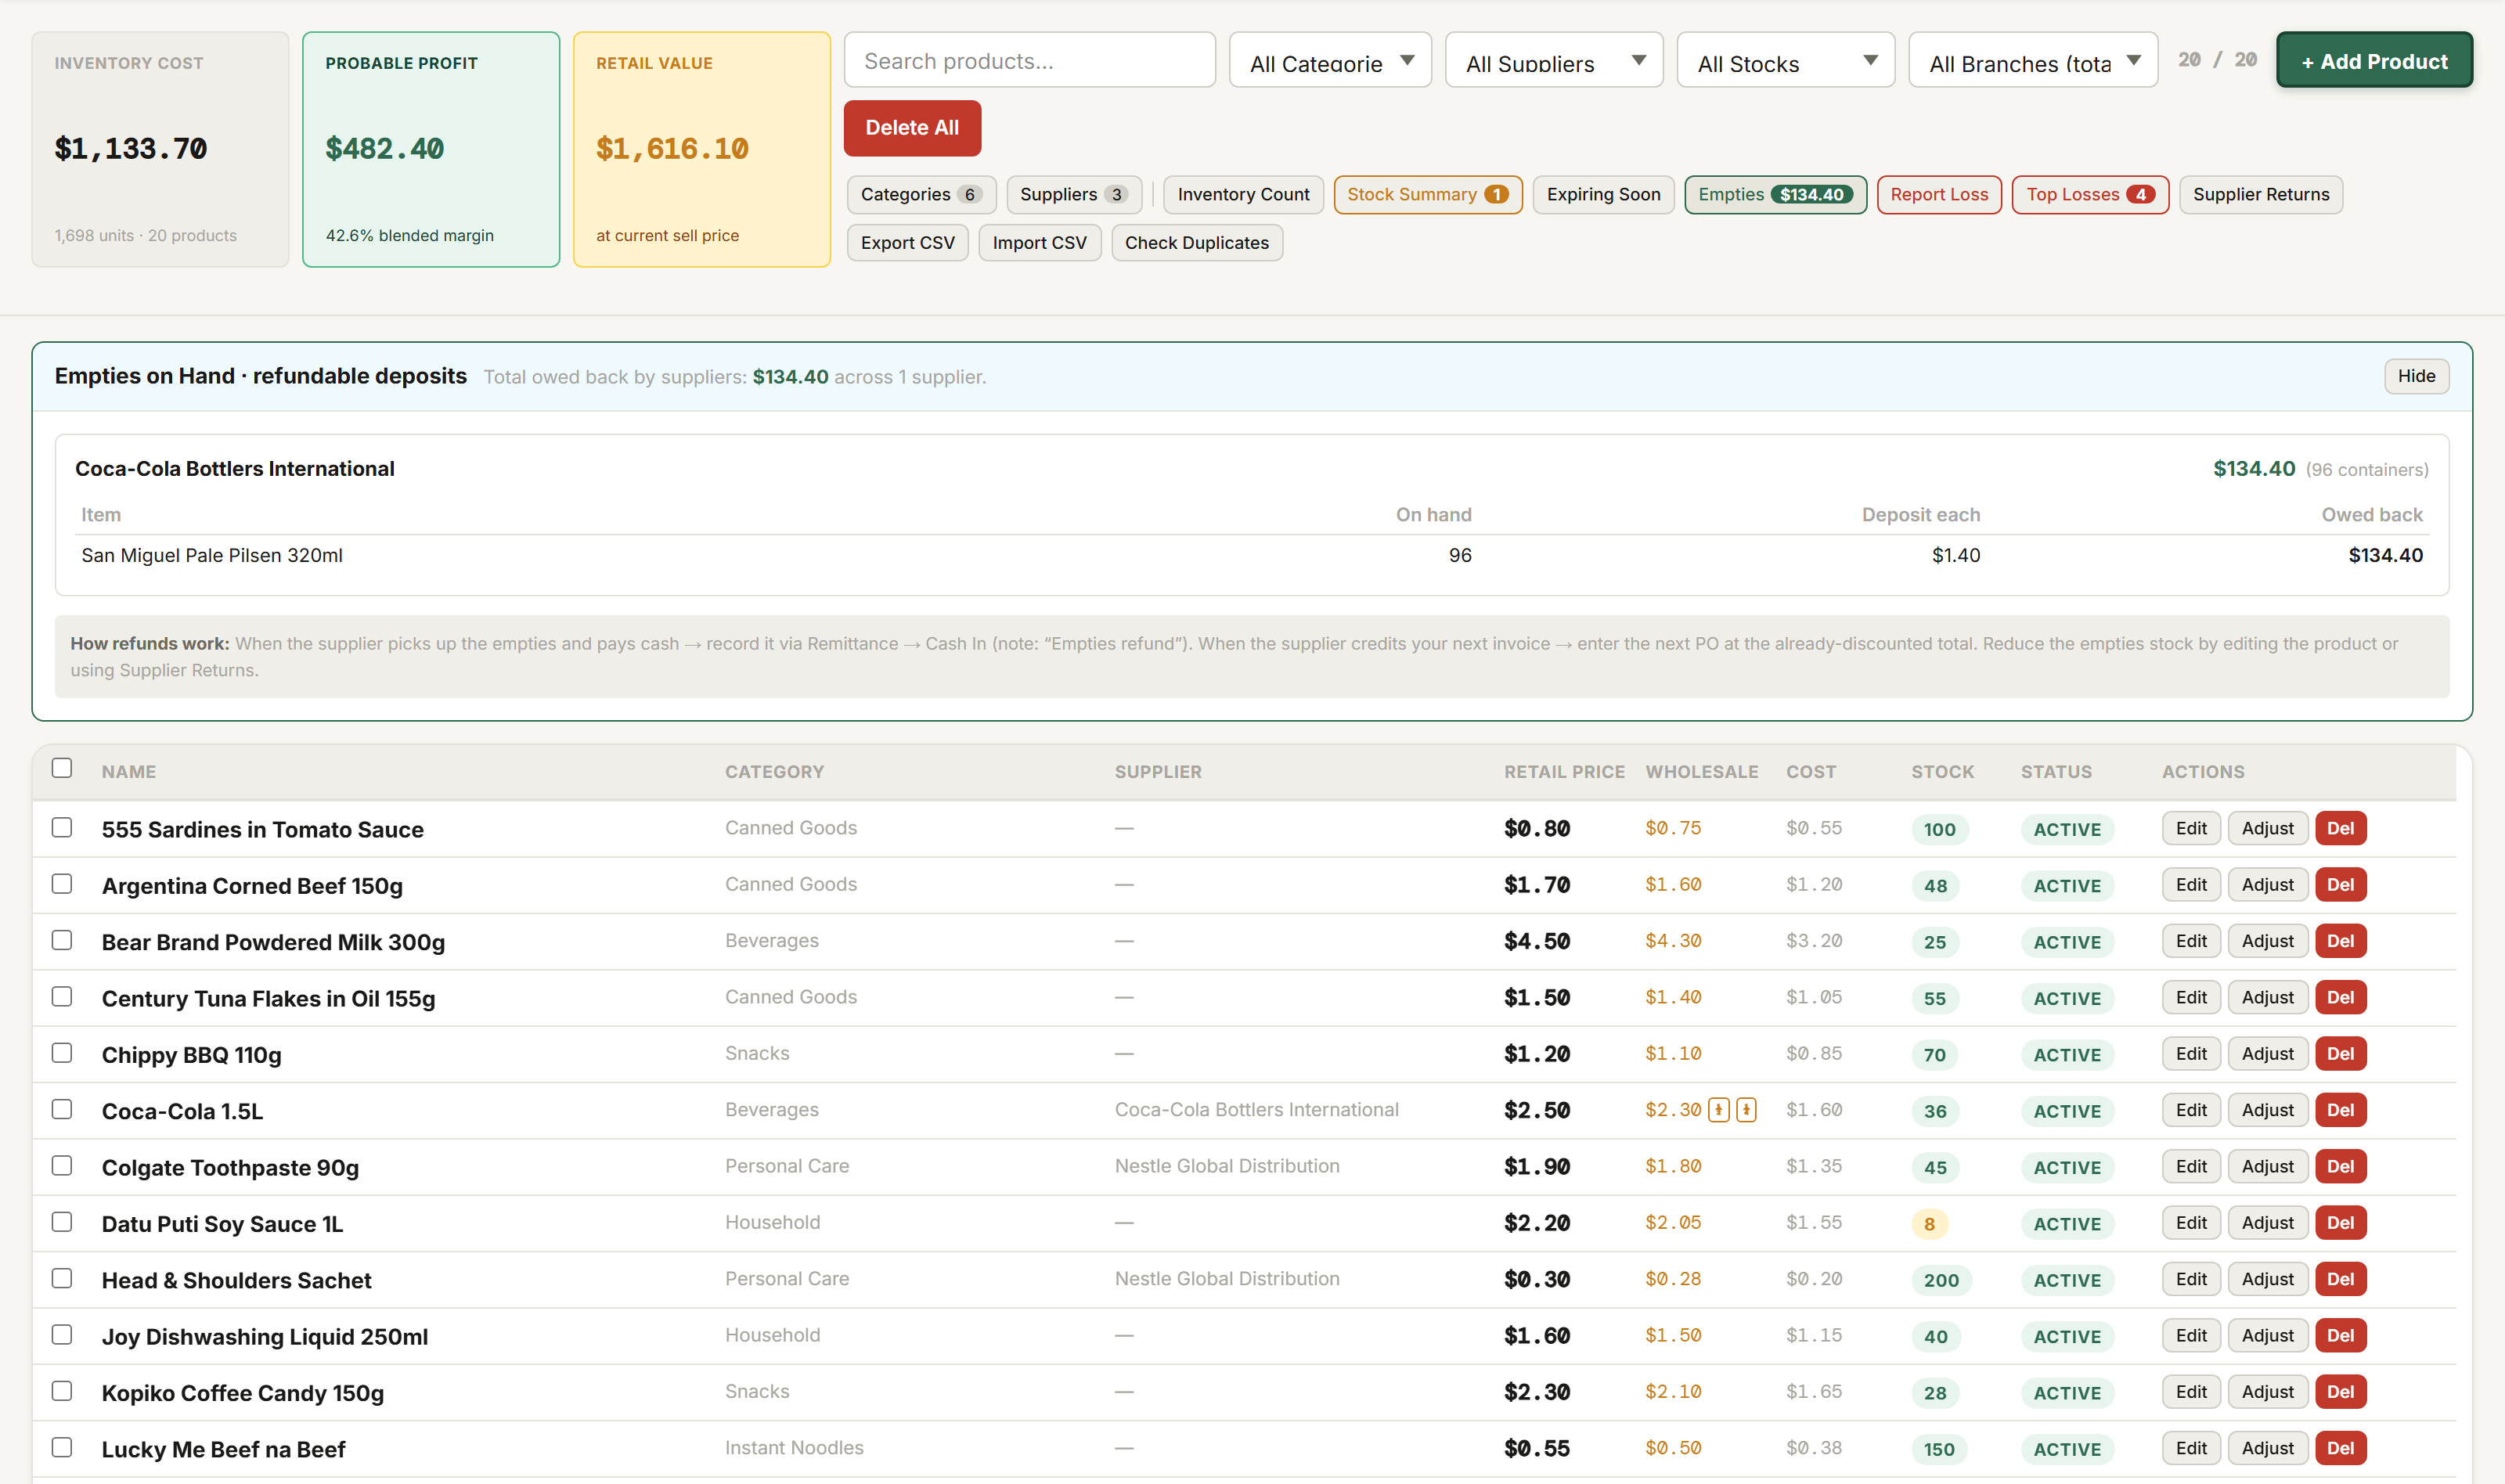
On the Inventory page, tap Empties to see your running total: how many bottles and cases you're holding, and how much deposit money that represents, broken down by supplier.
Empties on Hand: exactly how much deposit money is tied up, and with which supplier.
Your Dashboard's Deposit Liability tile shows the same figure: how much of your cash position is really just deposits waiting to be returned.
Refunds and voids at the register
Customers change their minds, or a cashier rings up the wrong item. Here's how to handle it without it messing up your books.
For a straight return, add the product to the cart like a normal sale, then use the quantity stepper to bring it negative. This becomes a refund line: the total adjusts down automatically, deposit included if the product had one.
If the whole transaction is a return, the total can go fully negative: checkout will walk you through handing cash back instead of collecting it.
For a sale that was rung up completely wrong minutes ago, go to Sales History, find the transaction, and open it. A manager or admin can process the correction against that exact order, keeping the audit trail clean.
A negative-quantity cart line: the total flips to a refund, deposit deduction included.
Every refund still shows up in reports, clearly marked.
E-load, bills & e-wallet remittance
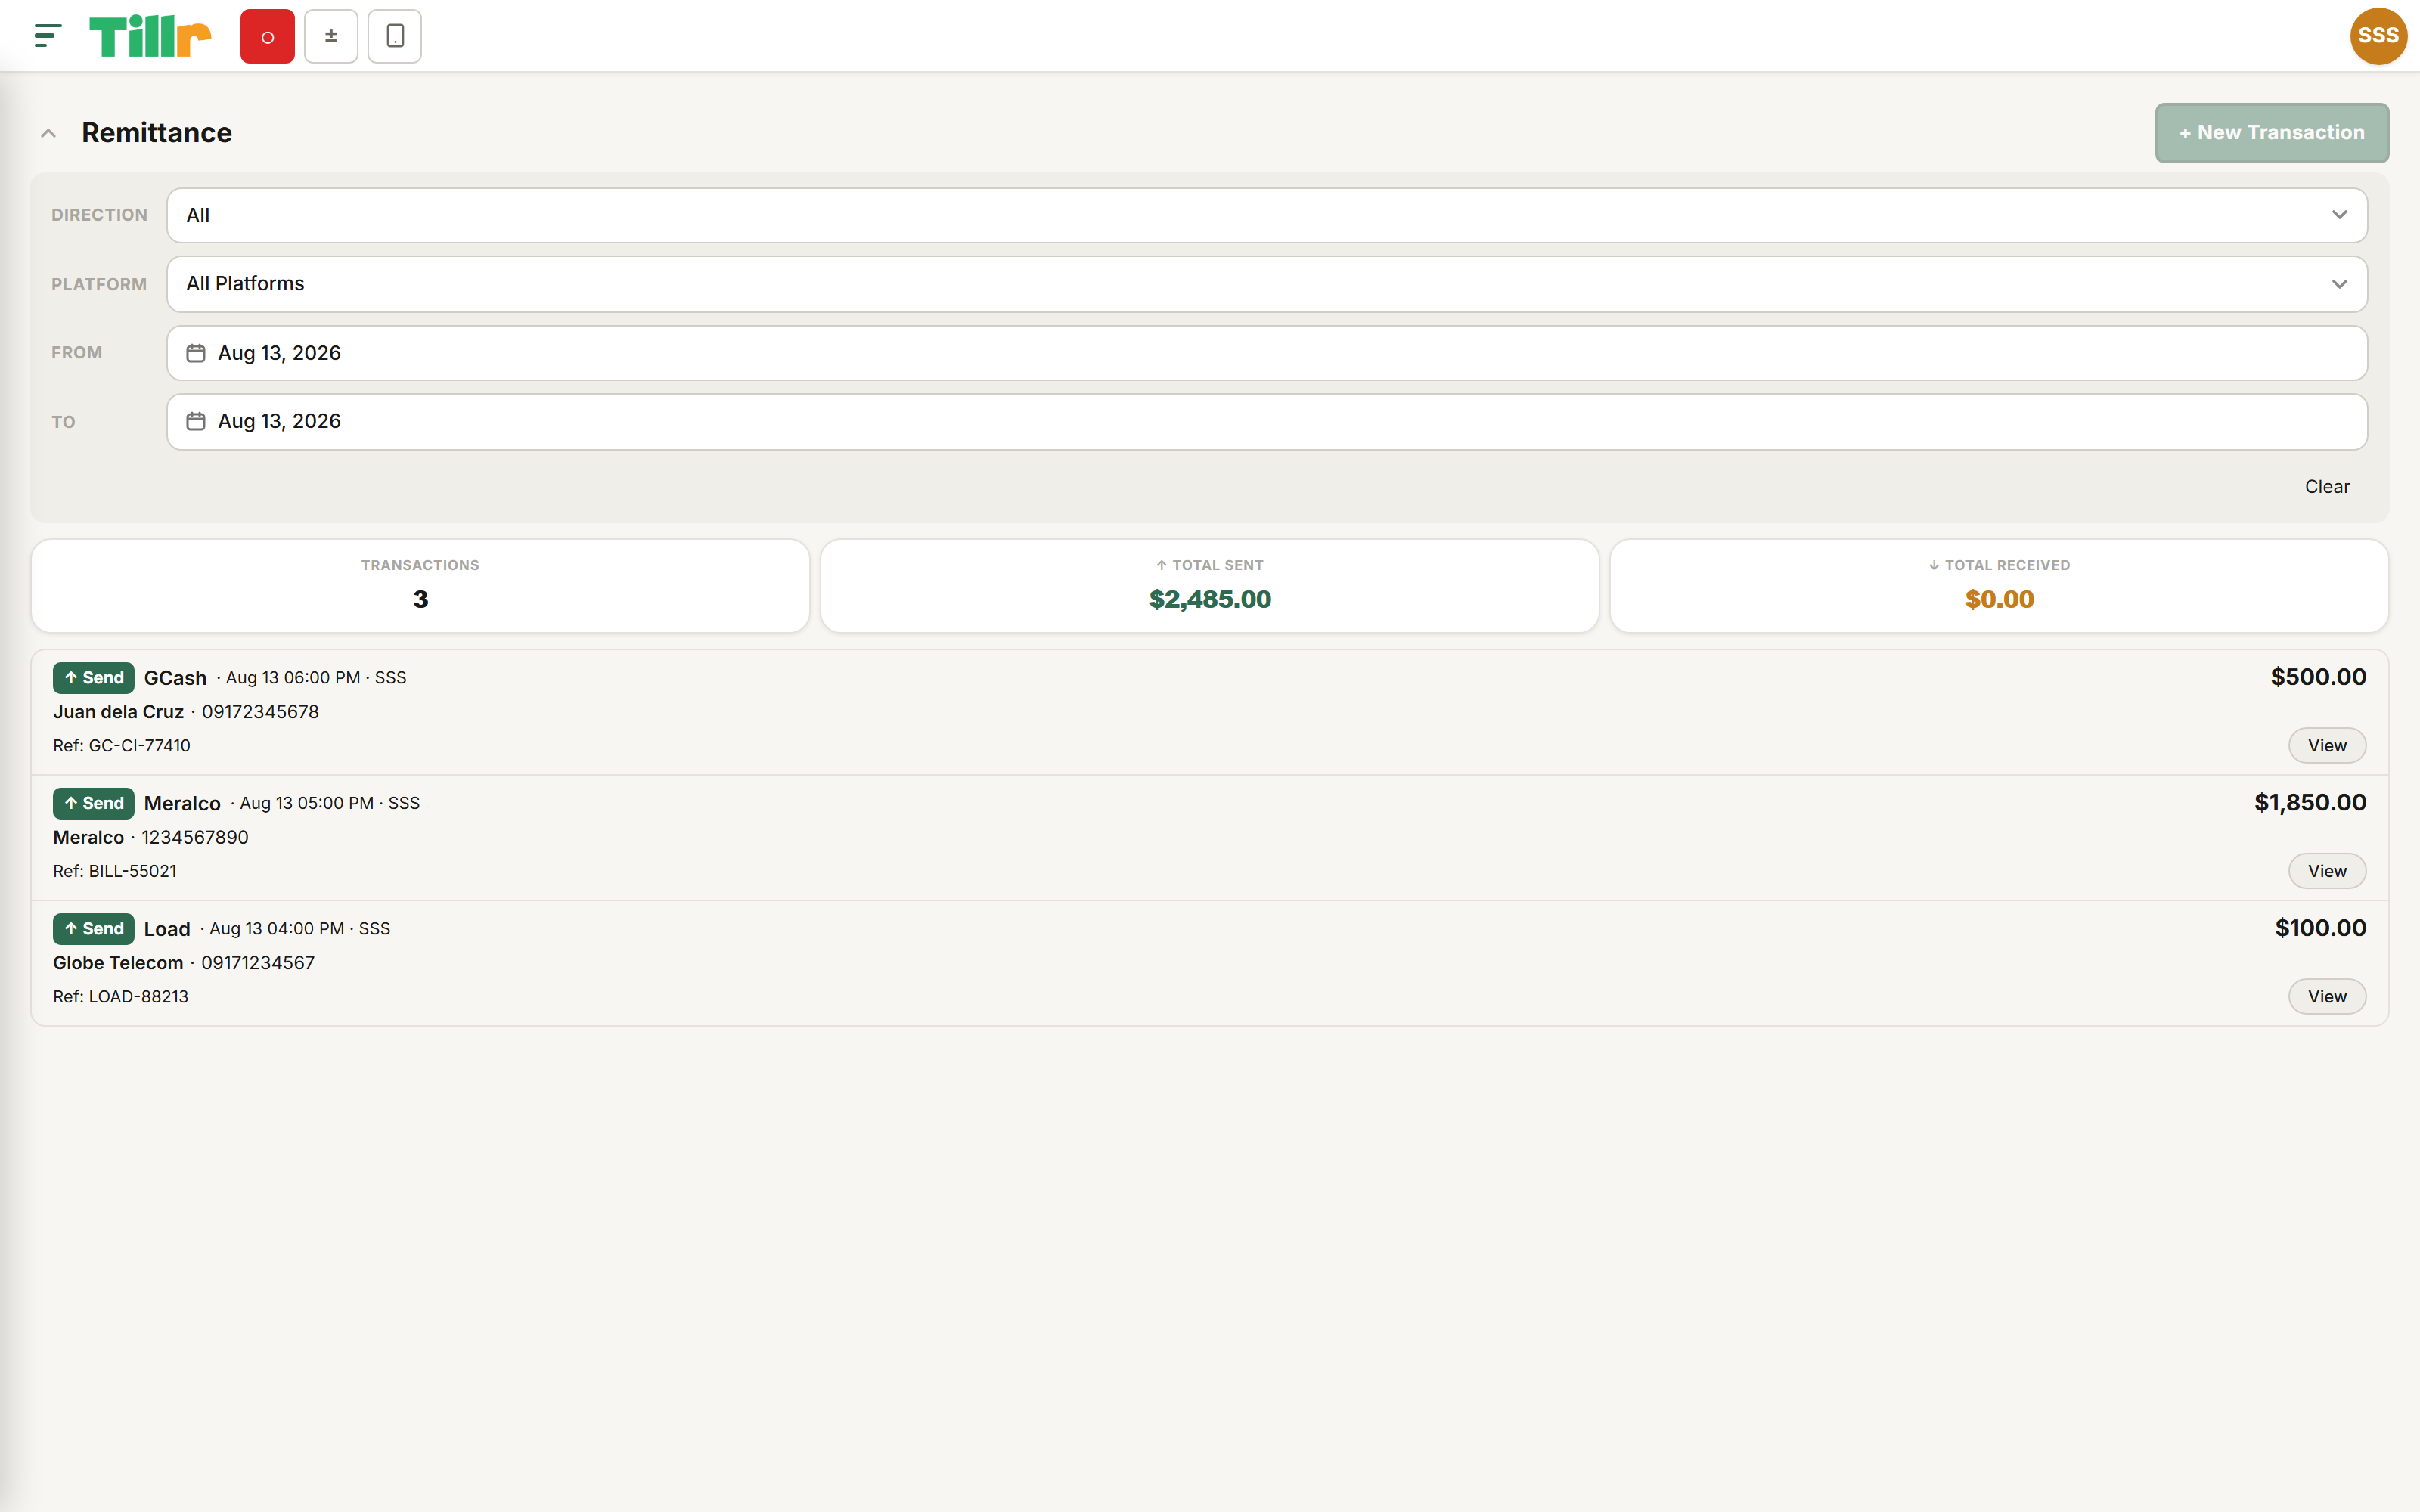
The Remittance tab keeps mobile load, bill payments, and e-wallet cash-in/cash-out separate from your product sales, and reconciled at day's end.
E-load: pick the network, enter the amount and the customer's number, confirm. It logs with your service fee tracked separately from the load's face value.
Bill payments: pick the biller, enter the account number and amount due, logged against your remittance total for the day.
E-wallet remittance: every cash-in/cash-out posts against that specific account's running balance, so you always know how much float you're holding in each wallet.
The Remittance tab: e-load, bills, and e-wallet cash-in/out, kept off your product sales total.
At closing, the remittance summary shows what your float should be against every service, so reconciling the drawer takes minutes, not a manual tally.
Setting up the customer-facing display Premium
If you've got a spare monitor at the counter, Tillr can turn it into a customer-facing screen, no extra software needed.
In Settings, under Customer Display, pick which connected monitor should be the customer screen. Tillr opens a dedicated window there automatically every time you launch the app.
Customers see every item as it's scanned, the running total, and deposit math if it applies.
Between customers, the screen rotates through store ads or promos you upload in Settings: the moment a new sale starts, it switches back to the live cart automatically.
Holding & sending a sale to another till
Not every sale finishes in one go. A customer forgets their wallet, or a line-buster needs to hand a half-built cart to the main register.
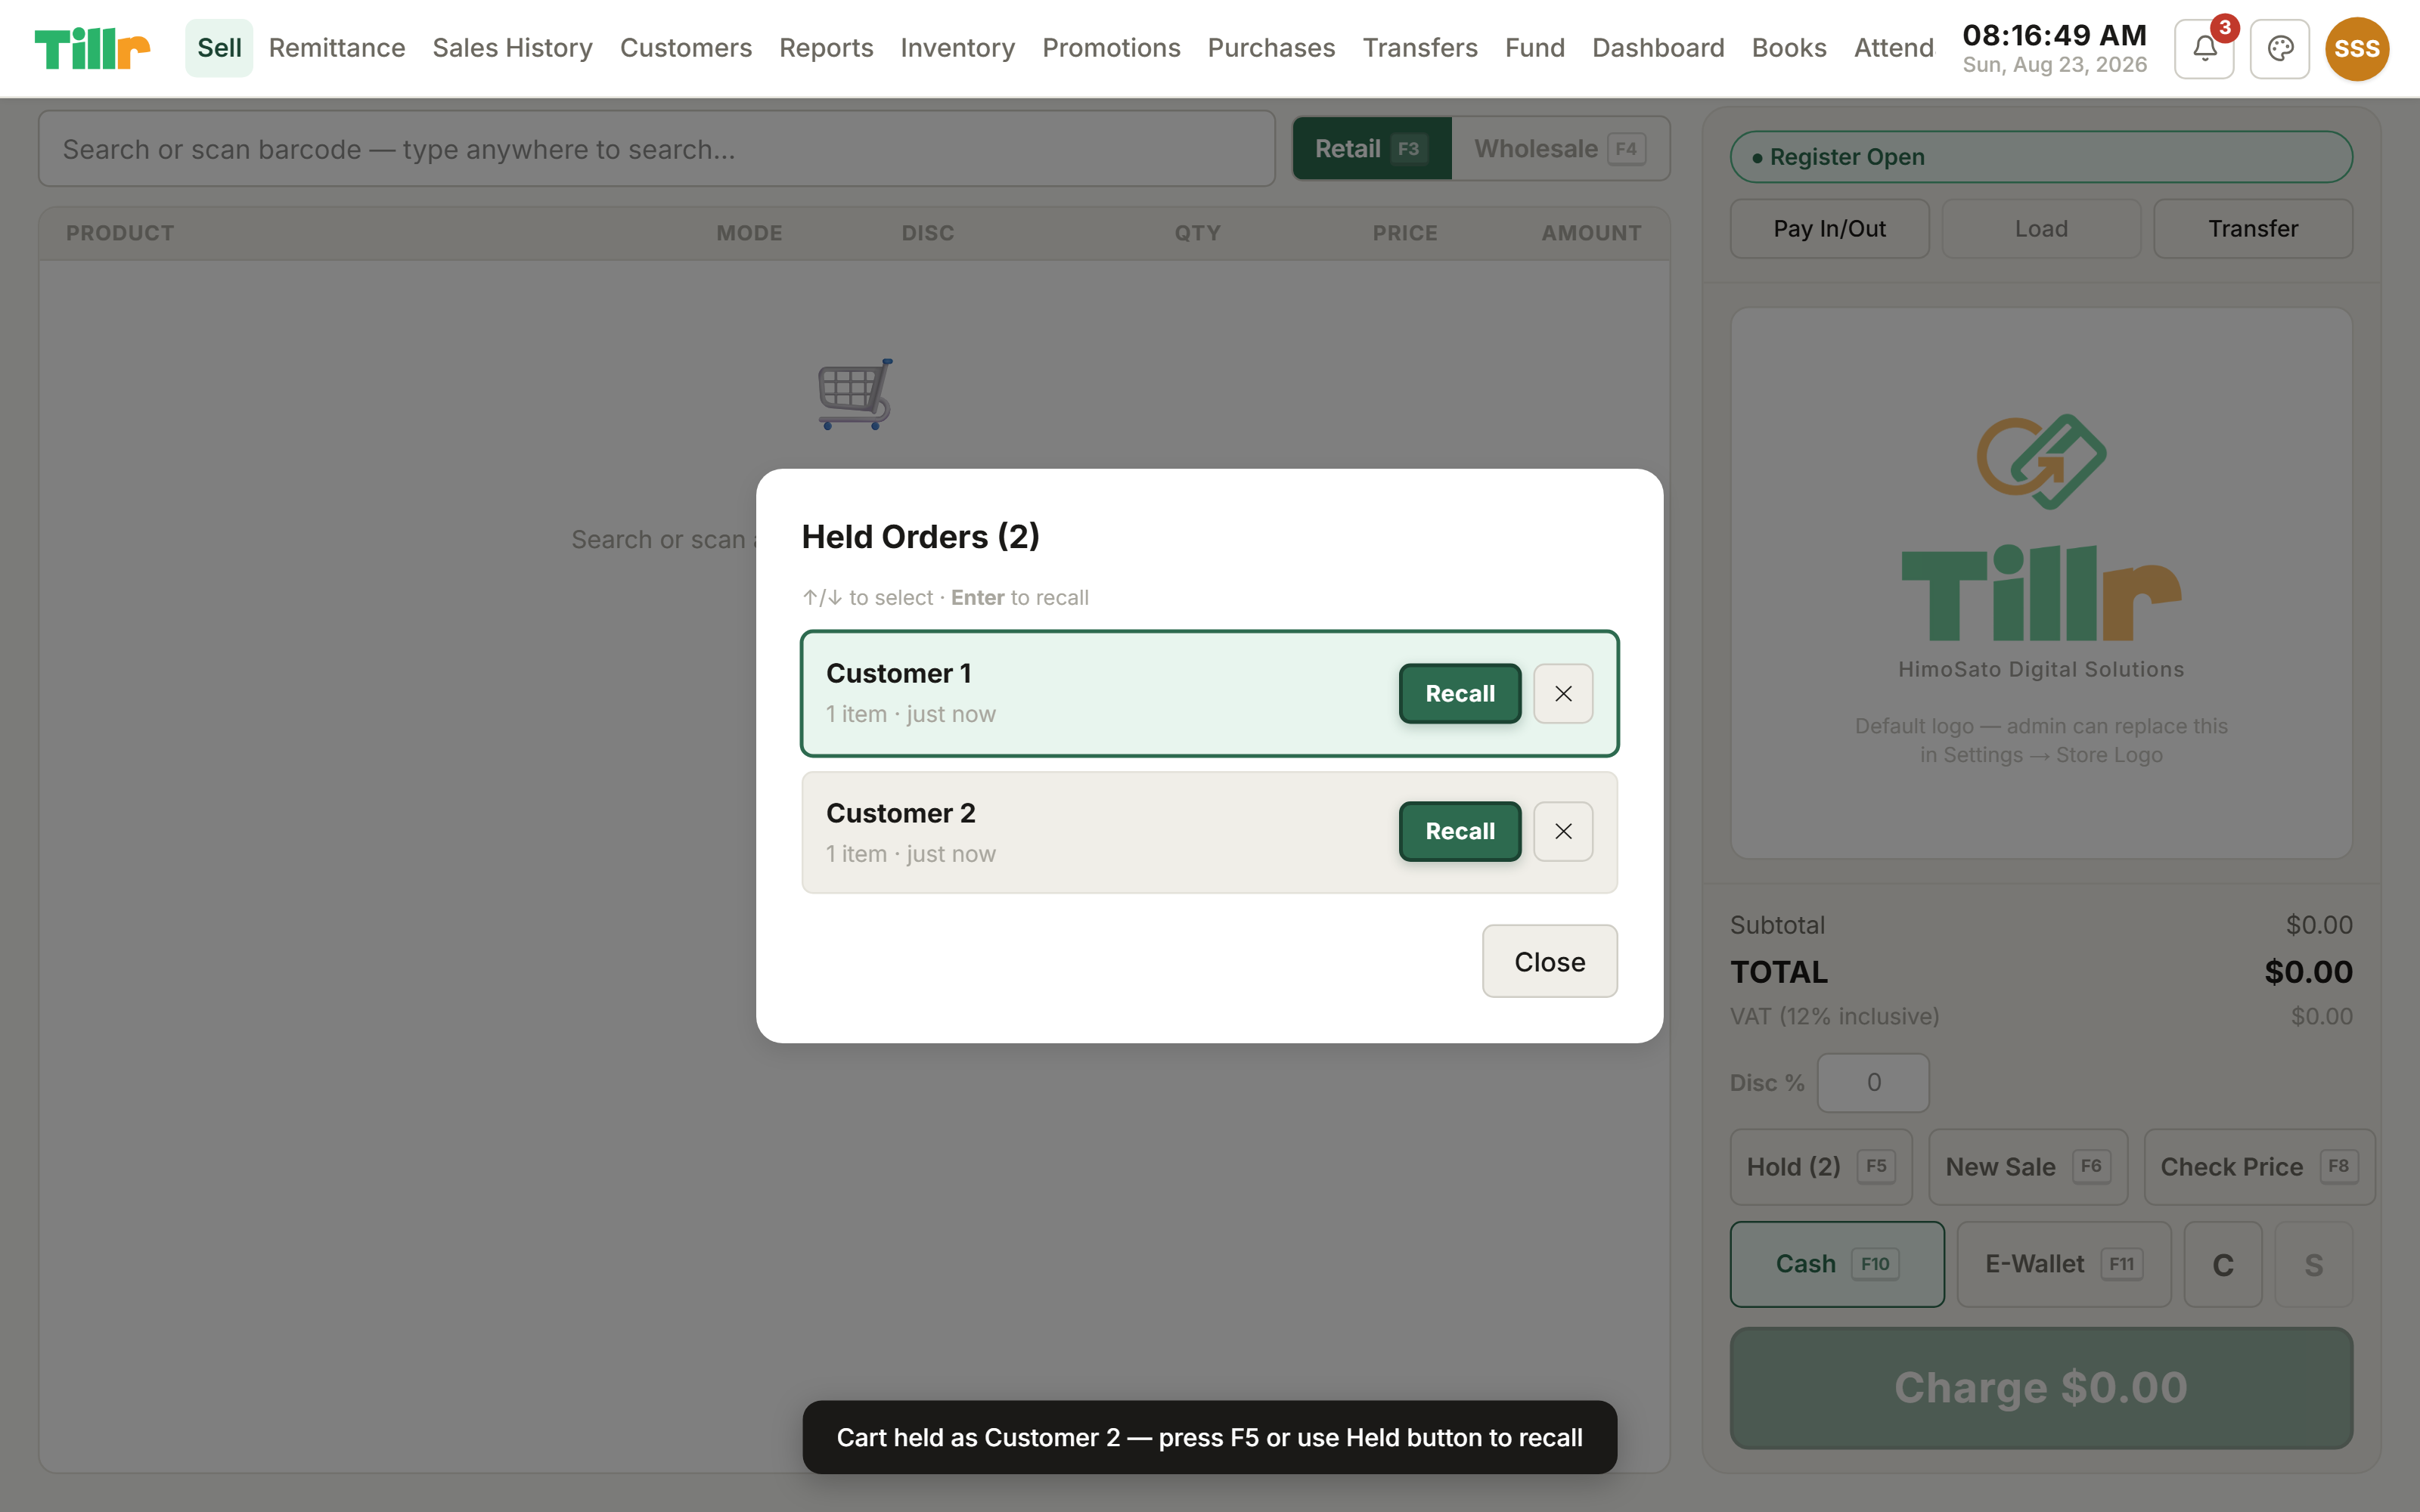
Mid-sale, tap Hold (or press F5). The cart parks itself under an automatic label like "Customer 2" and the register's free for the next transaction.
To bring it back, press F5 again to open the list of held sales, and tap the one you want. It drops right back into the cart exactly where you left it.
Running more than one till? Instead of holding, send the whole cart to another device. Pick the target till, add a note if it helps, and send it. The receiving till picks it up automatically within a few seconds, nothing needs re-entering.
Both are the same idea: nothing gets lost, and nobody has to re-scan a cart from scratch.
Held Orders: every parked sale, one tap to bring it back into the cart.
Handing off an e-wallet float mid-shift
If two cashiers need to share one GCash or Maya account across a single day, they don't have to close the whole register just to swap it.
From the register menu, choose Hand Off E-Wallet and pick which account you're releasing.
Depending on how your store's set up, this might need a manager or admin to confirm before it goes through.
Once released, that account frees up immediately for the next cashier to pick up on their own till, while the rest of the shift, cash, other e-wallet accounts, keeps running untouched.
03
Inventory Management
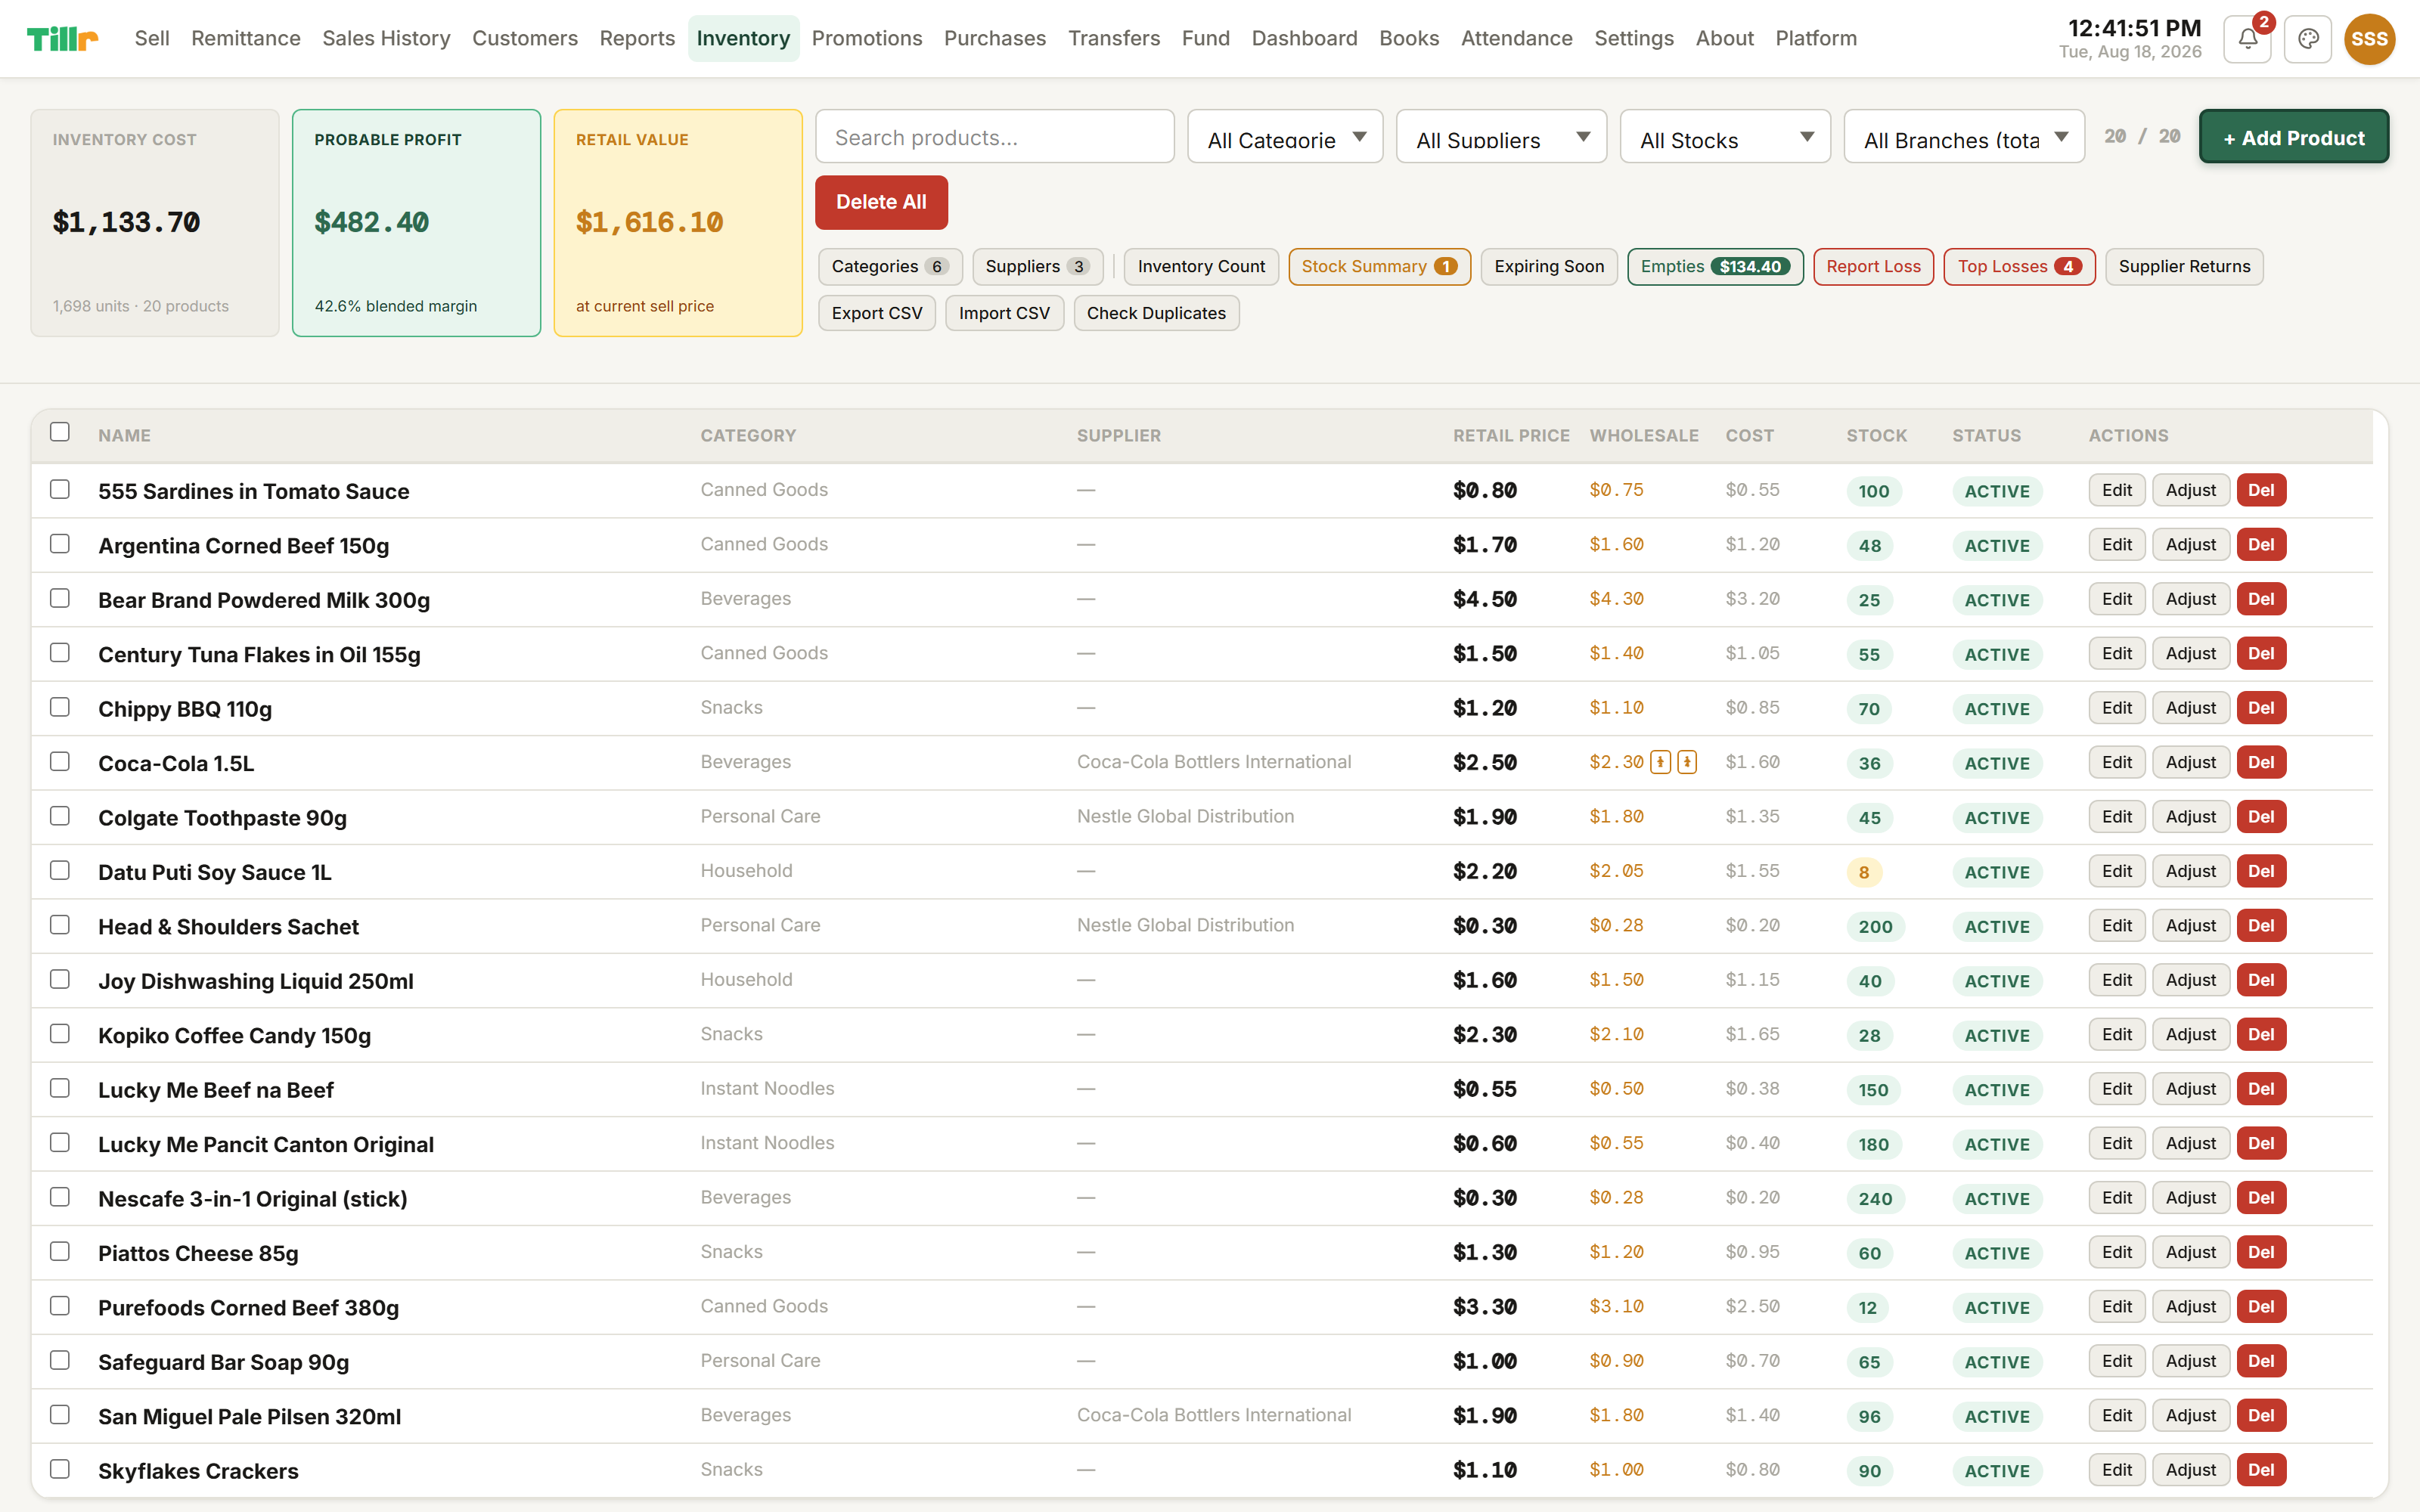
The Inventory page: every product's pricing, cost, and stock in one list.
Categories & suppliers
Two small setup steps make your whole Inventory page dramatically easier to work with.
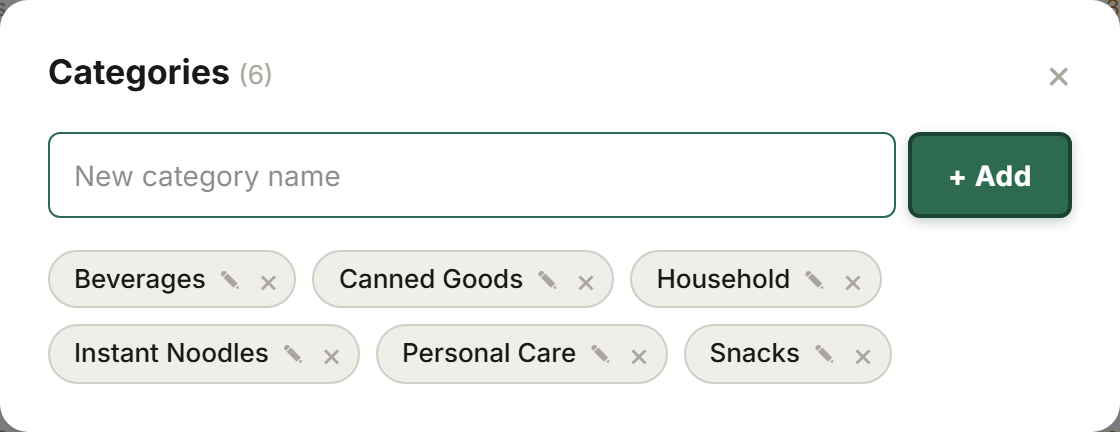
Tap Categories and add groupings that match how you think about your shelves: Bottled Drinks, Canned Goods, Personal Care. Every product tagged to one lets you filter the whole list down to one aisle's worth in a tap.
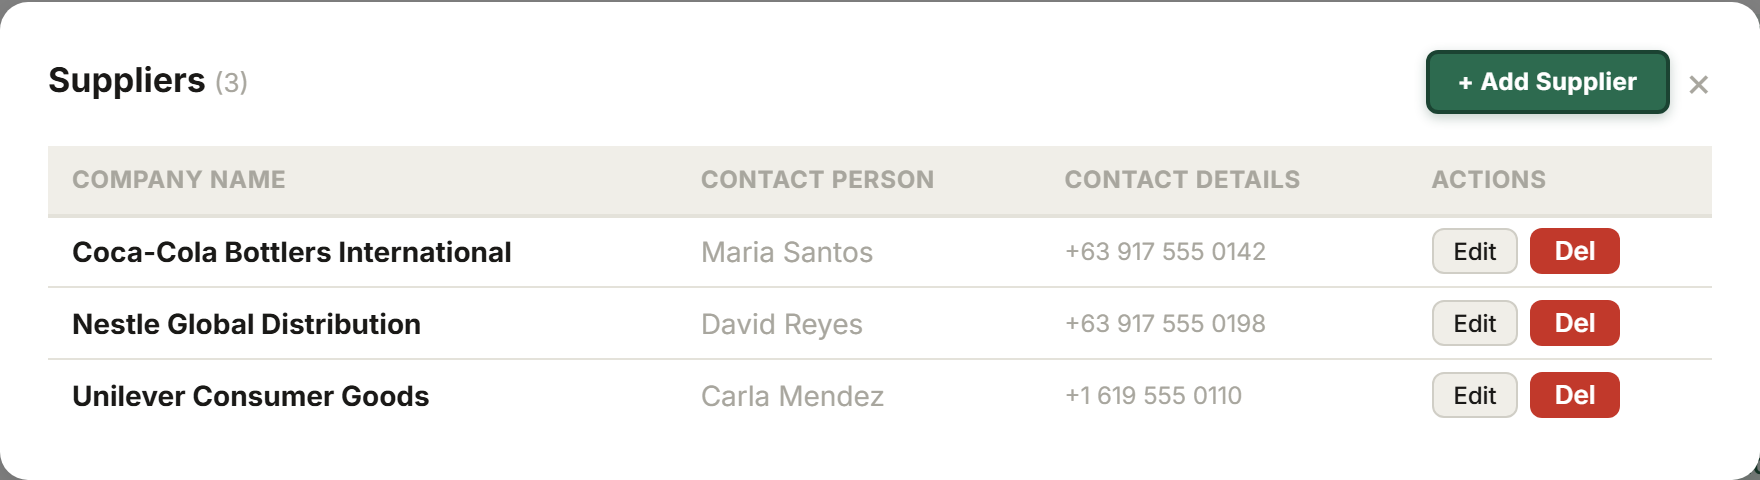
Tap Suppliers and add each one you order from, along with their typical delivery lead time in days. That lead time isn't just a note: it powers your reorder suggestions, telling you not just what's low but when to order to avoid running out.
Filter Inventory by category and supplier together to answer questions fast, like "what do I still need from Pepsi this week?"
Categories: add or remove groupings on the fly, no separate settings page.
Suppliers: each one's lead time feeds directly into reorder suggestions.
Recording stock loss, spoilage & damage
Stock doesn't only move through sales: spoilage, damage, and theft happen. Give every one of those a proper record instead of a silent, unexplained drop in count.
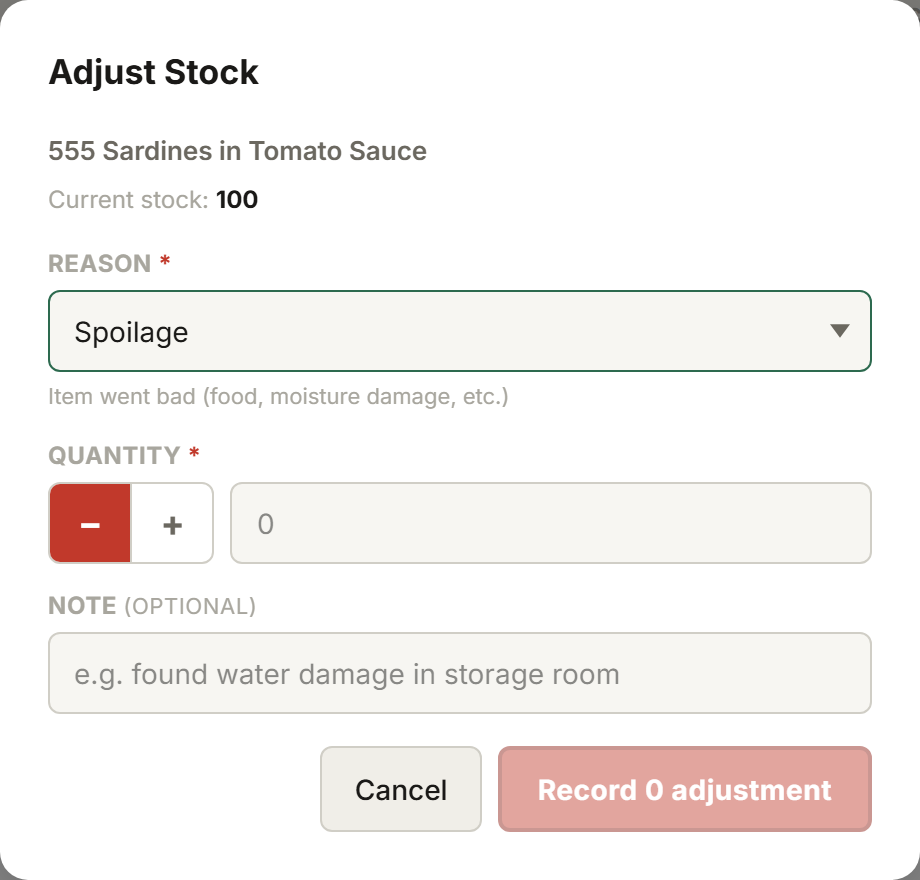
Tap Adjust next to any product, pick the reason (spoiled, damaged, expired, theft, internal use, giveaway), enter the quantity, and confirm. It's logged permanently with who made the change and when.
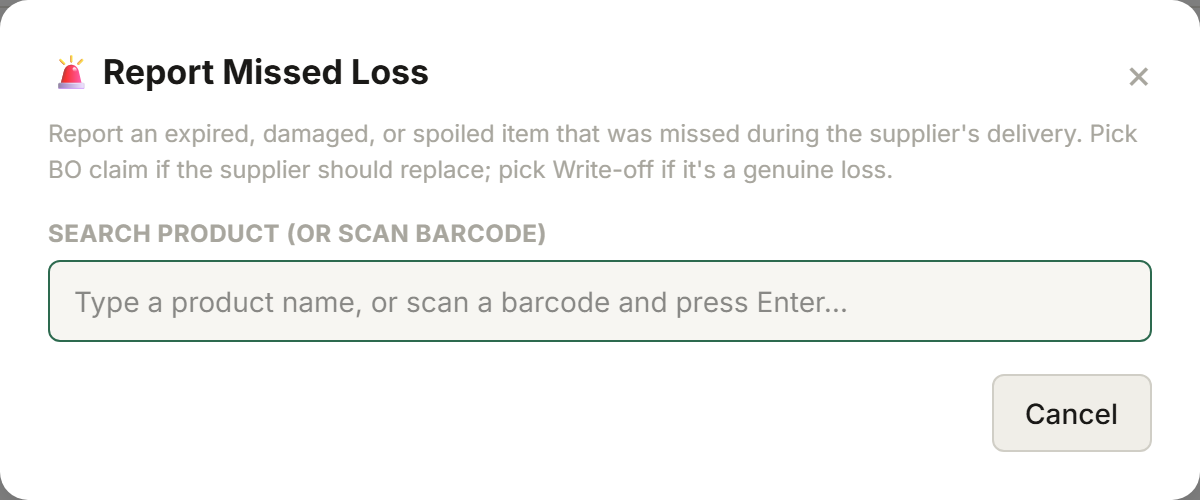
For something specific (an item that arrived already expired or damaged), use Report Loss instead. Search or scan the product, set the quantity, and choose whether it's a Bad Order claim you'll chase the supplier for, or a straight write-off.
Check the Top Losses panel: a 30-day ranked view of what's costing you the most in shrinkage, by peso value.
Adjust: every stock change on record with who made it, when, and why.
Report Loss: flag a Bad Order to chase the supplier, or write it off cleanly.
Running a physical inventory count
Once in a while you need to actually walk the store and count everything: that's what Stock Take is for.
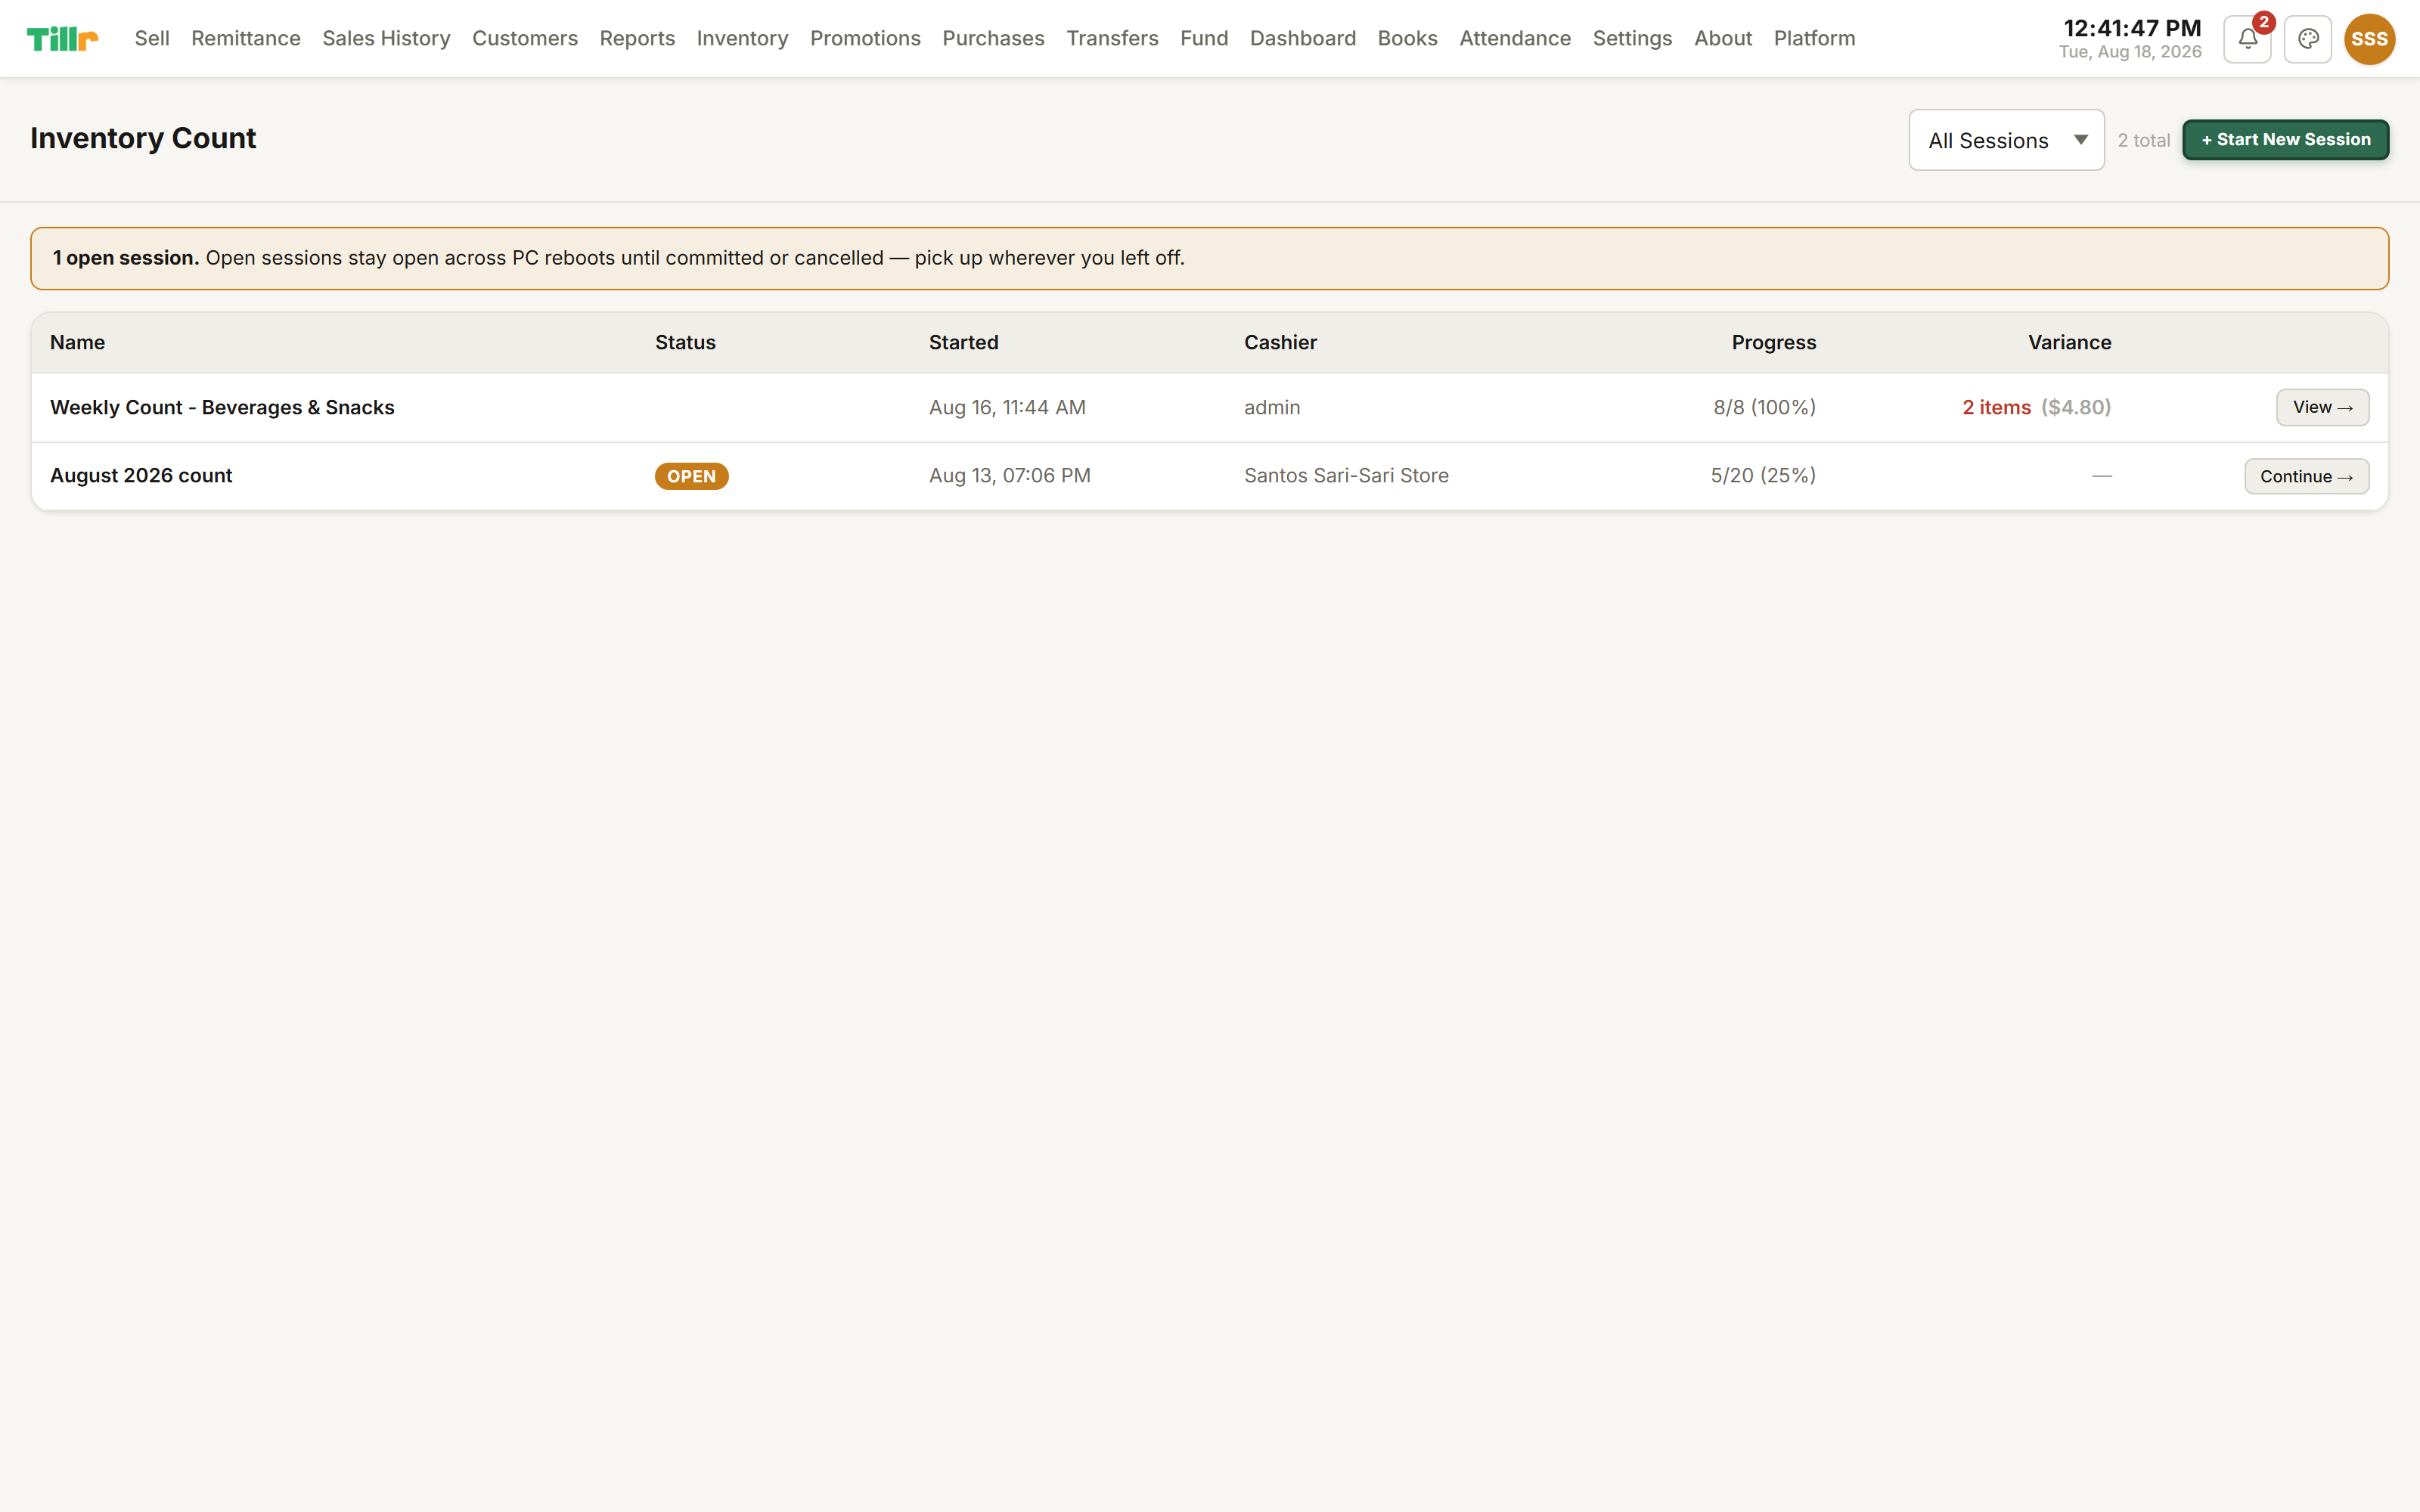
Start a new Stock Take session. You'll get a full product list with a blank counted-quantity field next to each; your system count stays visible alongside it.
Walk the aisles, count what's on the shelf, and enter it. Any product where your count doesn't match the system flags automatically.
Finish the session. Tillr shows the full variance summary in units and peso value, and writes a correction adjustment for every product that was off.
Every past count stays on record, so over time you can see whether shrinkage is getting better or worse.
Stock Take: walk the shelves, count, and let Tillr flag every mismatch.
Reorder suggestions
Instead of eyeballing the shelves and guessing what to order, let Tillr do the math.
On a product, set a reorder point (the stock level that should trigger a reorder) and a target quantity (how much to bring it back up to).
In Settings, set a default buffer (extra days of safety stock) and a default lead time for products without a specific supplier lead time.
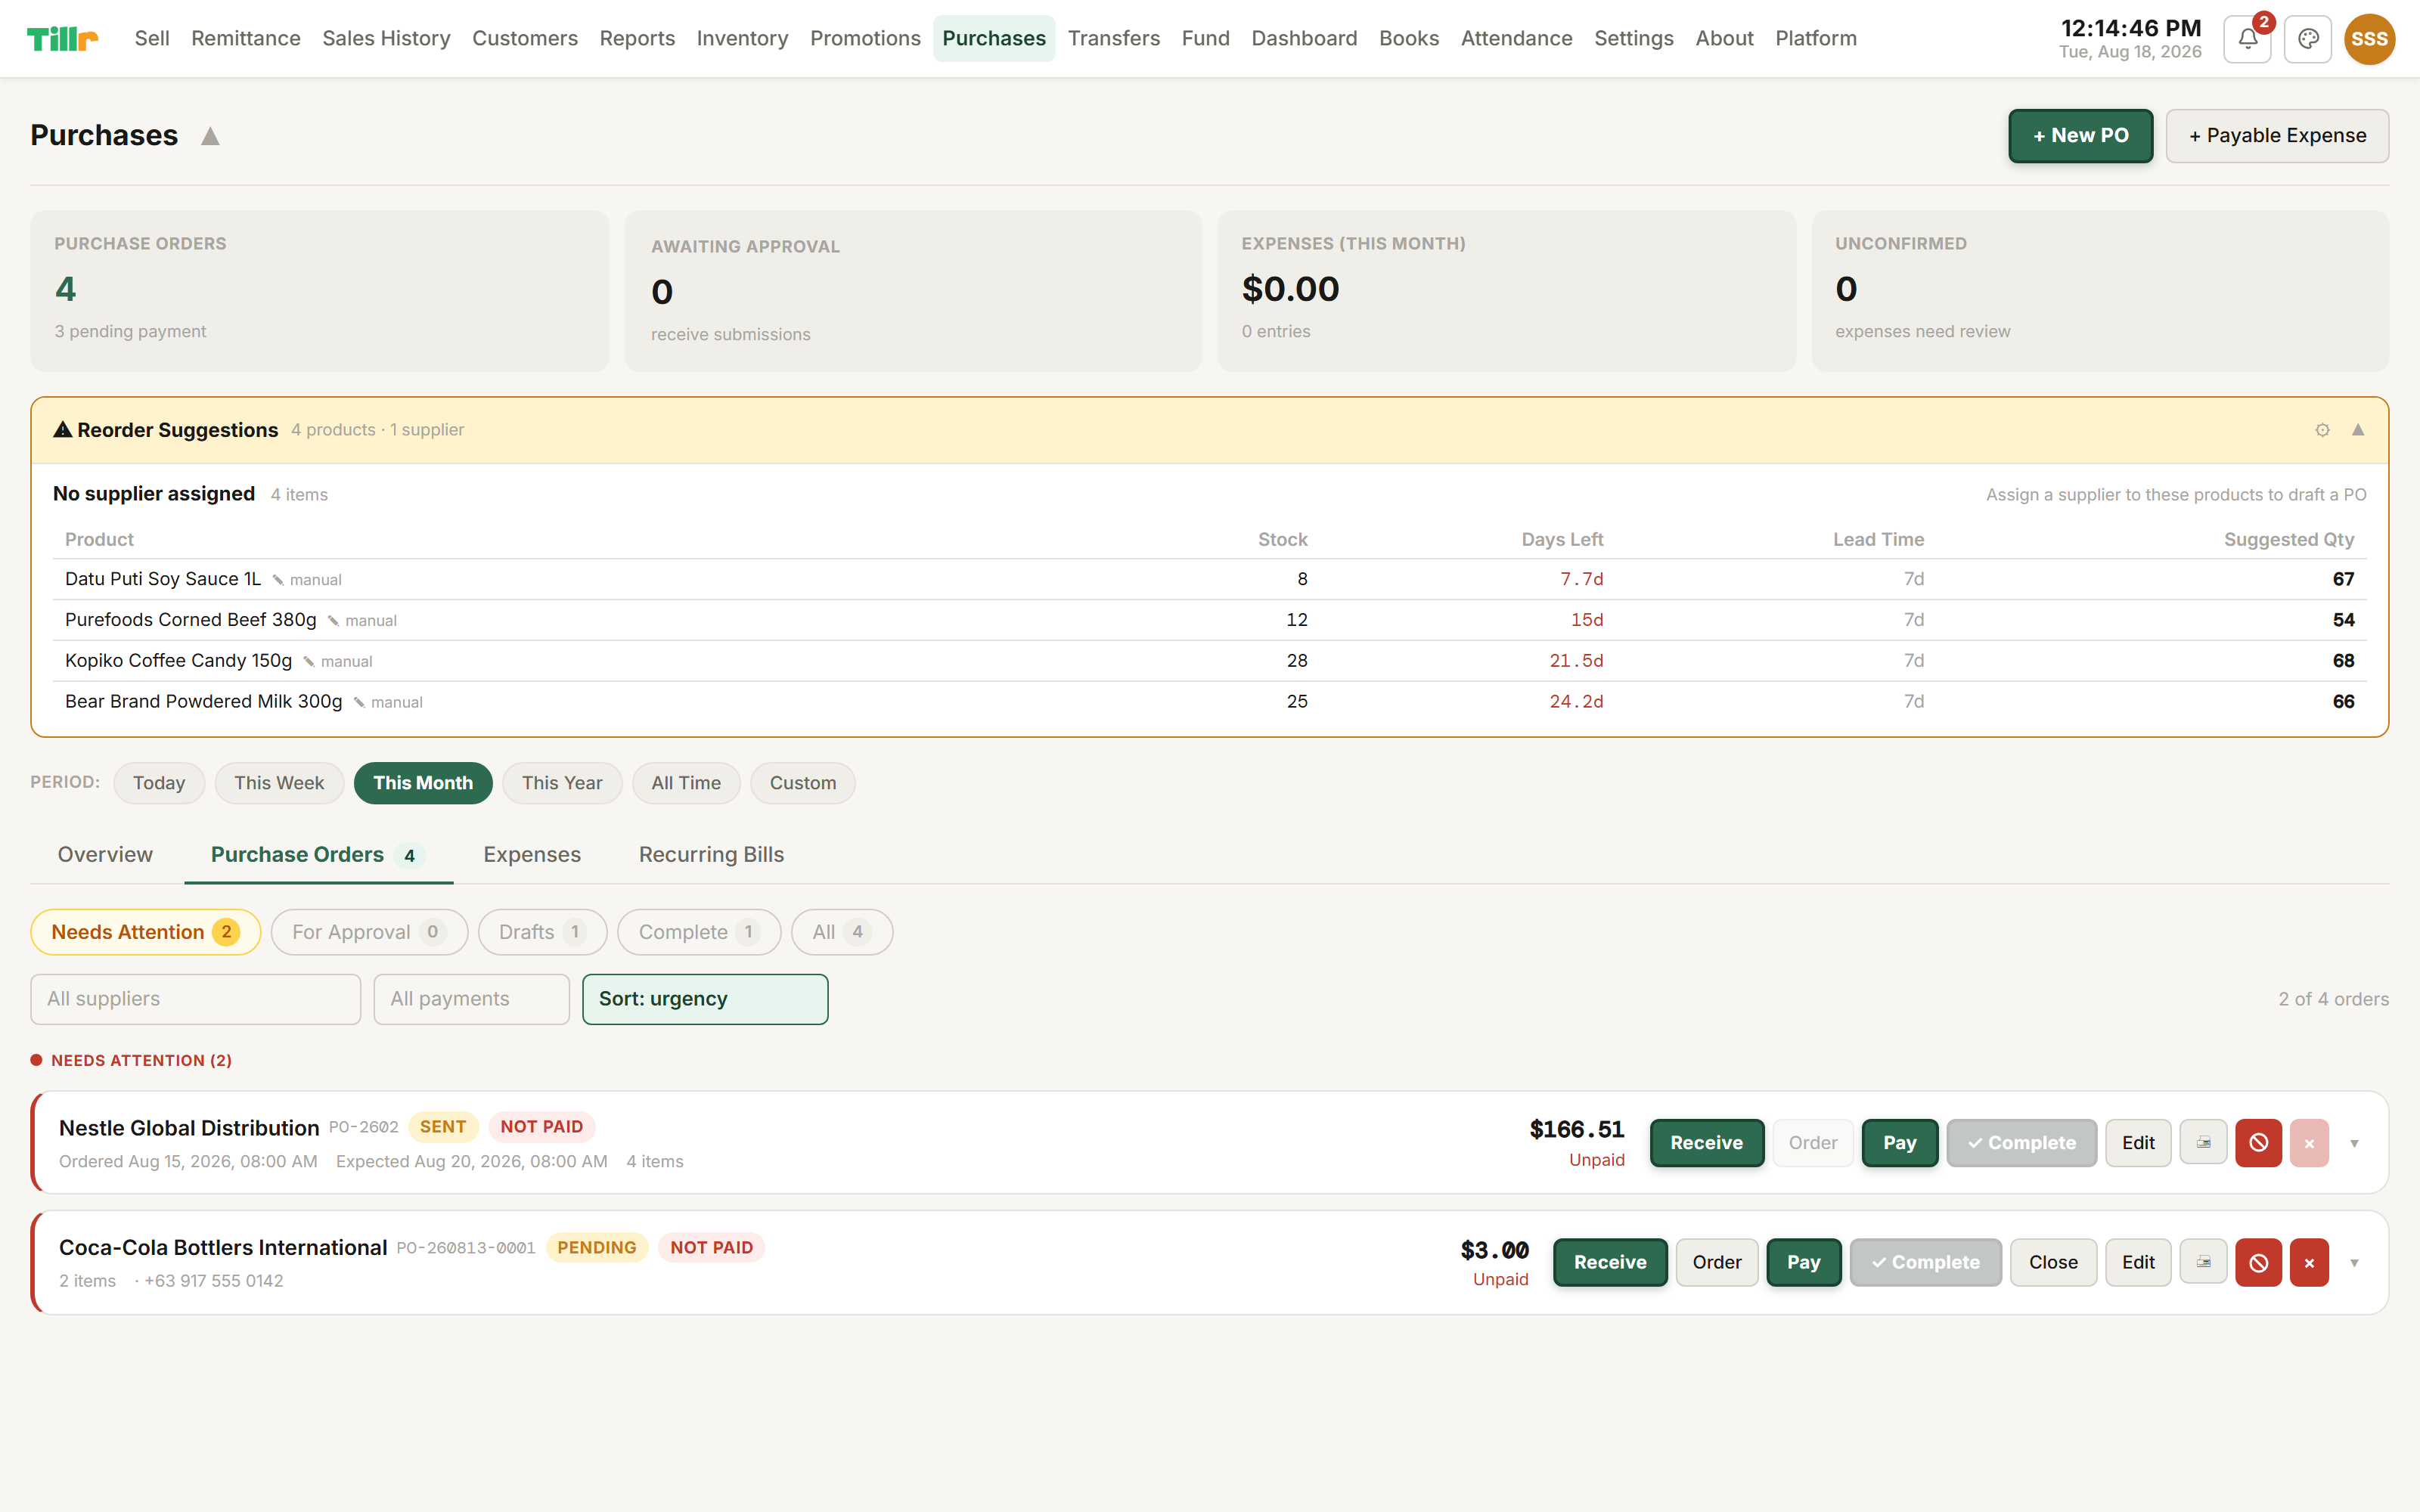
On the Purchases page, the Reorder Suggestions panel shows what's approaching its reorder point, how much to order, and by when, accounting for how long that supplier actually takes to deliver.
Tap straight from a suggestion into a new Purchase Order.
Reorder Suggestions on the Purchases page: what's low, how much to order, and by when.
Expiring products & empties on hand
Two panels on your Inventory page exist purely to catch problems before they cost you money.
For products with a shelf life, set it under the product's edit screen (days from last receiving until expiry). Tillr calculates the rest from your receiving history.
The Expiring Soon panel shows everything approaching or past that window: a seven-day early warning to mark things down, move them forward, or return them to a supplier.
Check Empties regularly too: it's stock-room space and money tied up until you return it, not just a customer-facing number.
04
Customers, Loyalty & Purchasing
Managing customers & store credit
If regulars run a tab at your store, Tillr tracks it properly instead of a notebook by the register.
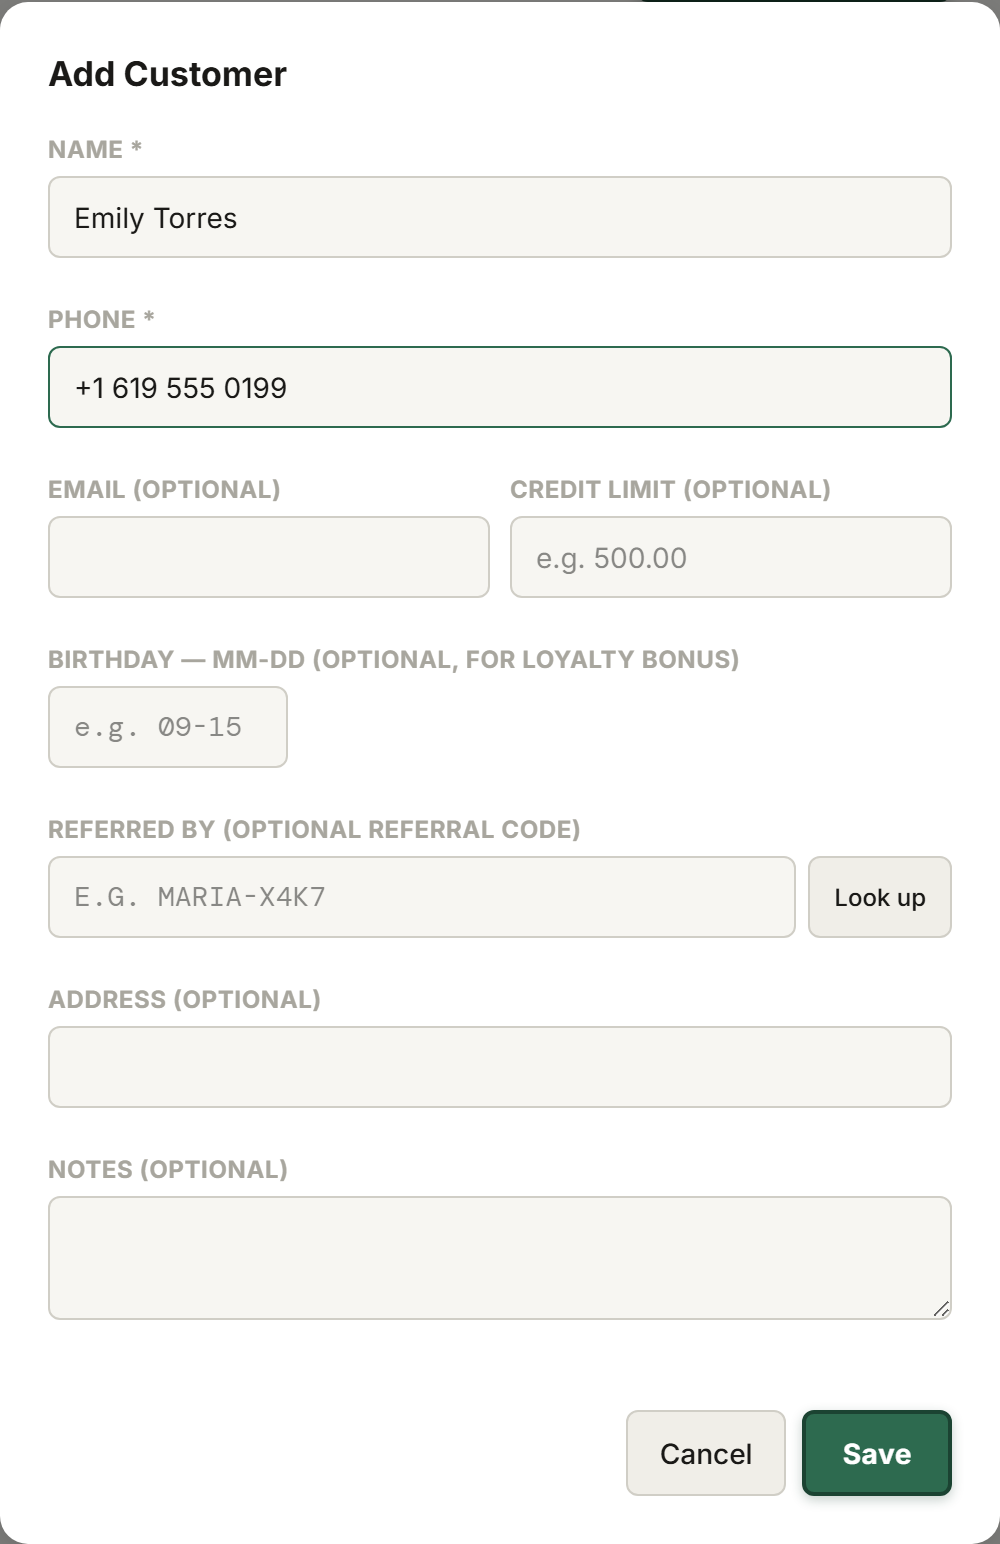
Add a customer once (name and contact info) and they're available at checkout from then on.
At checkout, instead of collecting payment, select the customer and choose Charge to Account. The sale still deducts stock and logs normally; it just moves the balance onto their ledger.
Open any customer's profile to see their full ledger: every charge, every payment, current balance.
When they pay back some or all of it, record the payment right there. It shows in your Dashboard as outstanding customer credit.
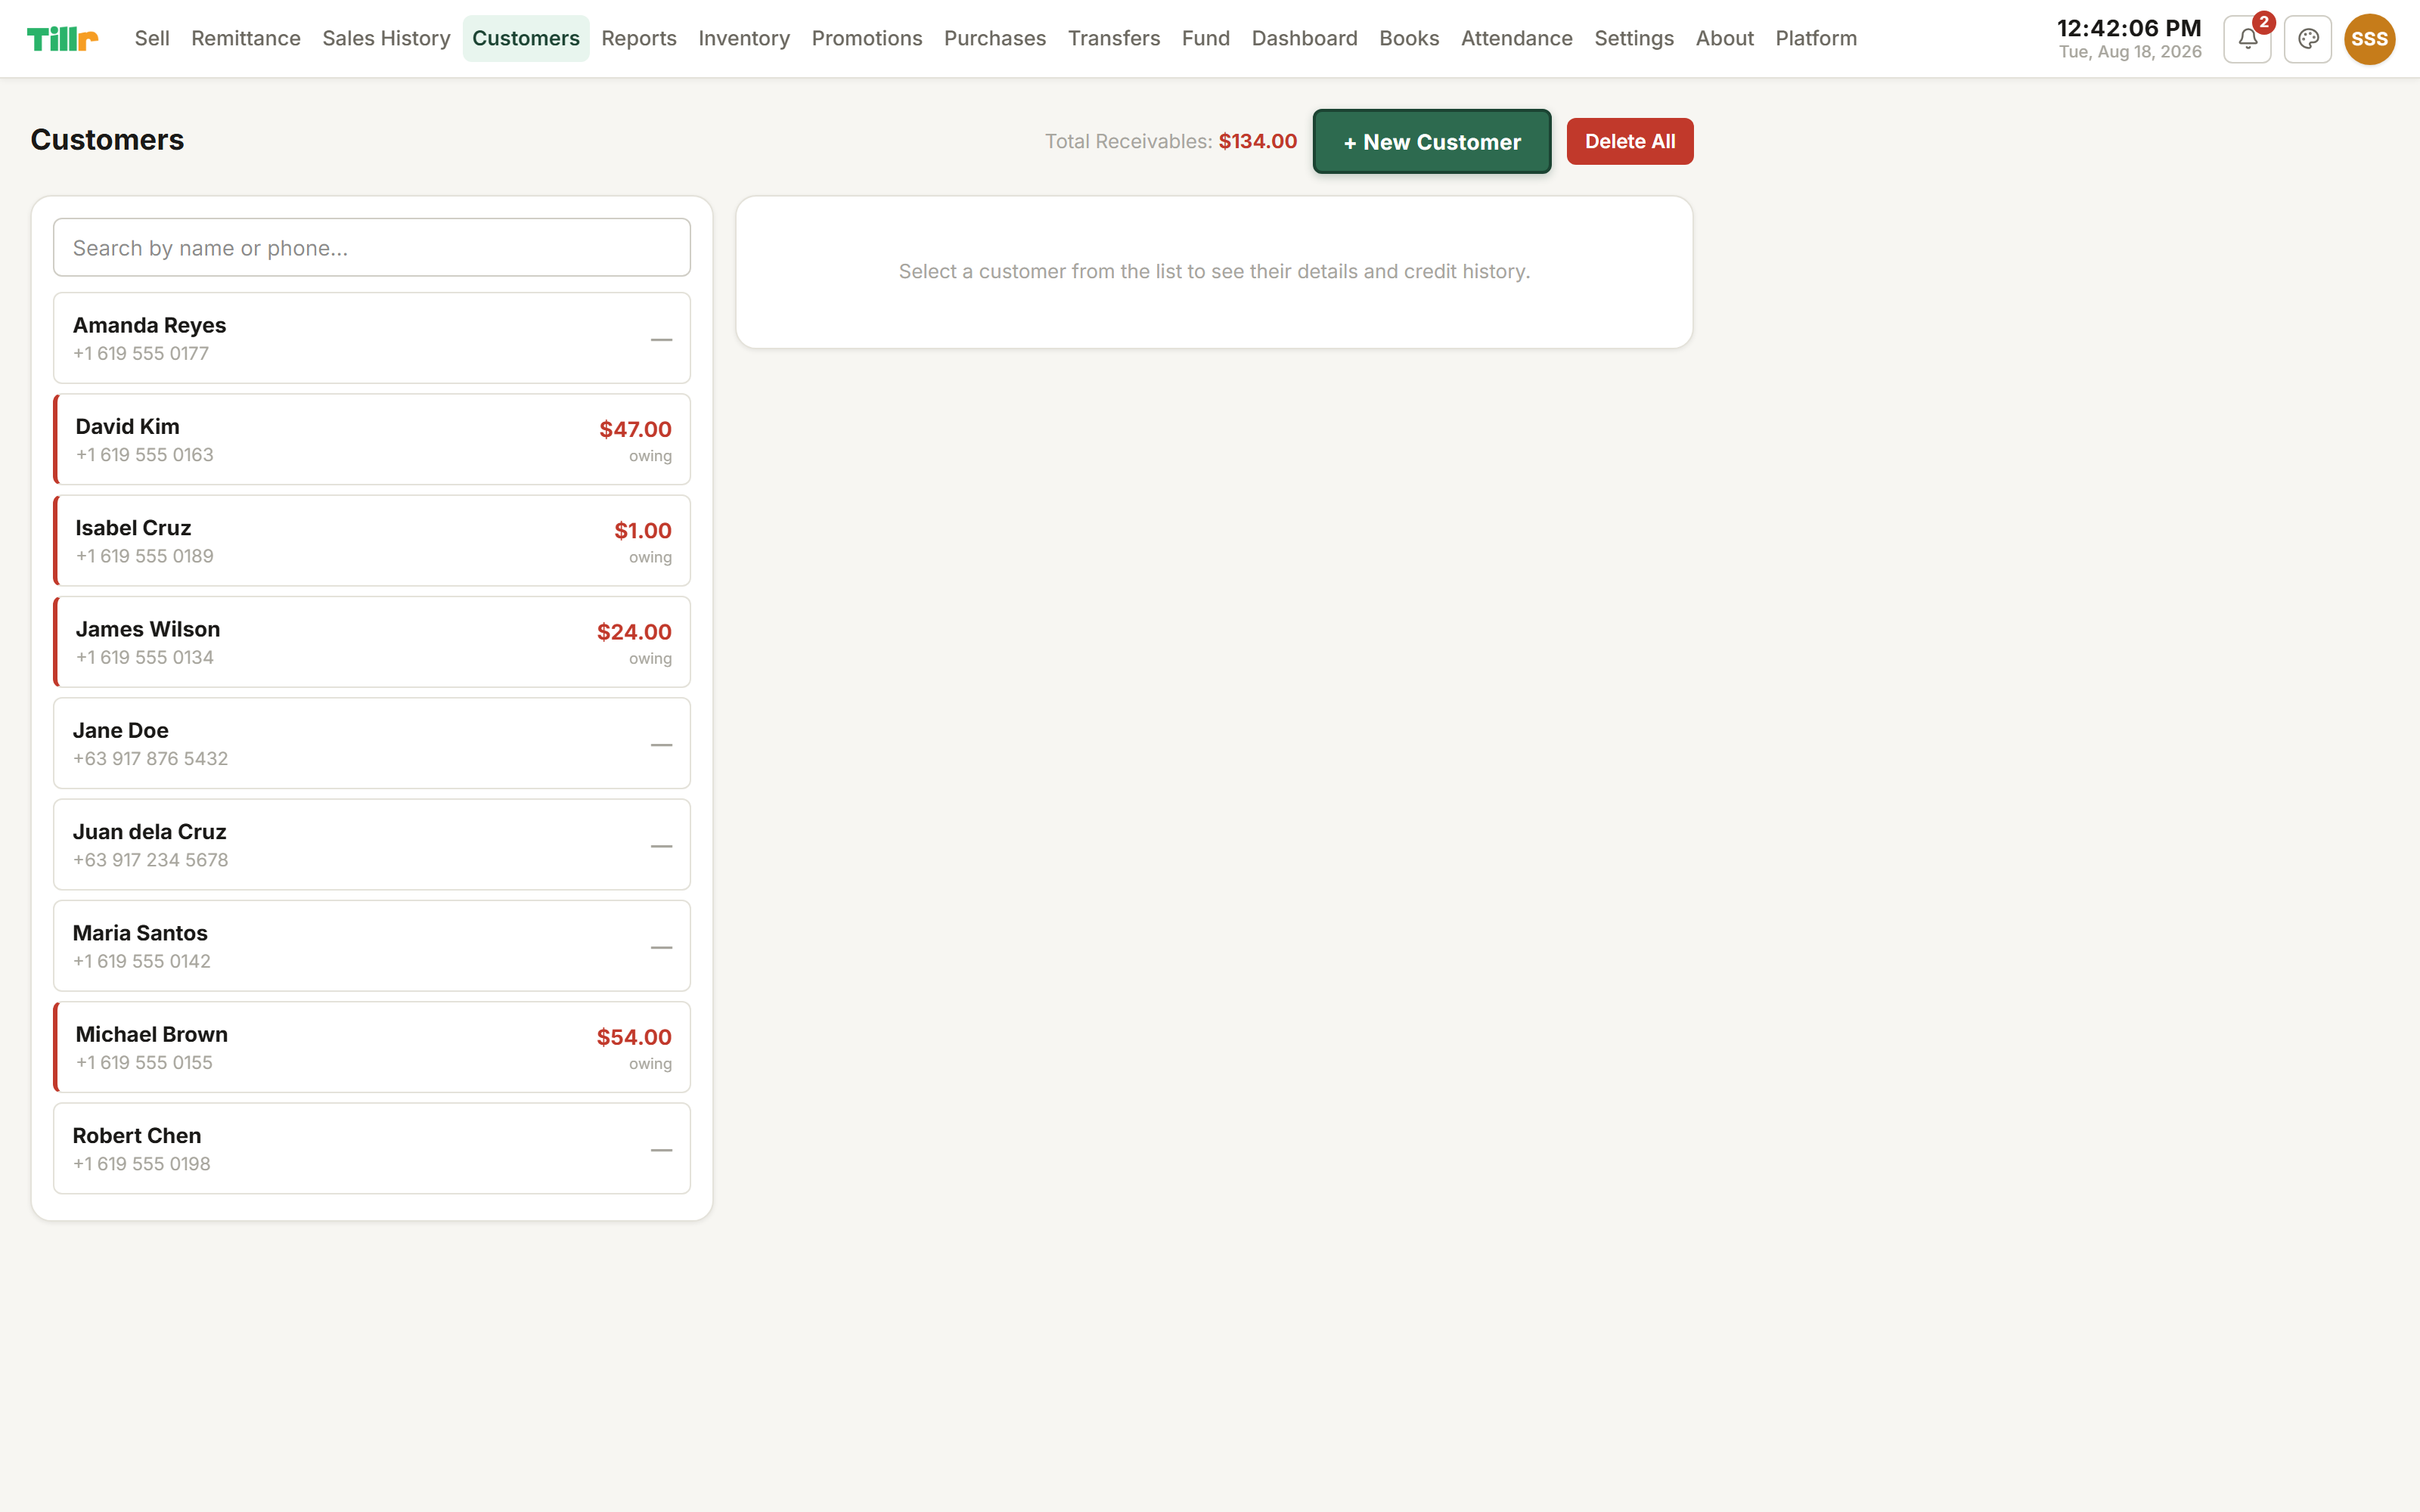
The Customers page: every regular's contact info and running ledger in one list.
Adding a customer: takes a few seconds, and they're available at checkout immediately.
Creating promotions & loyalty tiers Premium
Promotions in Tillr aren't just blanket discounts: you can target them to specific customer tiers, applied automatically at the register.
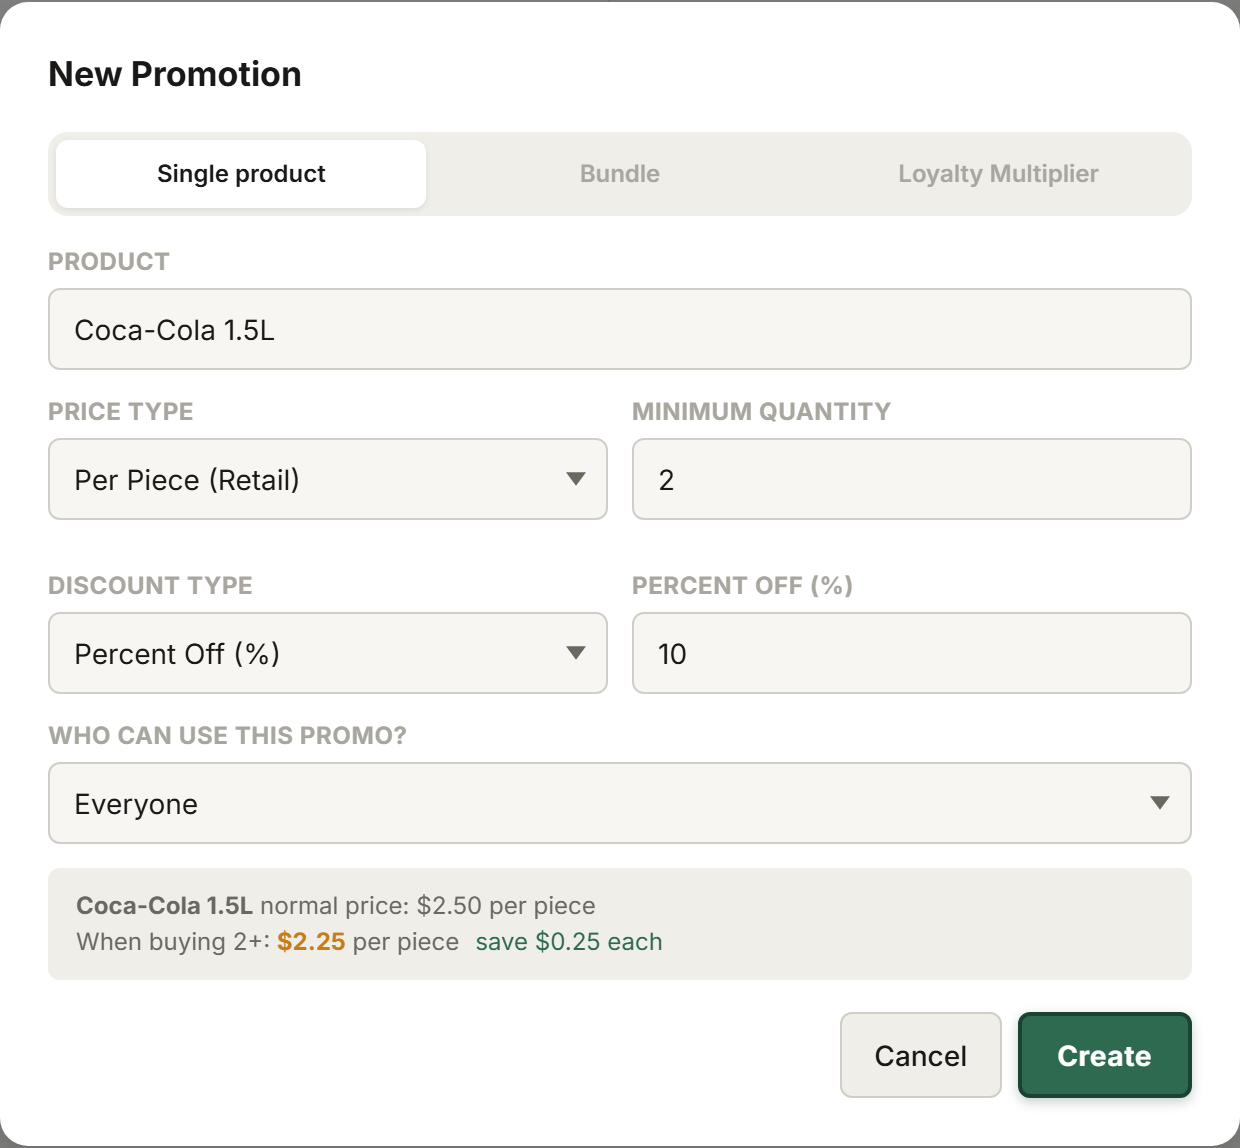
Create a new promotion, pick the products or category it applies to, and set the discount (percentage off, fixed amount, or bundle price). Set a start and end date and it runs itself.
Set up loyalty tiers based on how much a customer has spent or how many points they've earned. Restrict a promotion to your top tier to reward your best regulars specifically.
At checkout, once a customer's selected, any promotion they qualify for applies automatically: the cashier doesn't need to know the rules.
Customers can see their own points and tier progress on their profile.
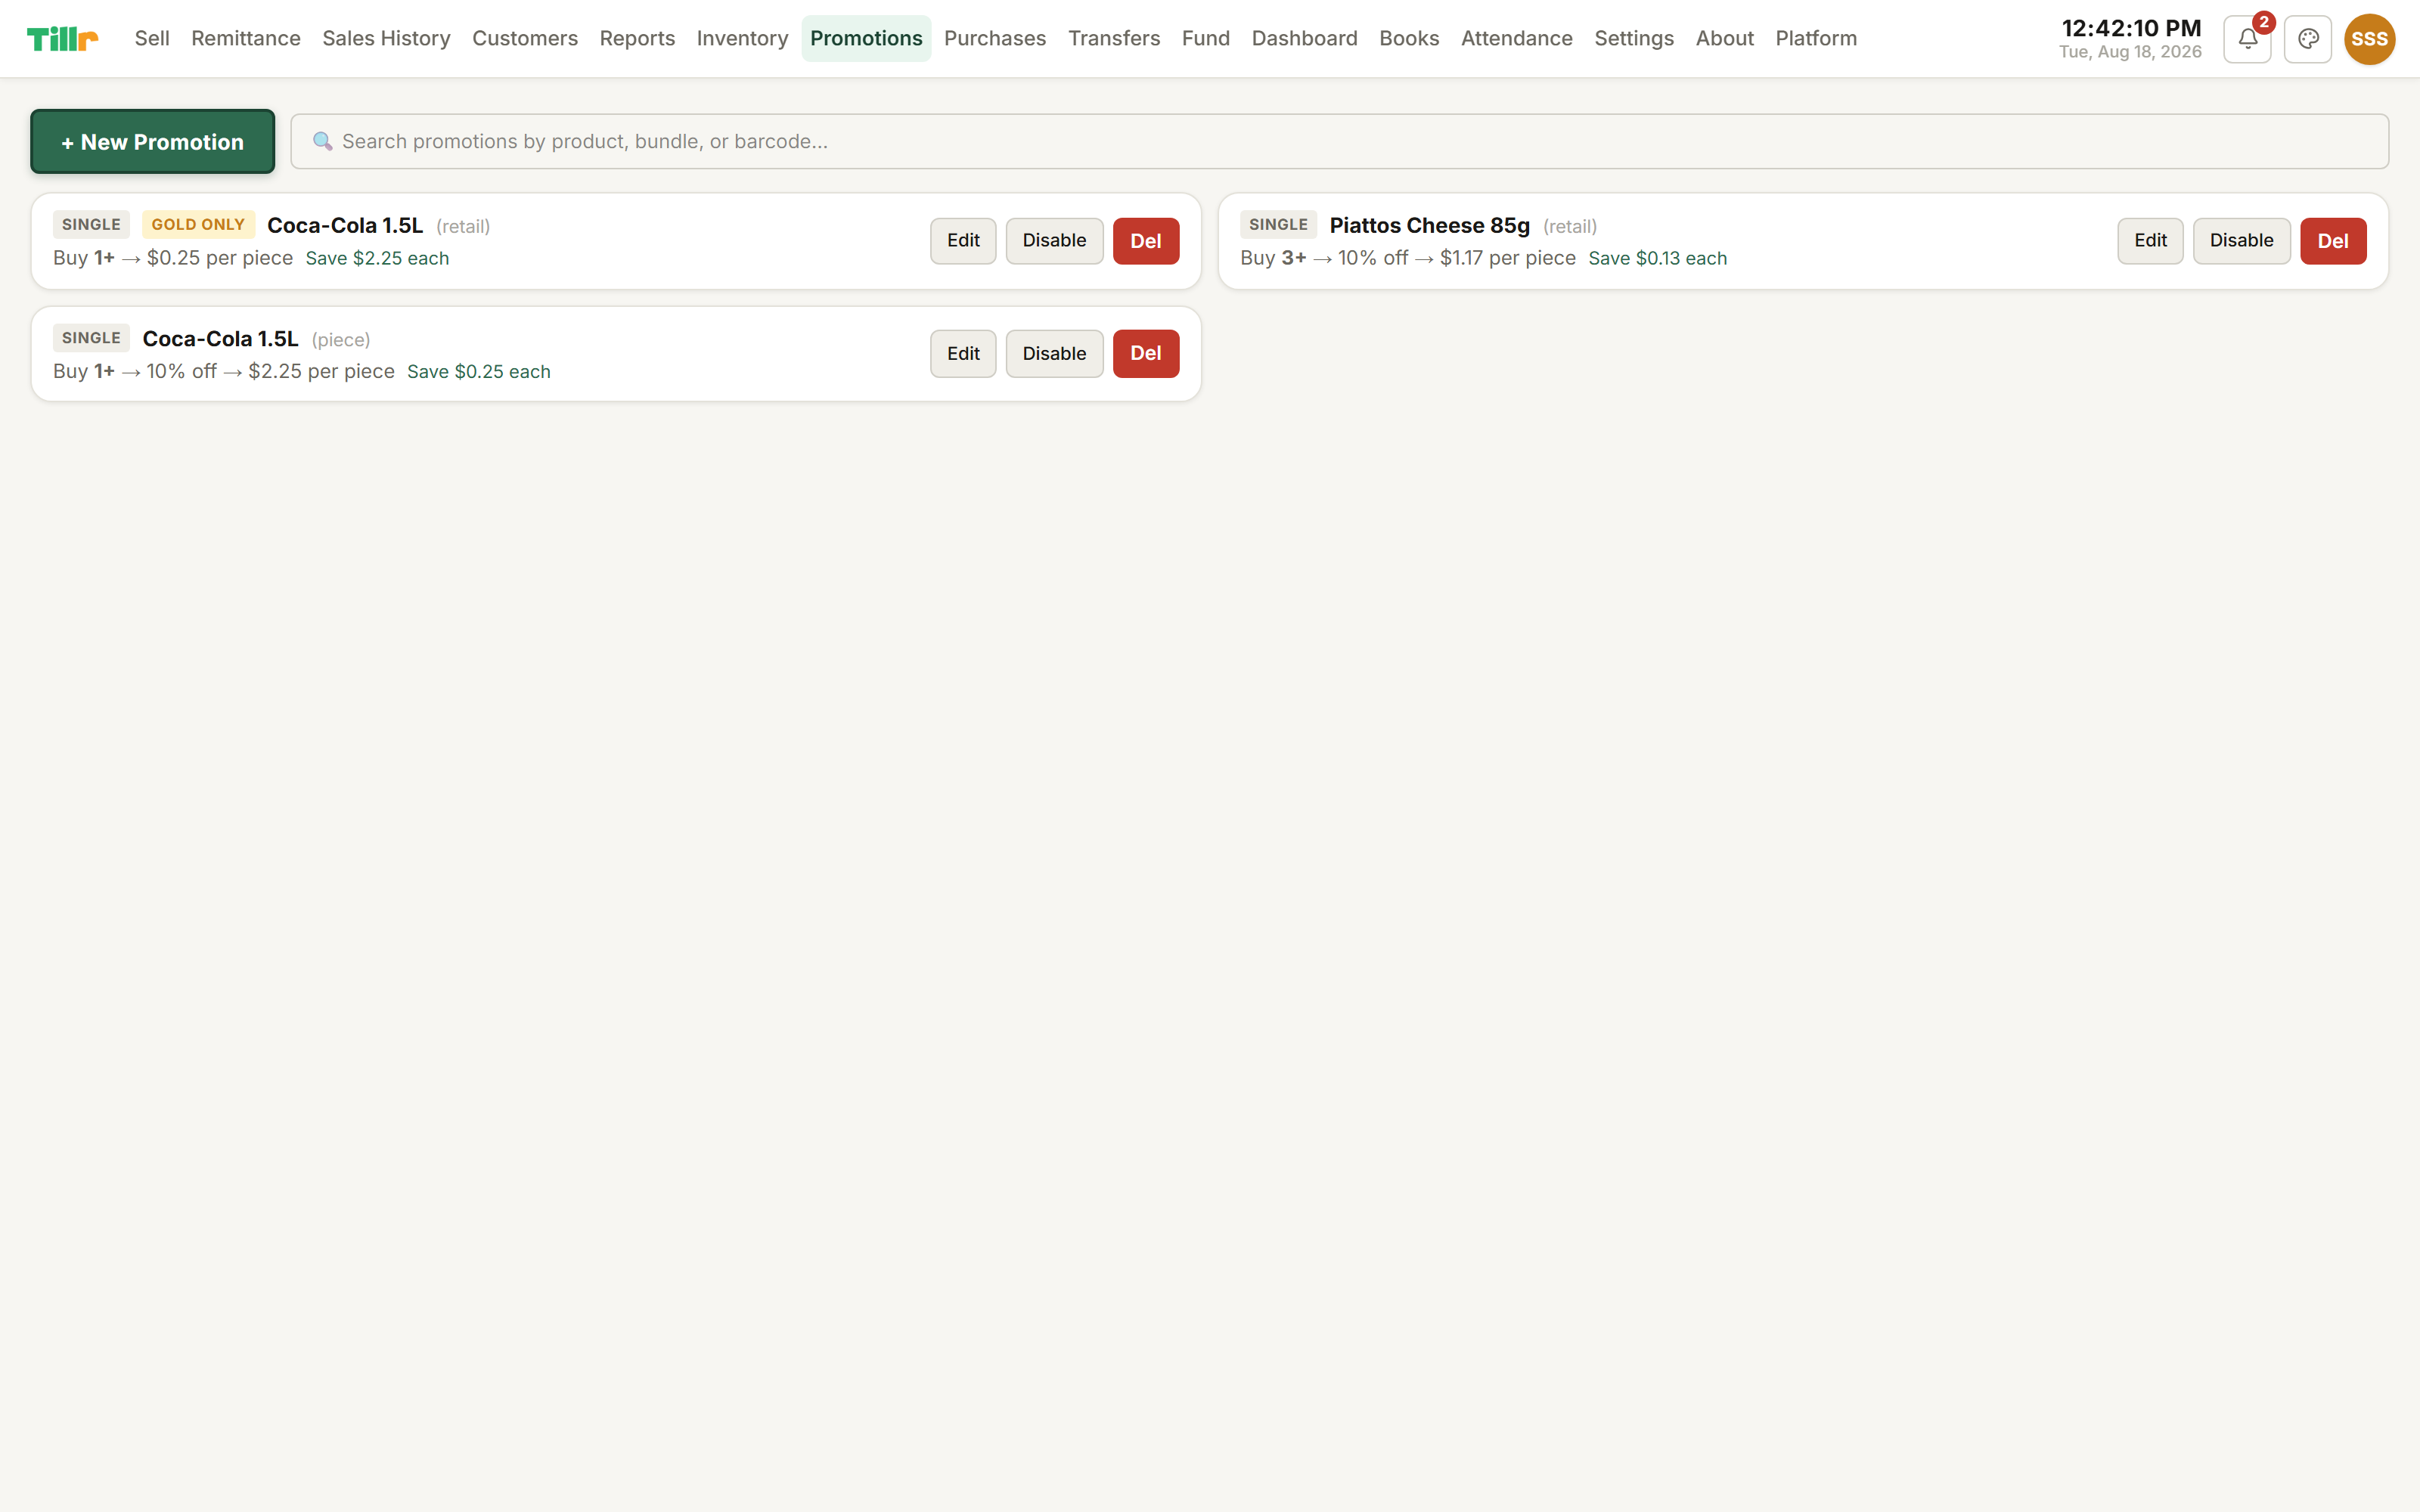
The Promotions page: every active discount, bundle, and loyalty rule in one list.
Creating a promotion: pick the products, the discount, and a date range.
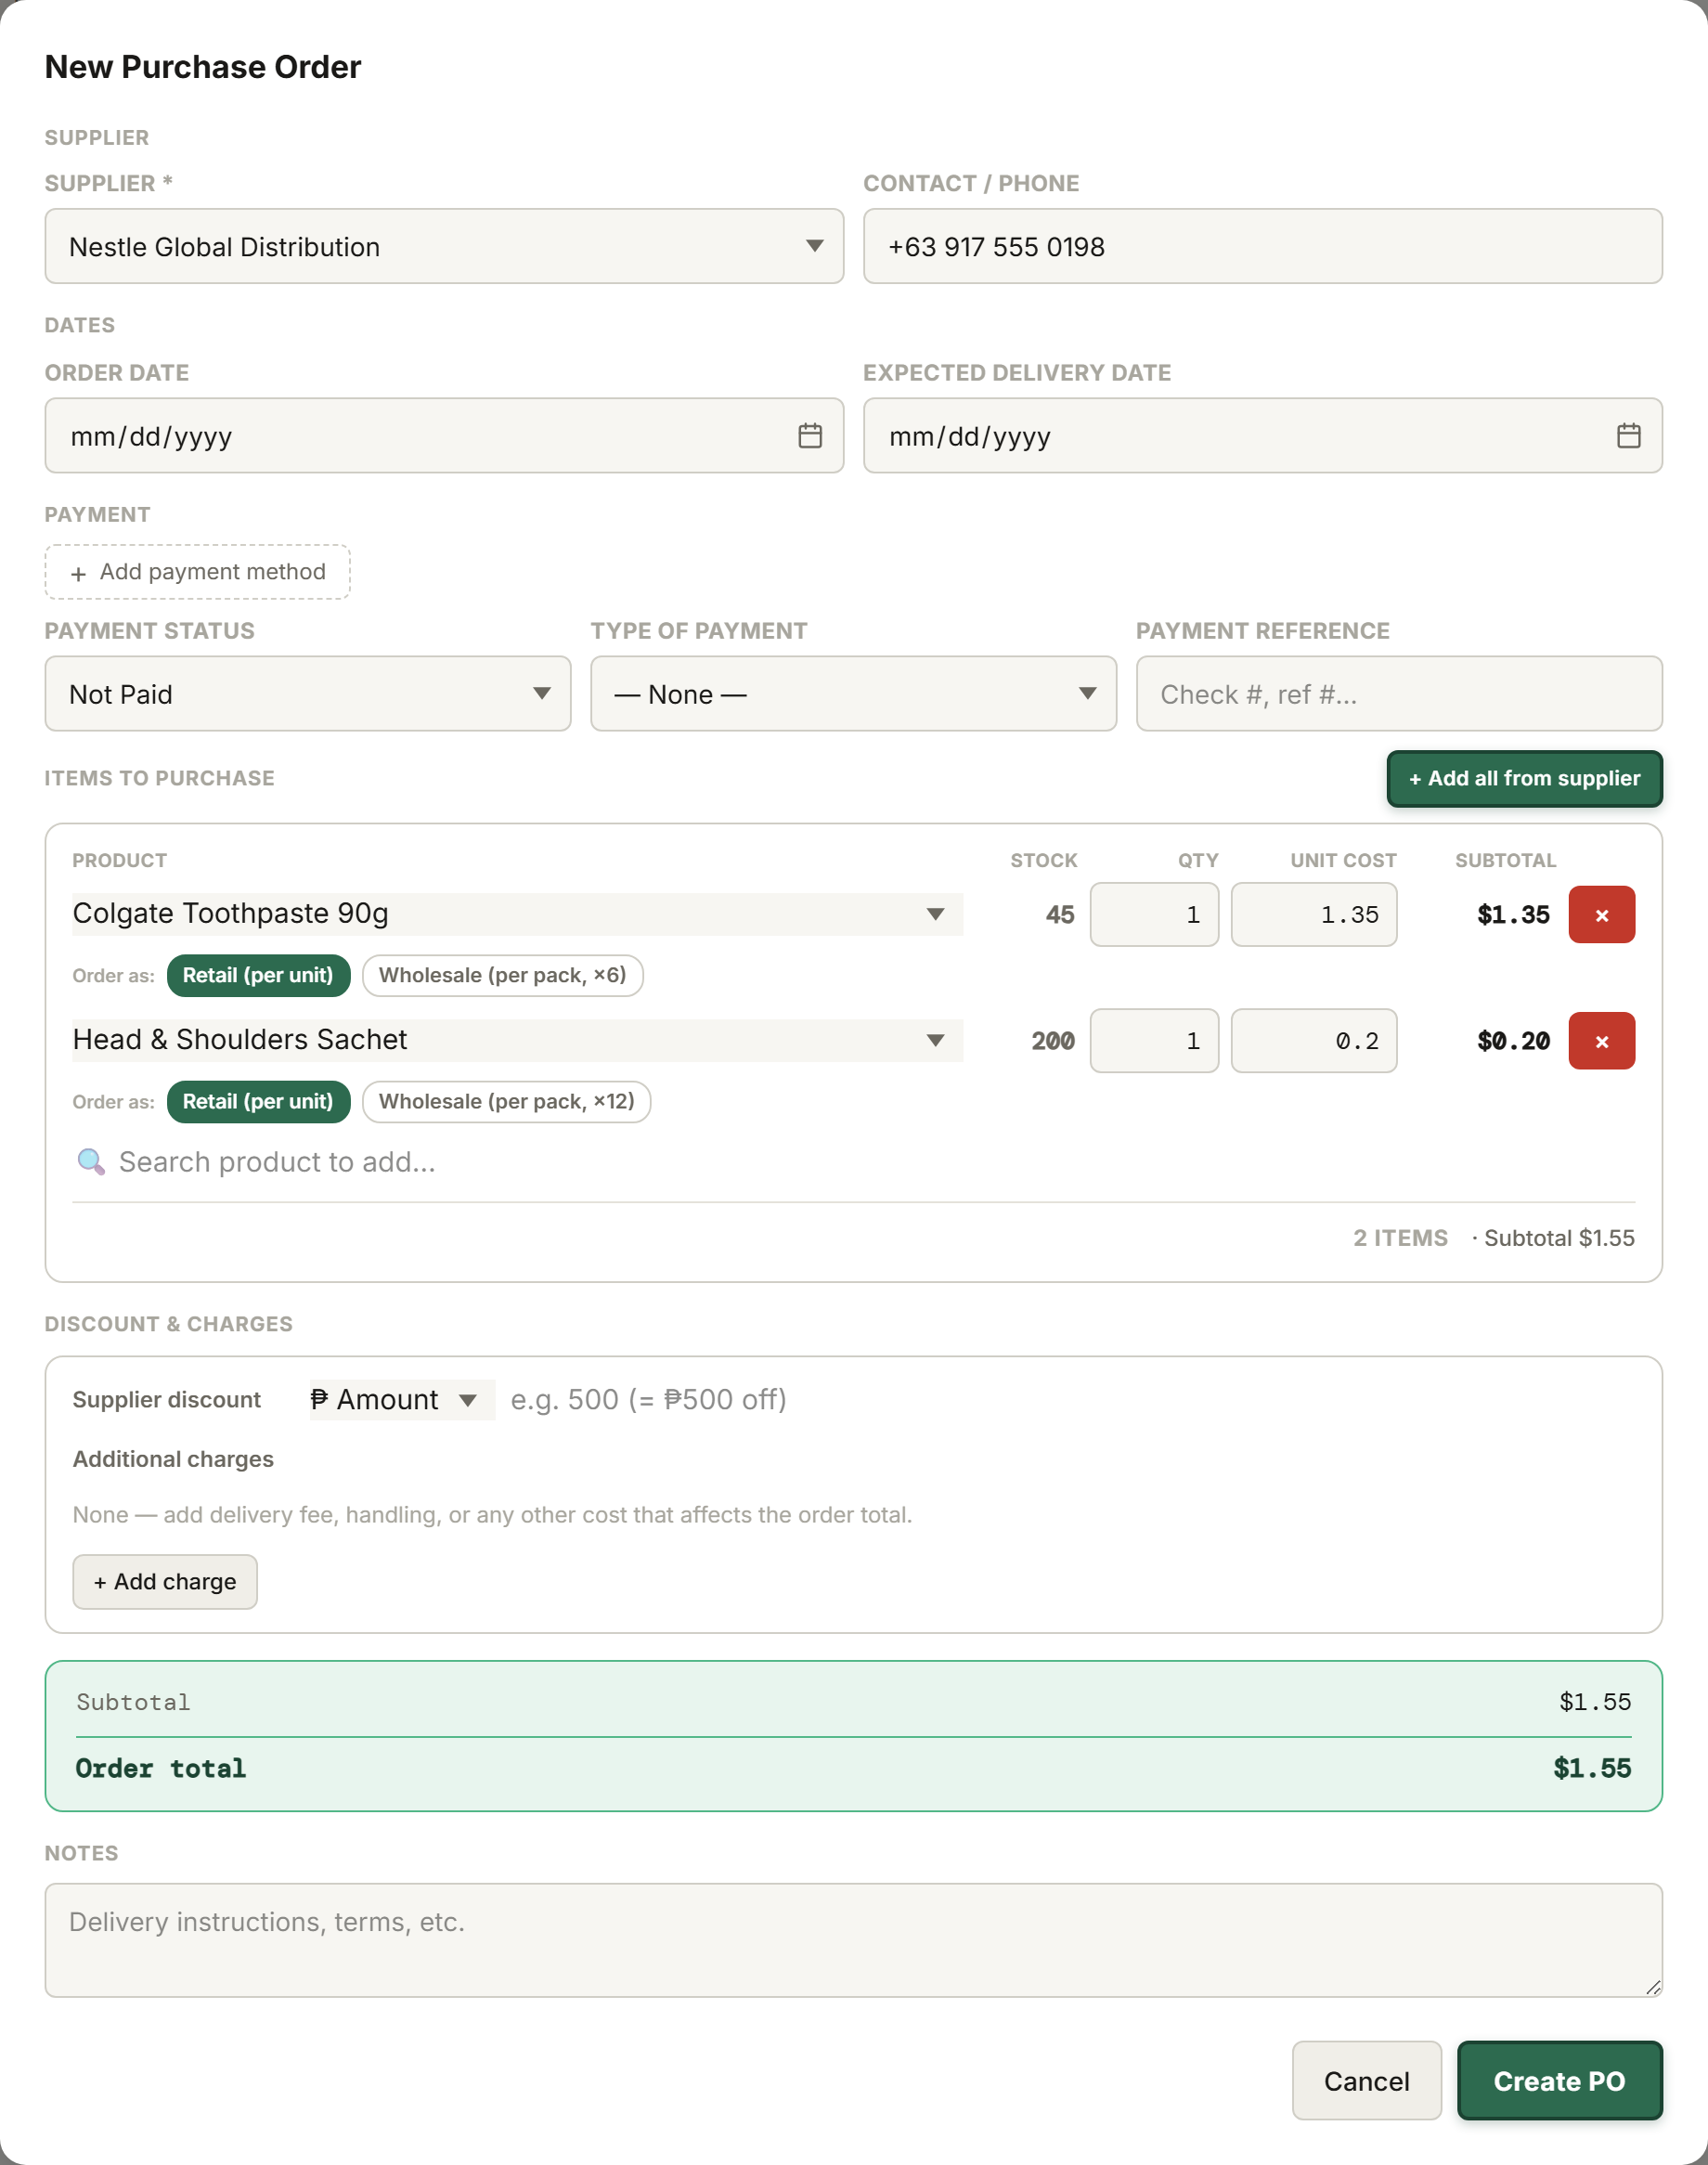
Purchase orders: ordering & receiving stock
When it's time to order from a supplier, Purchase Orders keep the whole process (order, delivery, payment) in one place.
Start a new PO, pick your supplier, and add each product with the quantity you're ordering. Cost prices pull in automatically but can be adjusted.
Mark it Sent once confirmed. When delivery arrives, open the PO and mark it Received: enter the actual quantities that showed up, since deliveries don't always match exactly. Stock updates the moment you confirm receiving.
Record payments against the PO as you pay the supplier, in full or in installments, you'll always see what's still outstanding.
Every PO's status (Draft, Sent, Received, Paid) is visible at a glance across your Purchases list.
Creating a PO: cost prices pull in automatically, adjustable per line.
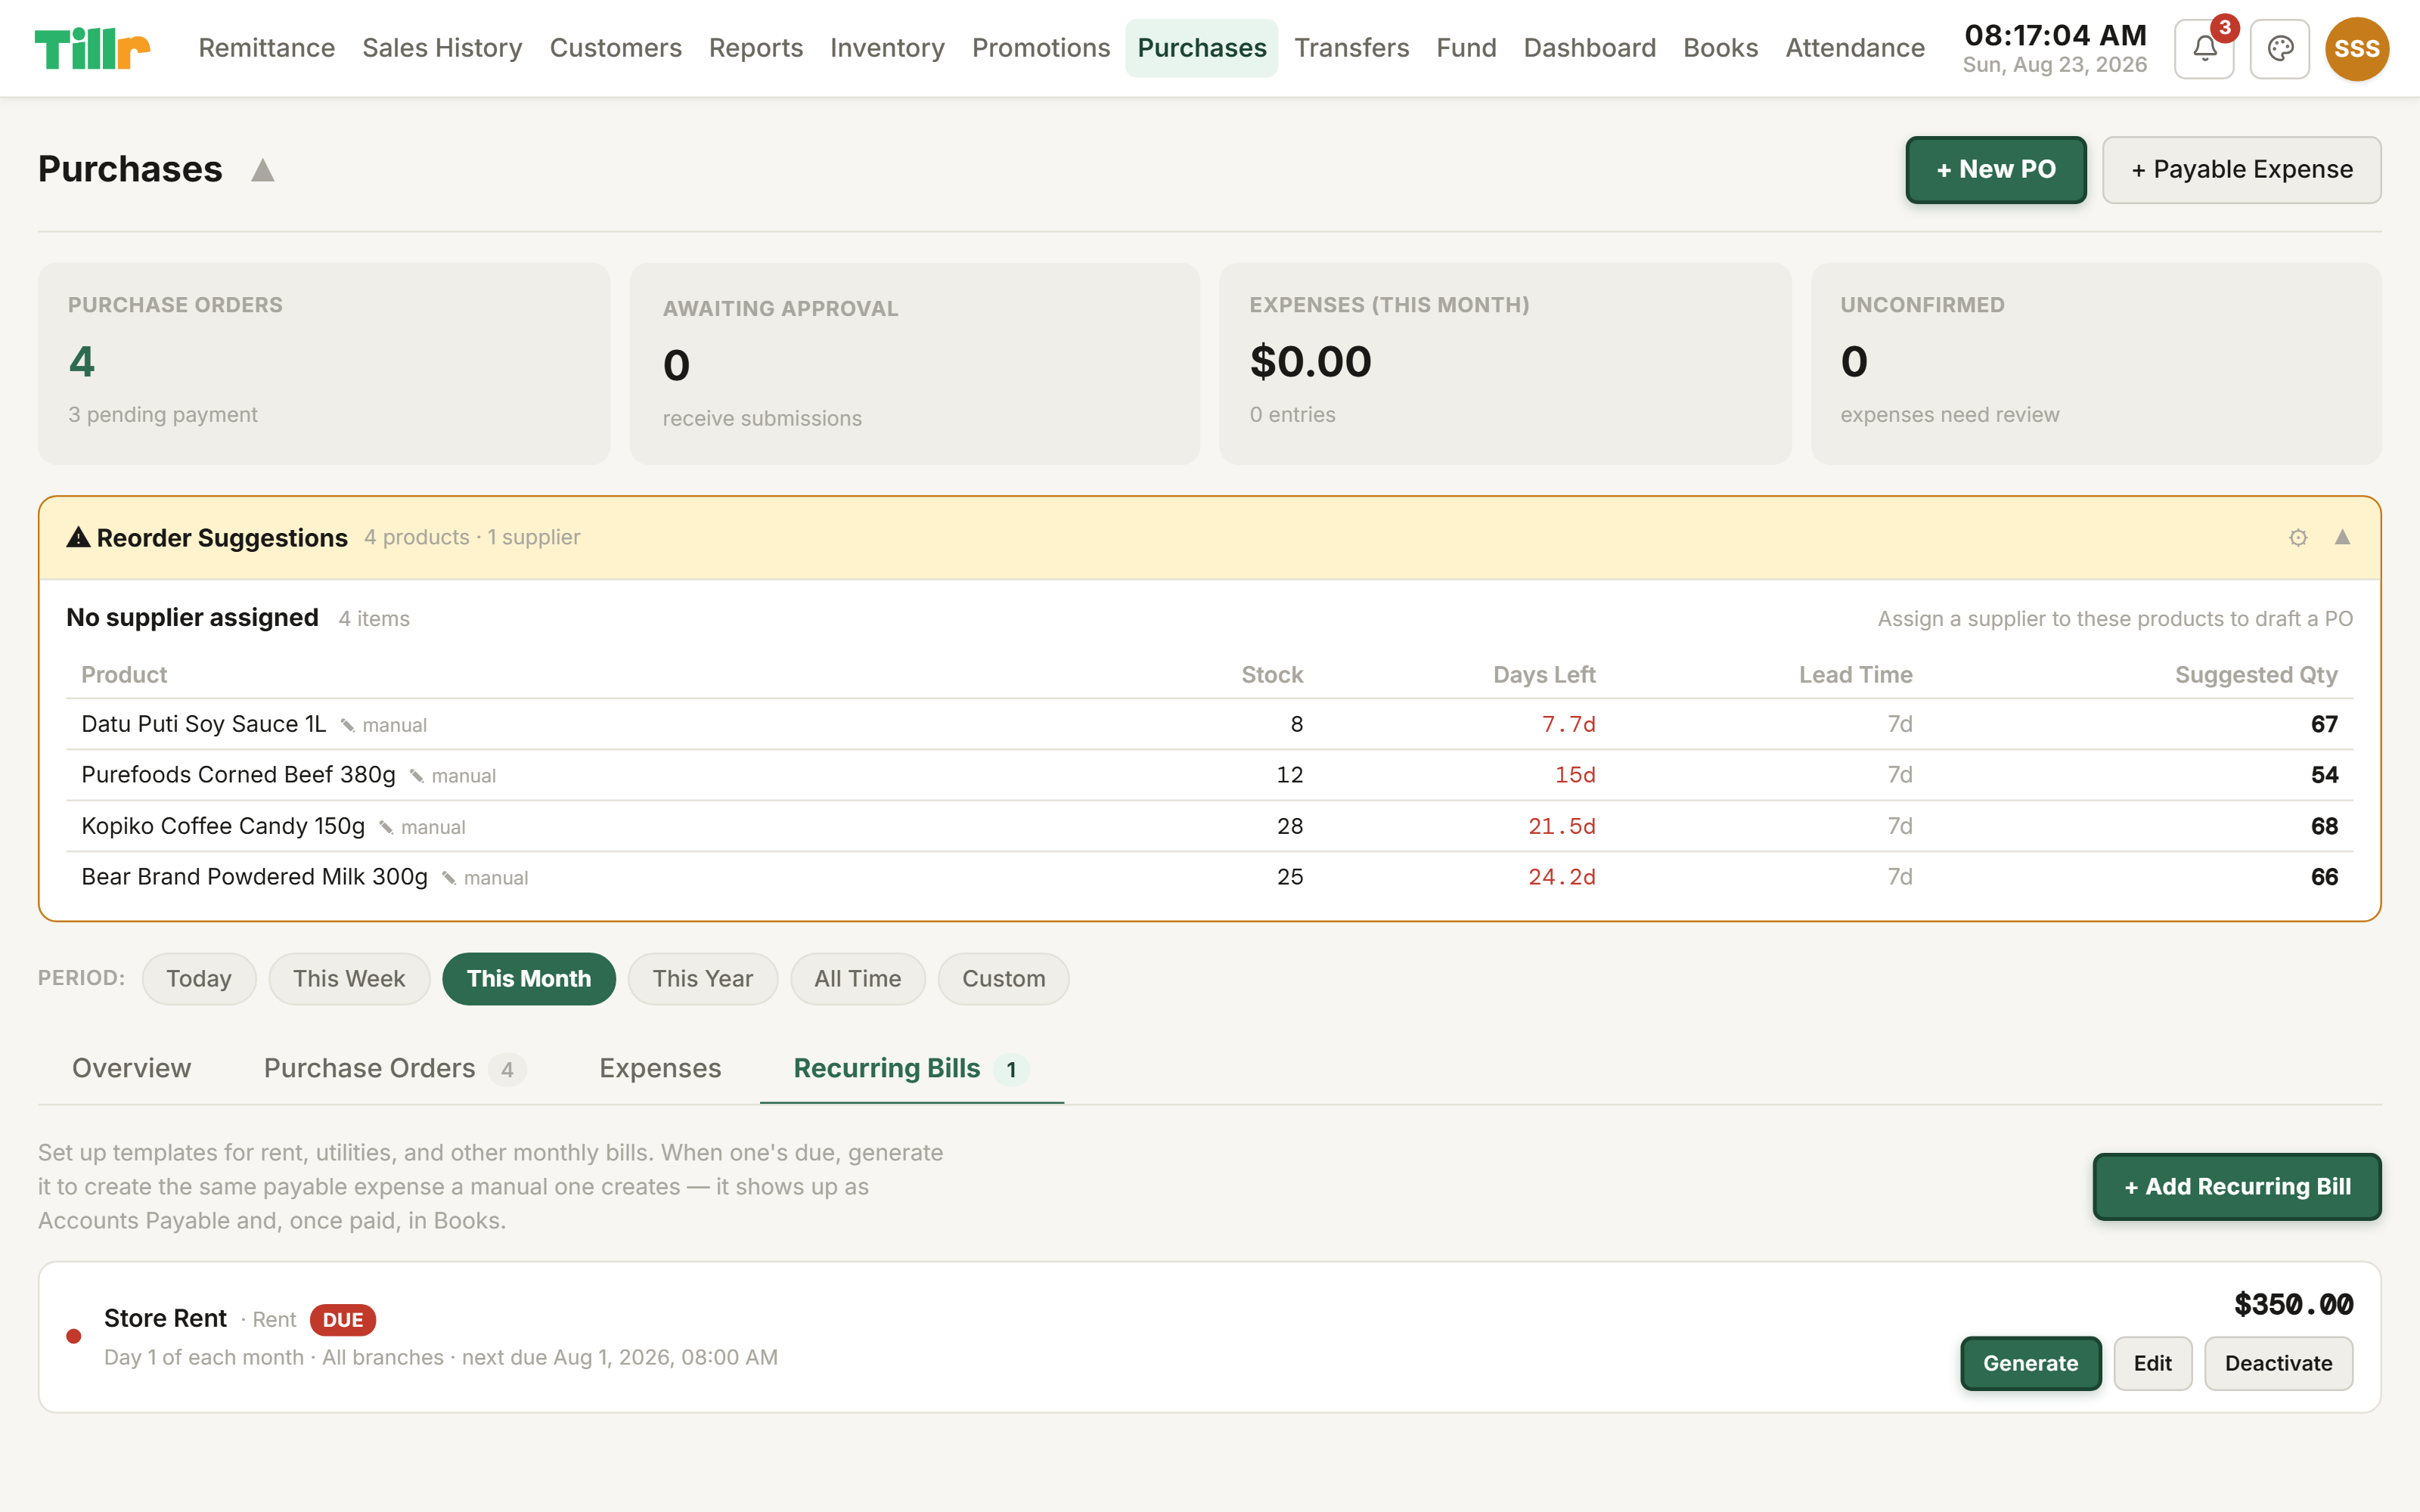
Setting up recurring bills
Rent, electricity, internet: the same bill, due on roughly the same date every month, doesn't deserve a fresh Purchase Order typed out by hand each time.
On the Purchases page, open the Recurring tab and add a bill: a name, a category, the usual amount, and which day of the month it's due.
When a bill's due date arrives, Tillr flags it as due. It never generates or charges anything on its own without you confirming first.
Tap Generate and it creates a proper Payable Expense purchase order for that period, ready to pay down like any other PO. It shows up in your Books report the same way, too.
Fallen behind, or only just set one up? Generating catches up every period still outstanding, not just the most recent one.
Recurring Bills: due bills are flagged, nothing generates until you confirm it.
05
Multi-Branch & Staff
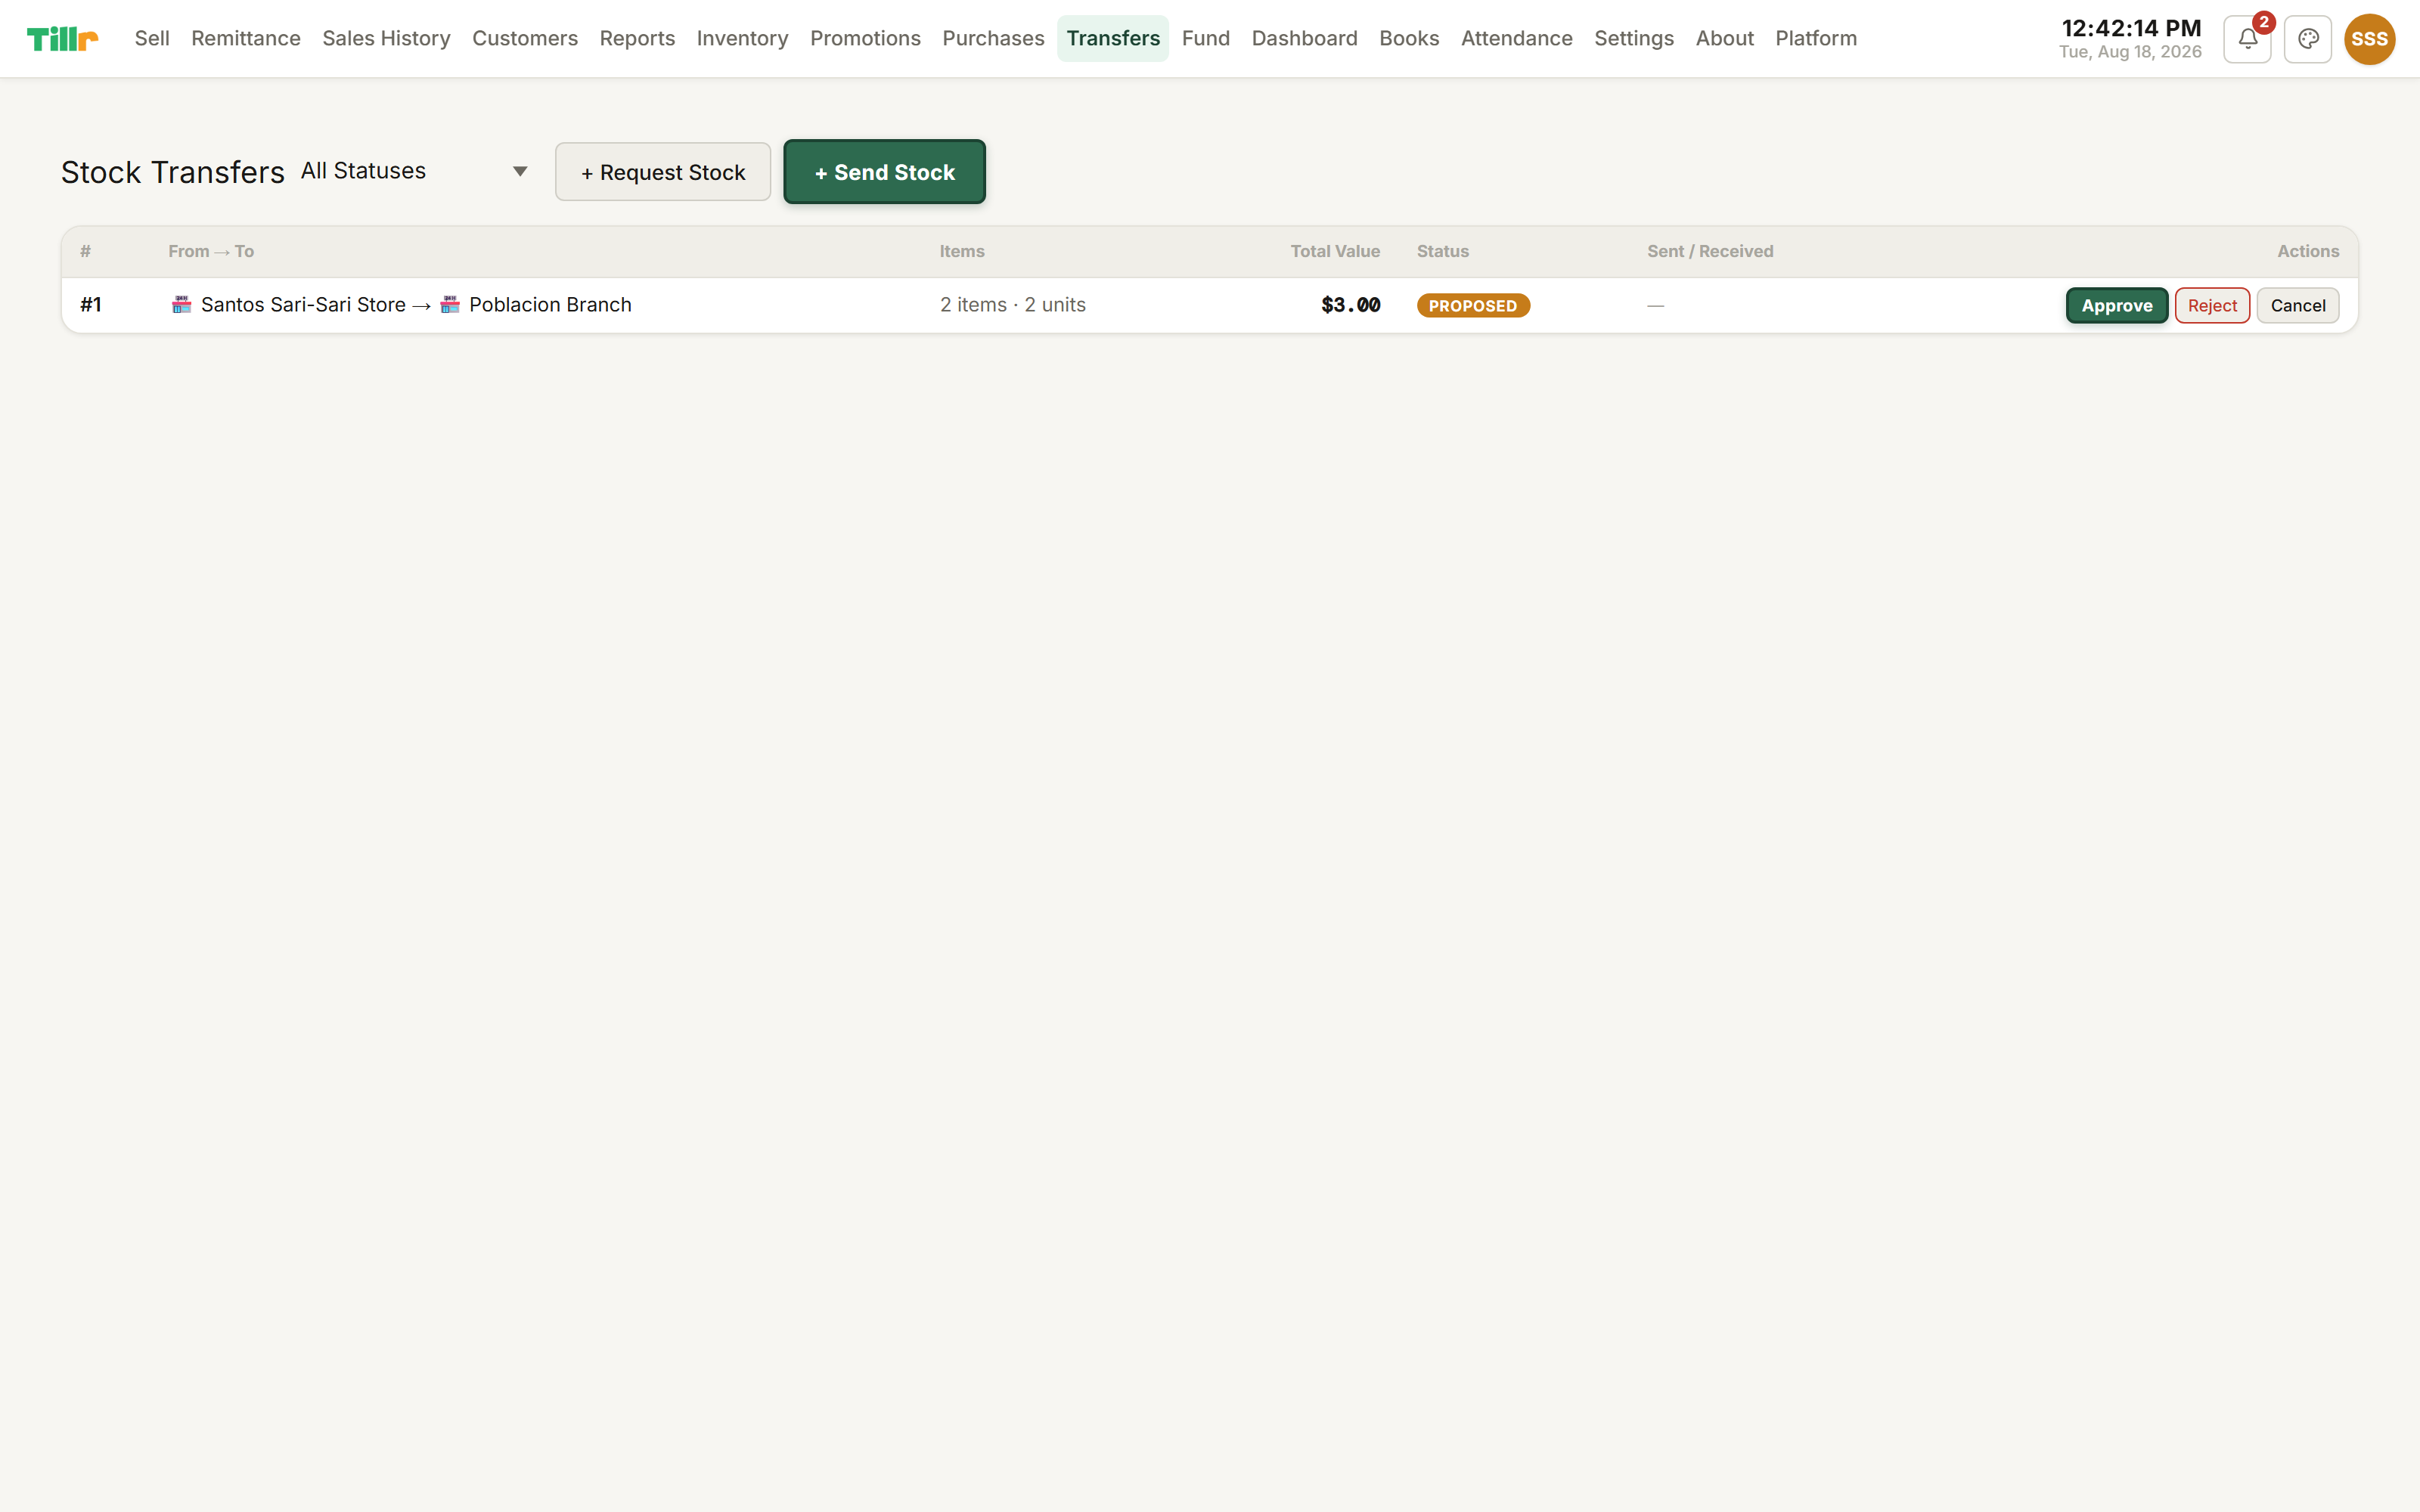
Multi-branch setup & stock transfers Premium
Running more than one store, or a store plus a warehouse? Tillr handles that as one account, with stock tracked separately per location.
Add each location in Settings under Branches. If it's a storage warehouse rather than a selling location, flip Is Warehouse on. Each branch gets its own stock counts.
To move stock between locations, go to Transfers. If you're sending stock out, tap Send Stock, pick the destination and what's going, and propose the transfer. If your branch needs stock, tap Request Stock instead.
Once approved and sent, the receiving branch marks it received: stock moves down at the source, up at the destination, with a full record of who moved what, when.
On the Inventory page, a branch selector lets you view one location's stock or the combined total across all of them.
Transfers: send or request stock between locations, tracked end to end.
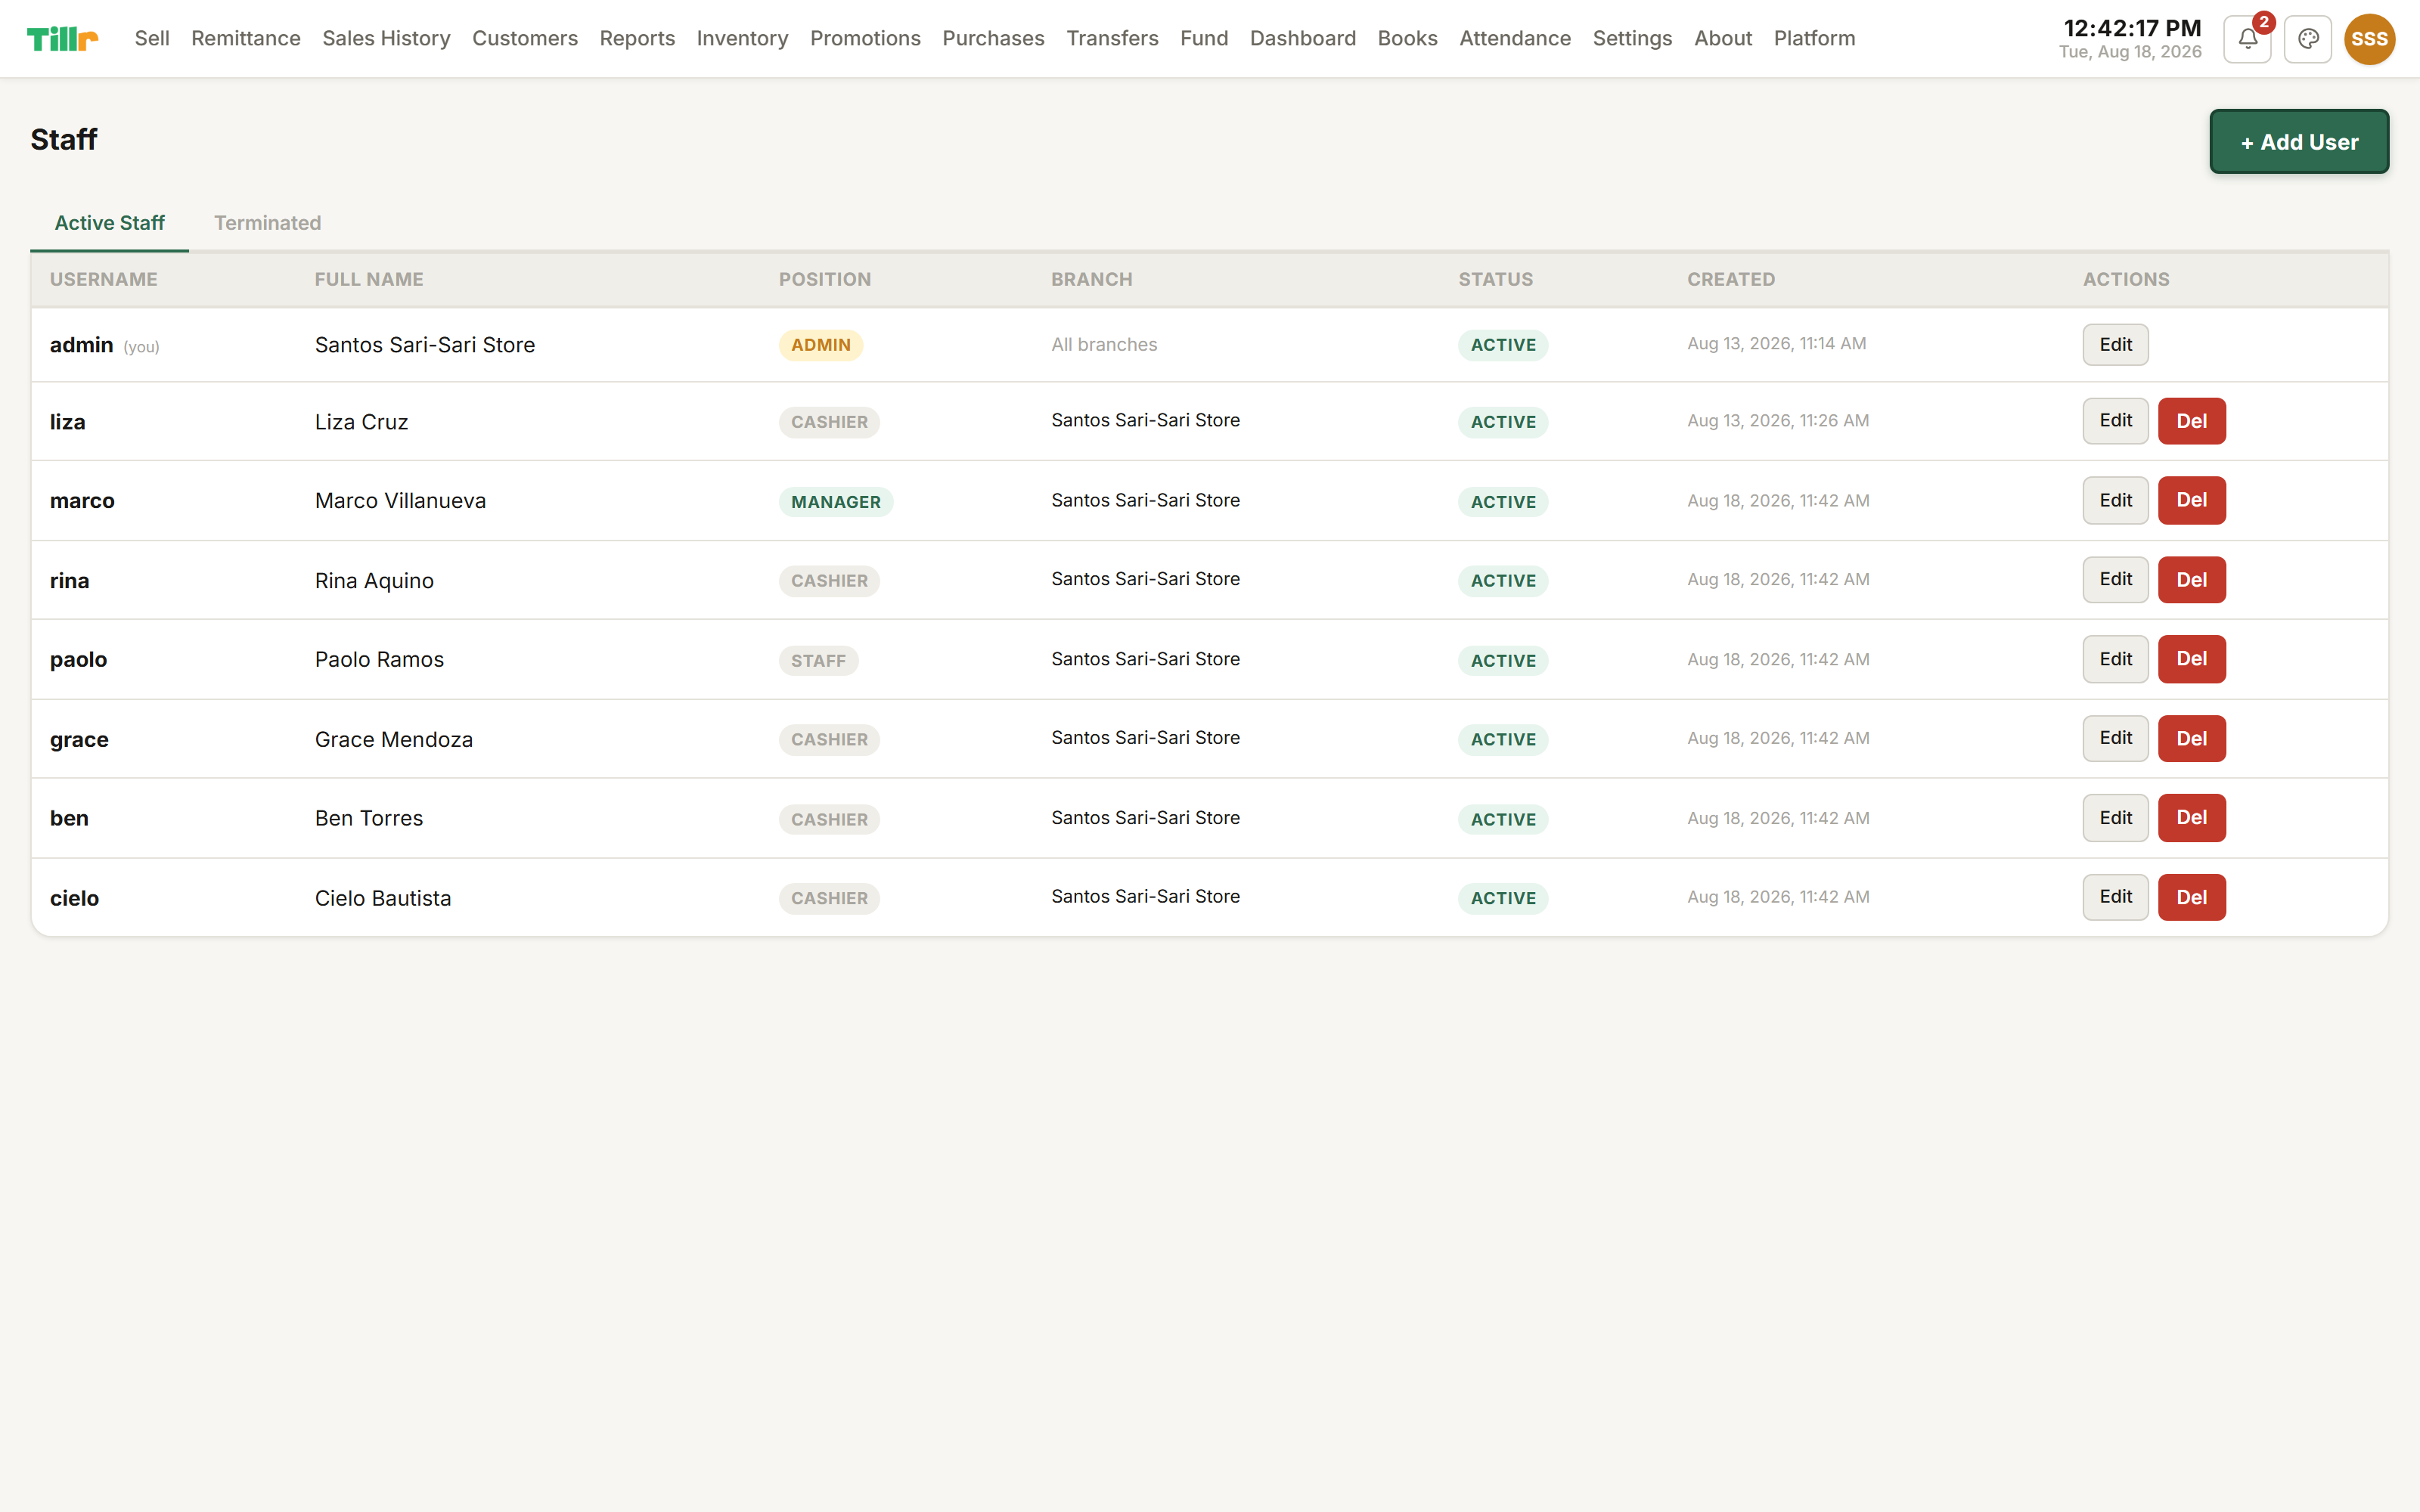
Adding staff & setting roles
Every person who touches your register should have their own login.
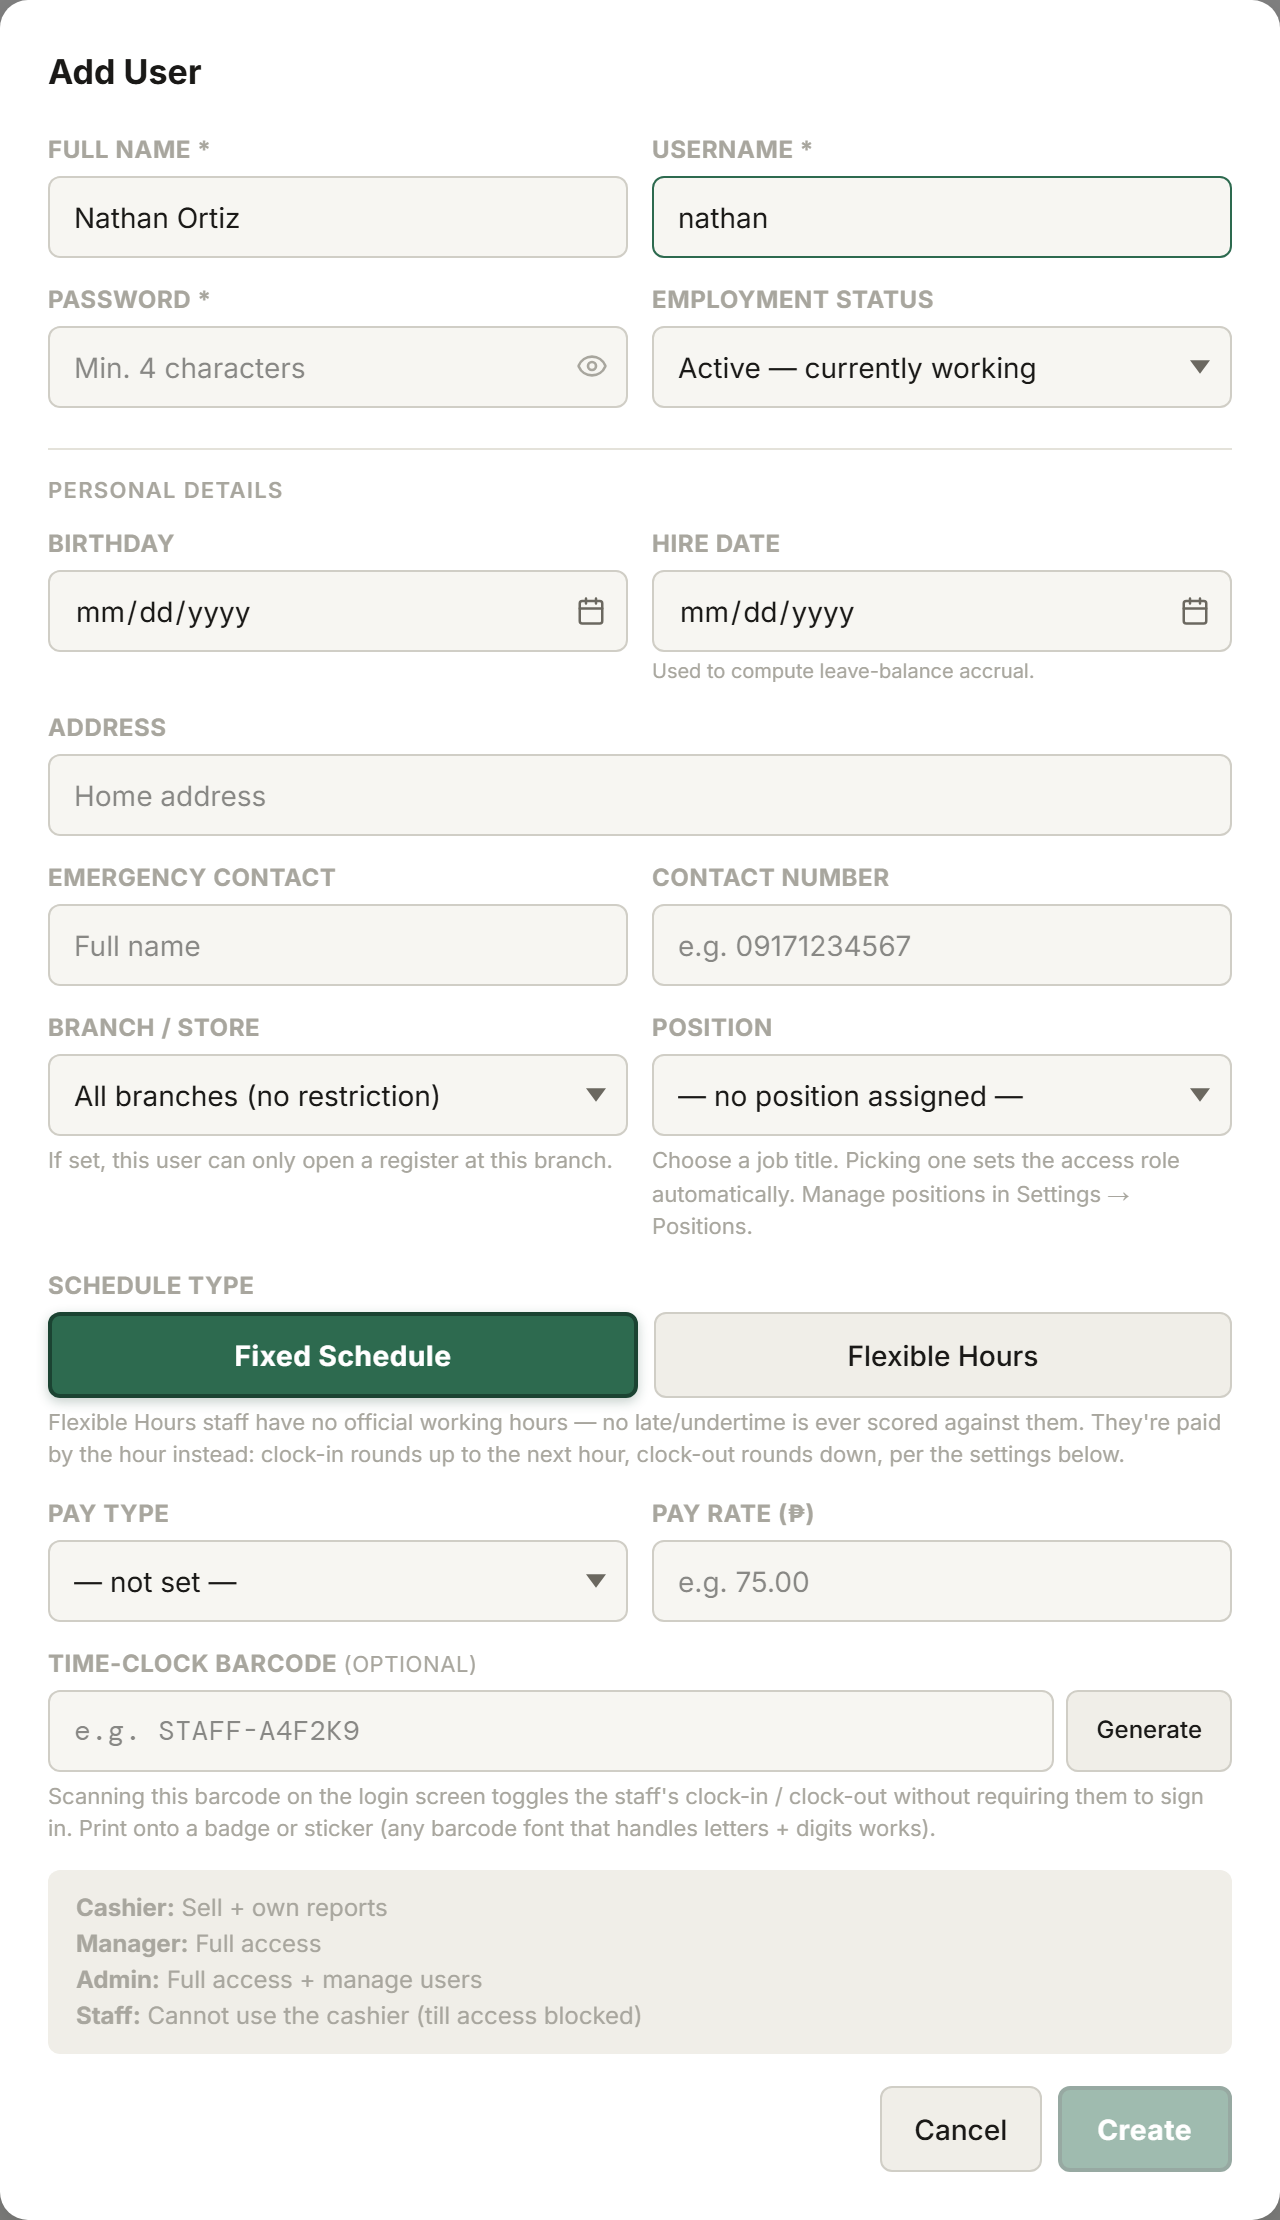
Add a new user, give them a name and login, and assign a position. Five access levels ship by default: Cashier (sells, clocks in/out), Manager (adds inventory, purchases, approvals), Multi-Branch Manager (oversight across a set of branches — see below), Staff (no till access, for stockroom/back-office work), or Admin (sees and controls everything, including billing).
What each role sees changes the interface itself, not just what buttons are enabled — a cashier's menu stays focused on selling and reporting; a manager's opens up inventory, purchases, and promotions too; a Multi-Branch Manager's is narrower again, showing only Dashboard, Books, and Attendance for the branches they oversee. If a staff member's menu looks unexpectedly short, check their assigned position first.
For extra security, lock a specific device to a specific branch: even a manager's login can't process a sale for a different store from the wrong PC.
Positions are reusable: set up "Cashier" once with the access level that fits your store, and every new hire in that role inherits it automatically. Each access level's exact page access is spelled out right next to the picker when you create or edit a position, in Settings → Positions.
The Staff list: every login, their position, branch, and status at a glance.
Adding a new user: personal details, branch assignment, position, and schedule type.
Time clock, schedules & attendance Premium
Attendance in Tillr starts right at login: staff clock in and out with a quick barcode scan, no separate app needed.
Once logged in, the Time Clock panel shows a simple clock-in button and, once on shift, a running timer.
Managers set fixed schedules per employee under Attendance → Schedules, including a grace period so a five-minute late arrival doesn't automatically flag as tardy.
For roles that genuinely don't run on a fixed shift, switch that employee to Flexible Hours instead: no lateness or undertime is scored at all, and pay is simply their clocked time rounded to whatever interval you set.
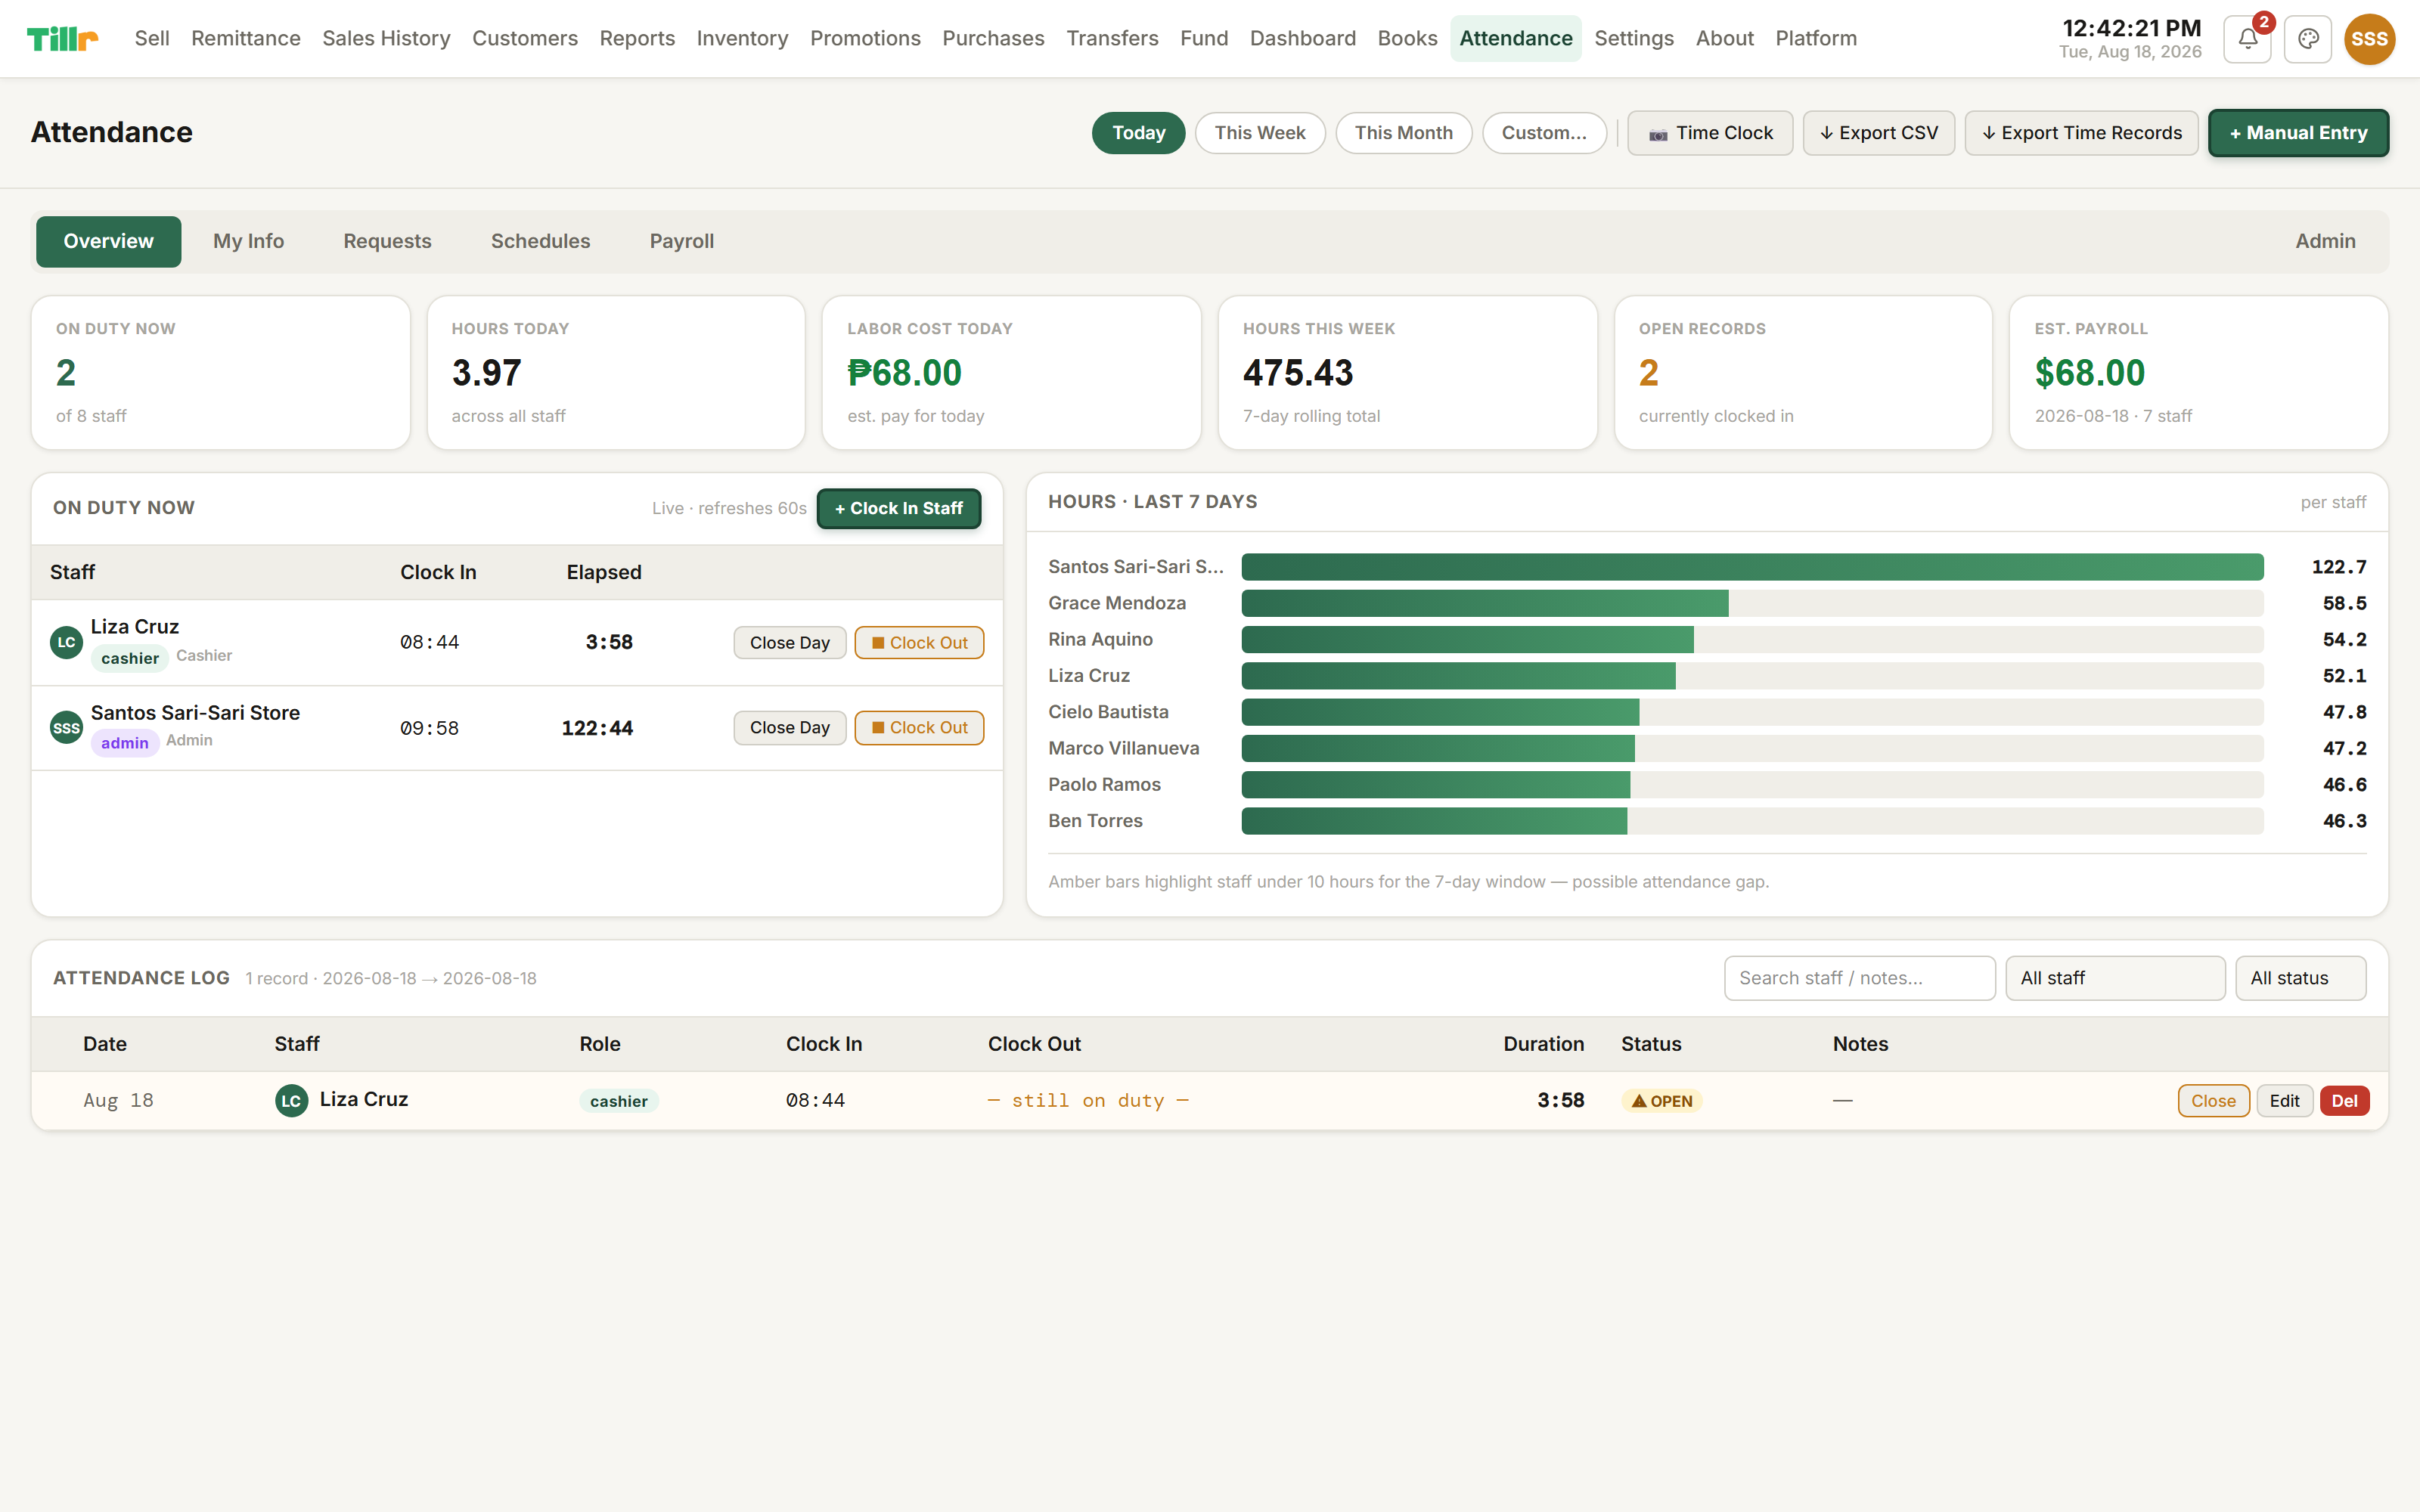
The Overview tab shows every staff member's hours, lateness, and status for any date range.
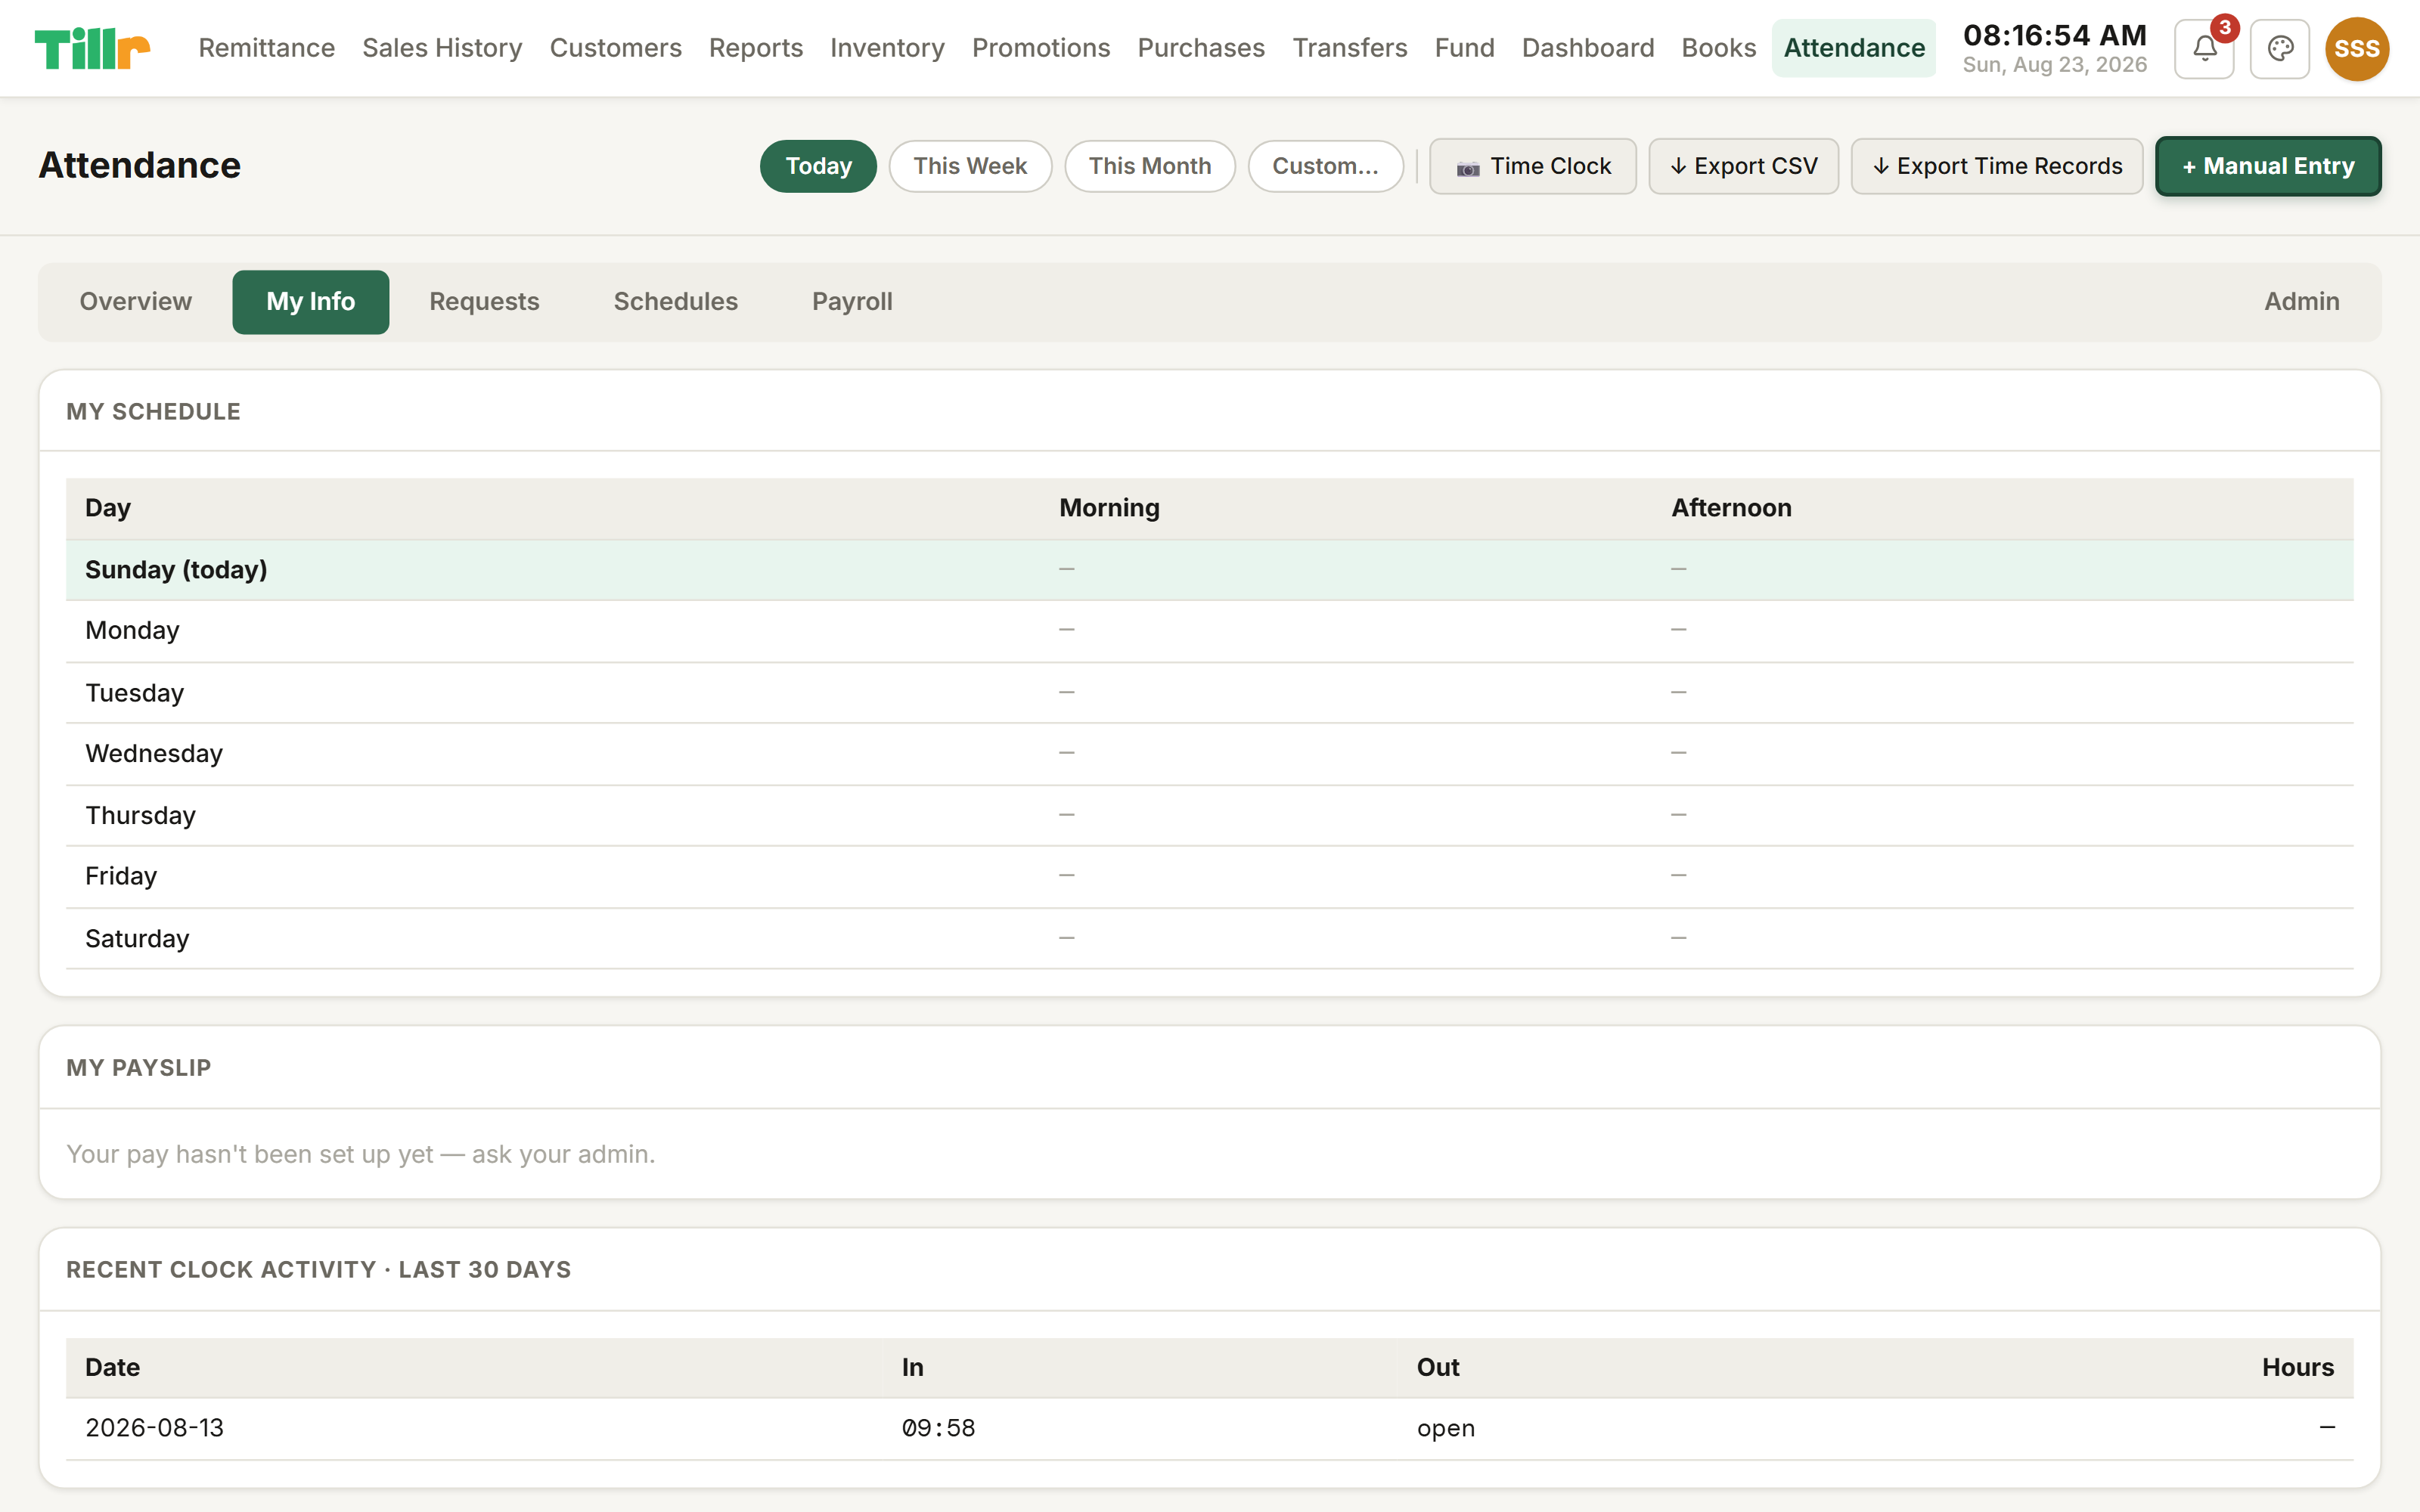
Every staff member has their own My Info tab to check their own schedule and clock history.
Attendance overview: who's clocked in, who's finished, and hours this week.
Running payroll Premium
Payroll pulls directly from the same clock-in data your staff already generated, no re-entering hours by hand.
Set each staff member up once with a pay type (hourly, daily, monthly) and a pay schedule (weekly, bi-monthly, or custom).
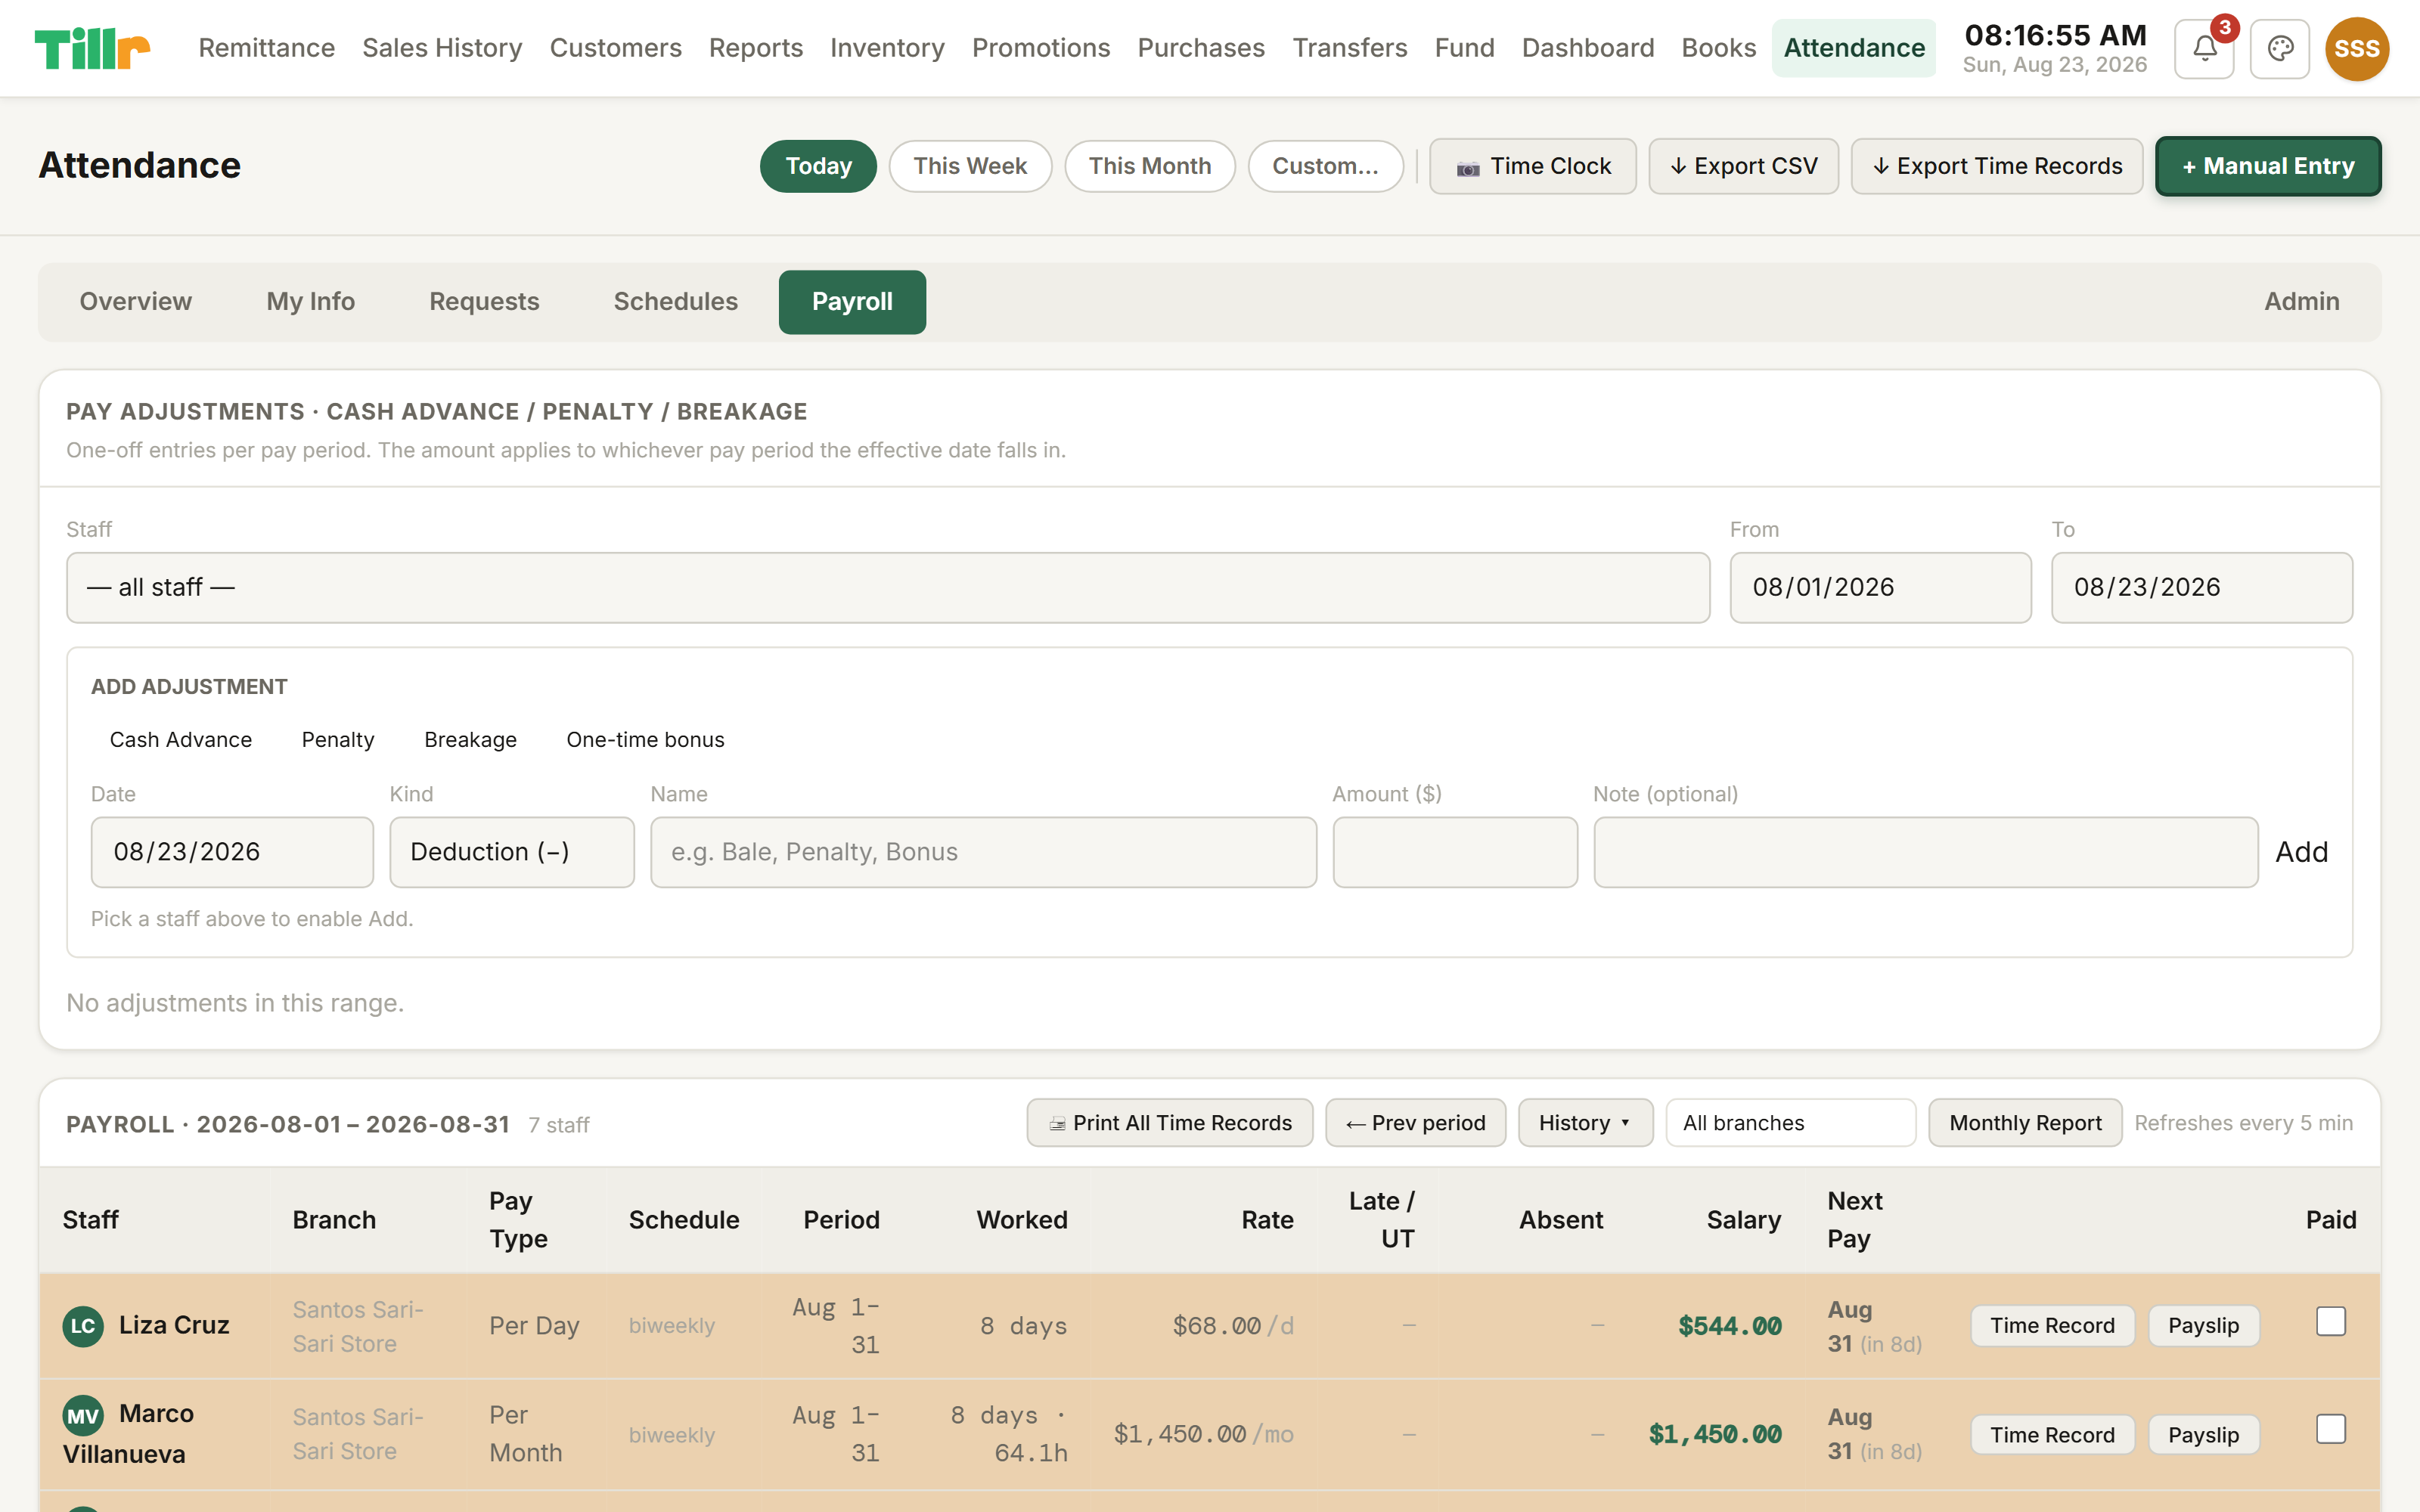
Pick a pay period. Tillr computes gross pay from actual clocked hours, applies leave used, late deductions, or shortage deductions on record, and shows net pay per person.
Open any employee's payslip for a full, printable breakdown: hours, leave balance, every deduction spelled out.
Once a period's settled, tap Lock to freeze it as a permanent snapshot: a later change to a pay rate or a policy can never quietly rewrite what someone was actually paid. A separate Mark as Paid checkbox just tracks whether that person's actually been handed their pay yet, independent of the lock.
Export official time records for one employee or your whole team at once, for your own records or an accountant.
Payroll: gross pay computed straight from real clock-in data, per employee.
Leave requests & approvals Premium
Staff don't need to interrupt you mid-shift to ask for a day off: leave requests run right through the app.
From their own login, a staff member files a request: pick dates, add a reason, submit. Their current leave balance shows right there.
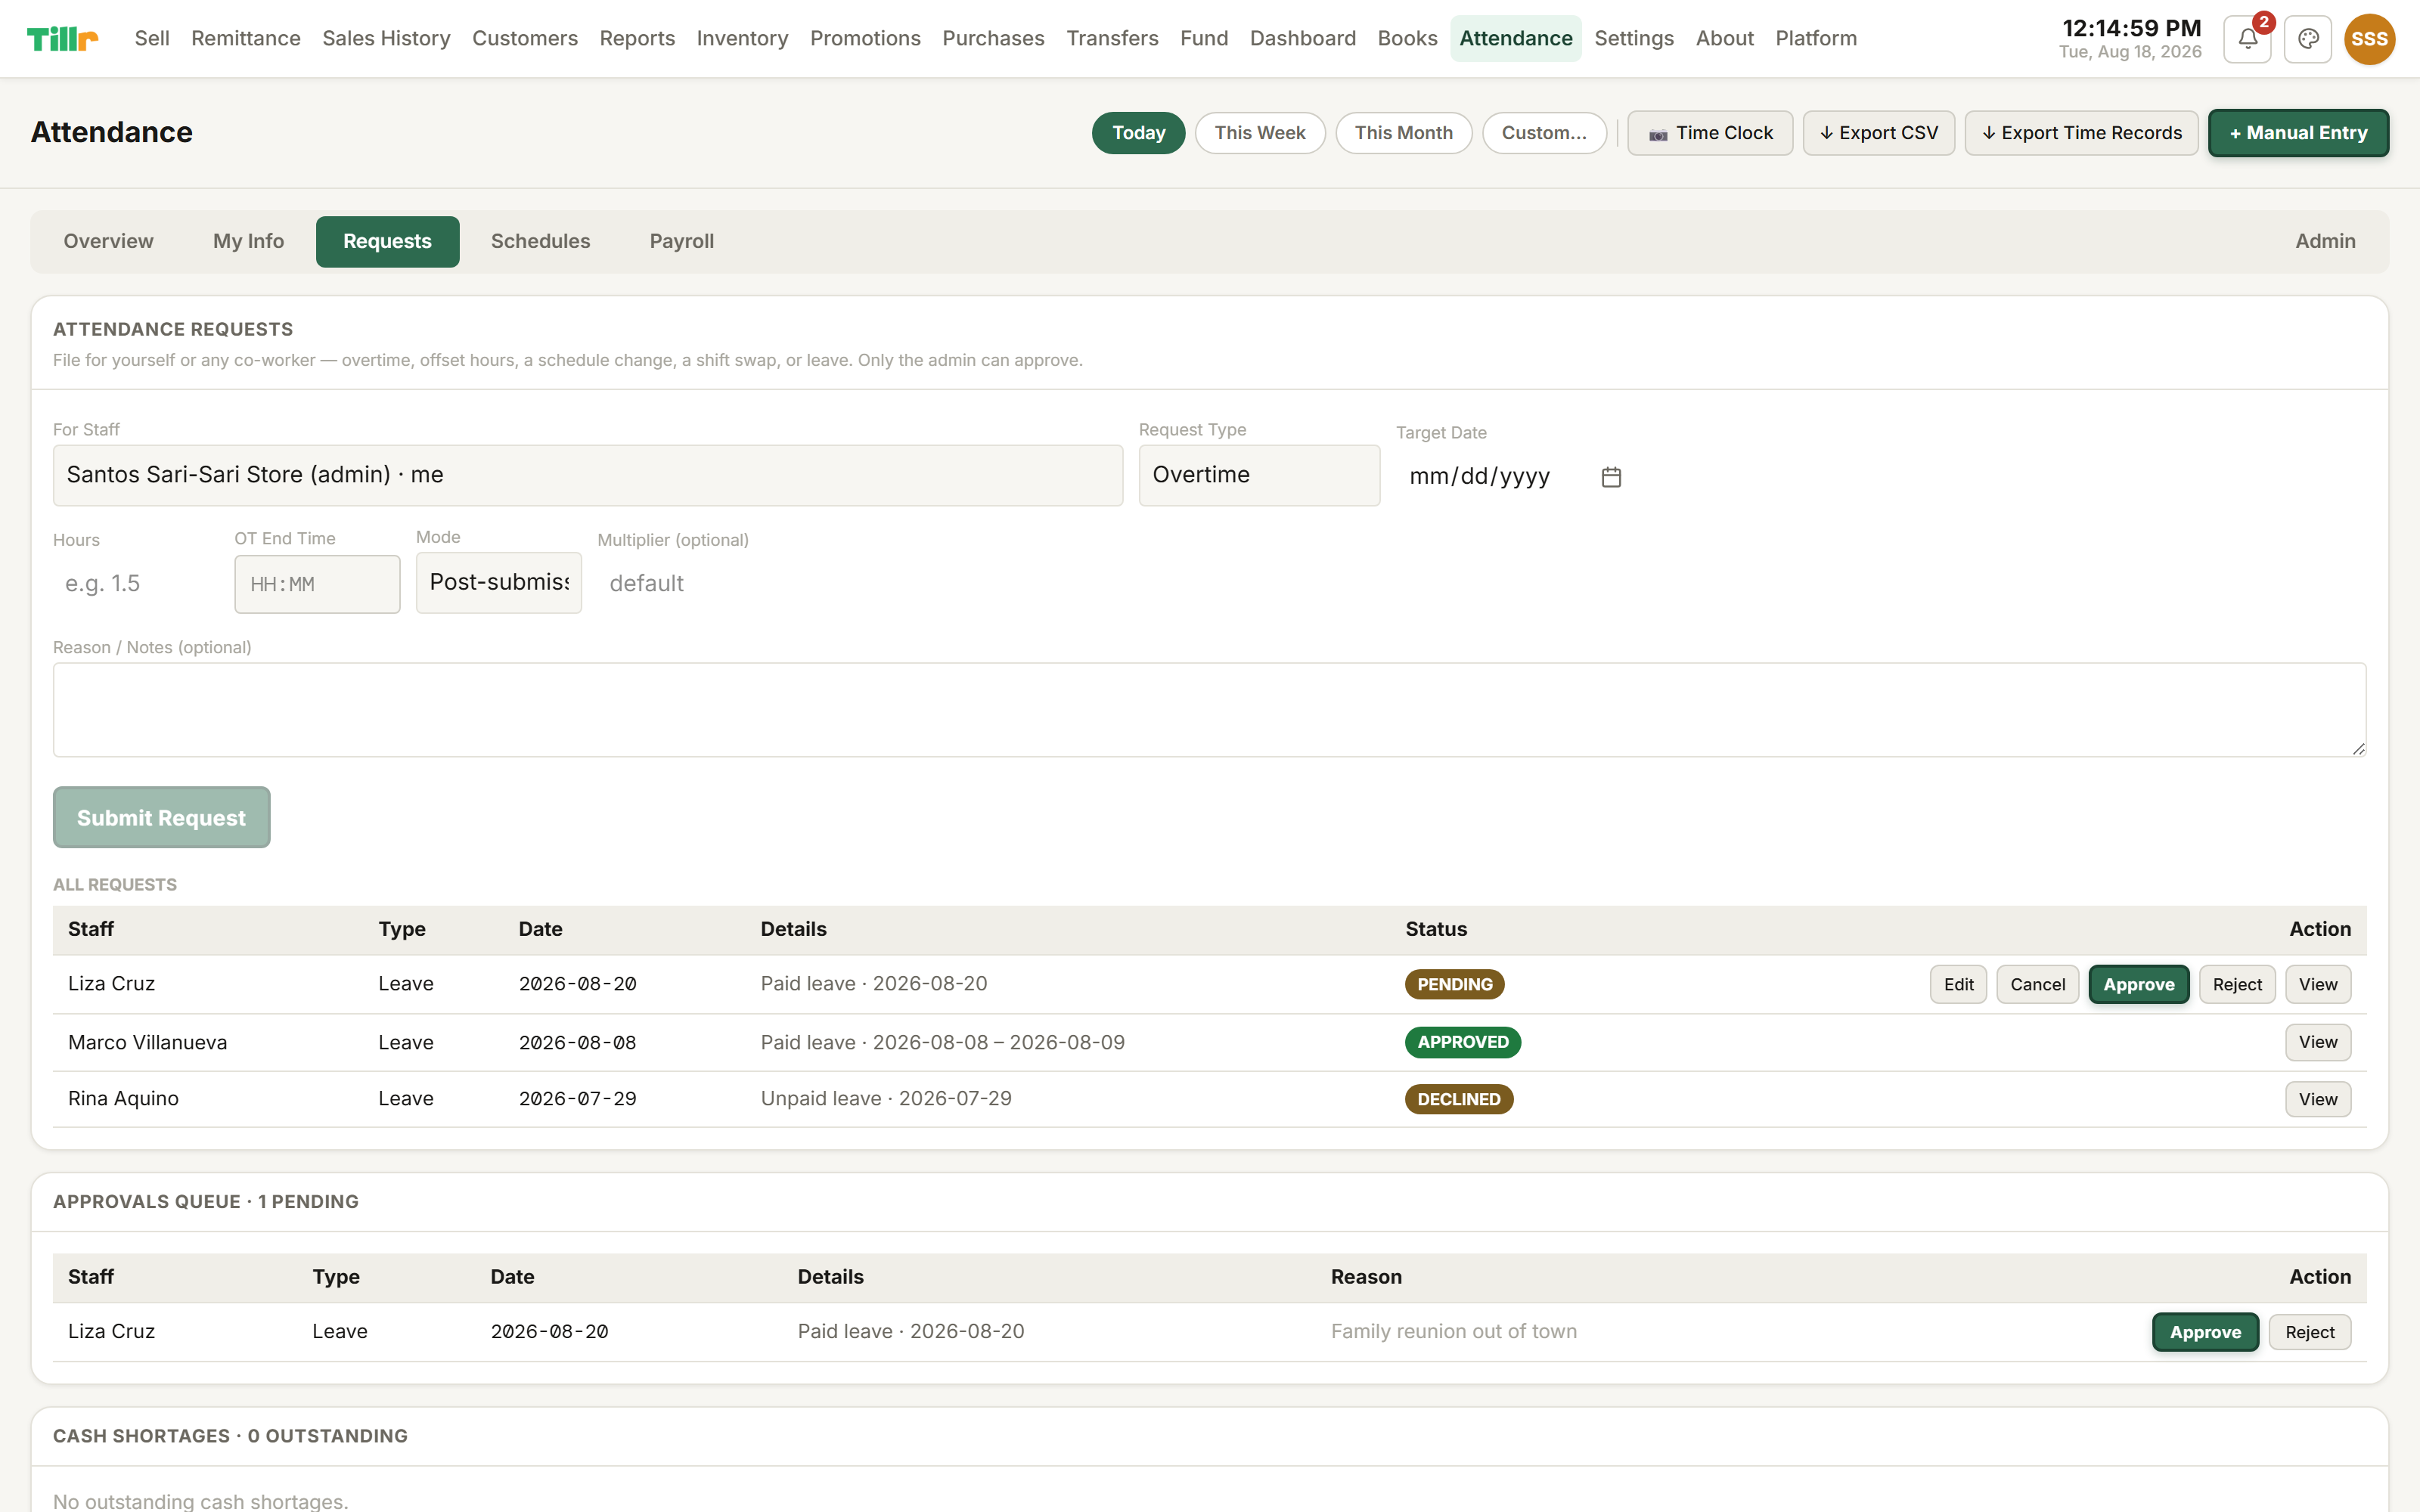
On the manager side, pending requests land in the Requests tab: approve or decline with a tap. The staff member's schedule and balance update automatically.
Set your accrual policy once in Settings (how many days build up, on what schedule) and it applies consistently across your team.
Once approved, leave flows straight into payroll automatically.
The Requests tab: approve or decline with a tap, balances update automatically.
The Multi-Branch Manager role Premium
Running three or four branches but don't want to hand any one person full admin access to your whole account, billing included? This role is built for exactly that.
Add or edit a staff member and set their position to Multi-Branch Manager.
Choose exactly which branches they can see and act on. It's an allow-list: leave a branch unchecked and it's simply invisible to them, not just restricted.
Inside those branches, they get real manager-level power: viewing the dashboard, reading the Books (P&L) report, approving attendance and leave requests, deciding cash-shortage cases, all scoped to their assigned locations only.
This is an oversight role, not a till role — it deliberately gets only three tabs: Dashboard, Books, and Attendance. It does not include Sell, Inventory, Purchases, Promotions, or Transfers; if someone in this role also needs to work the register, give them a second, separate login with a Cashier or Manager position instead.
It's the middle ground between a single-branch manager and a full admin, useful the moment one person is genuinely overseeing more than one store.
Overtime, offset time, schedule changes & shift swaps Premium
Leave isn't the only thing staff can request through the app. Four more request types run through the exact same Requests tab.
Overtime: hours worked before or after a shift, at your configured OT rate, or a one-off rate for that specific request.
Offset: extra hours worked, paid at the plain hourly rate, no overtime premium.
Schedule Change: a one-off change to a specific day's in/out times, without touching the employee's regular weekly schedule.
Shift Swap: two staff members trade shifts, each on their own date if needed.
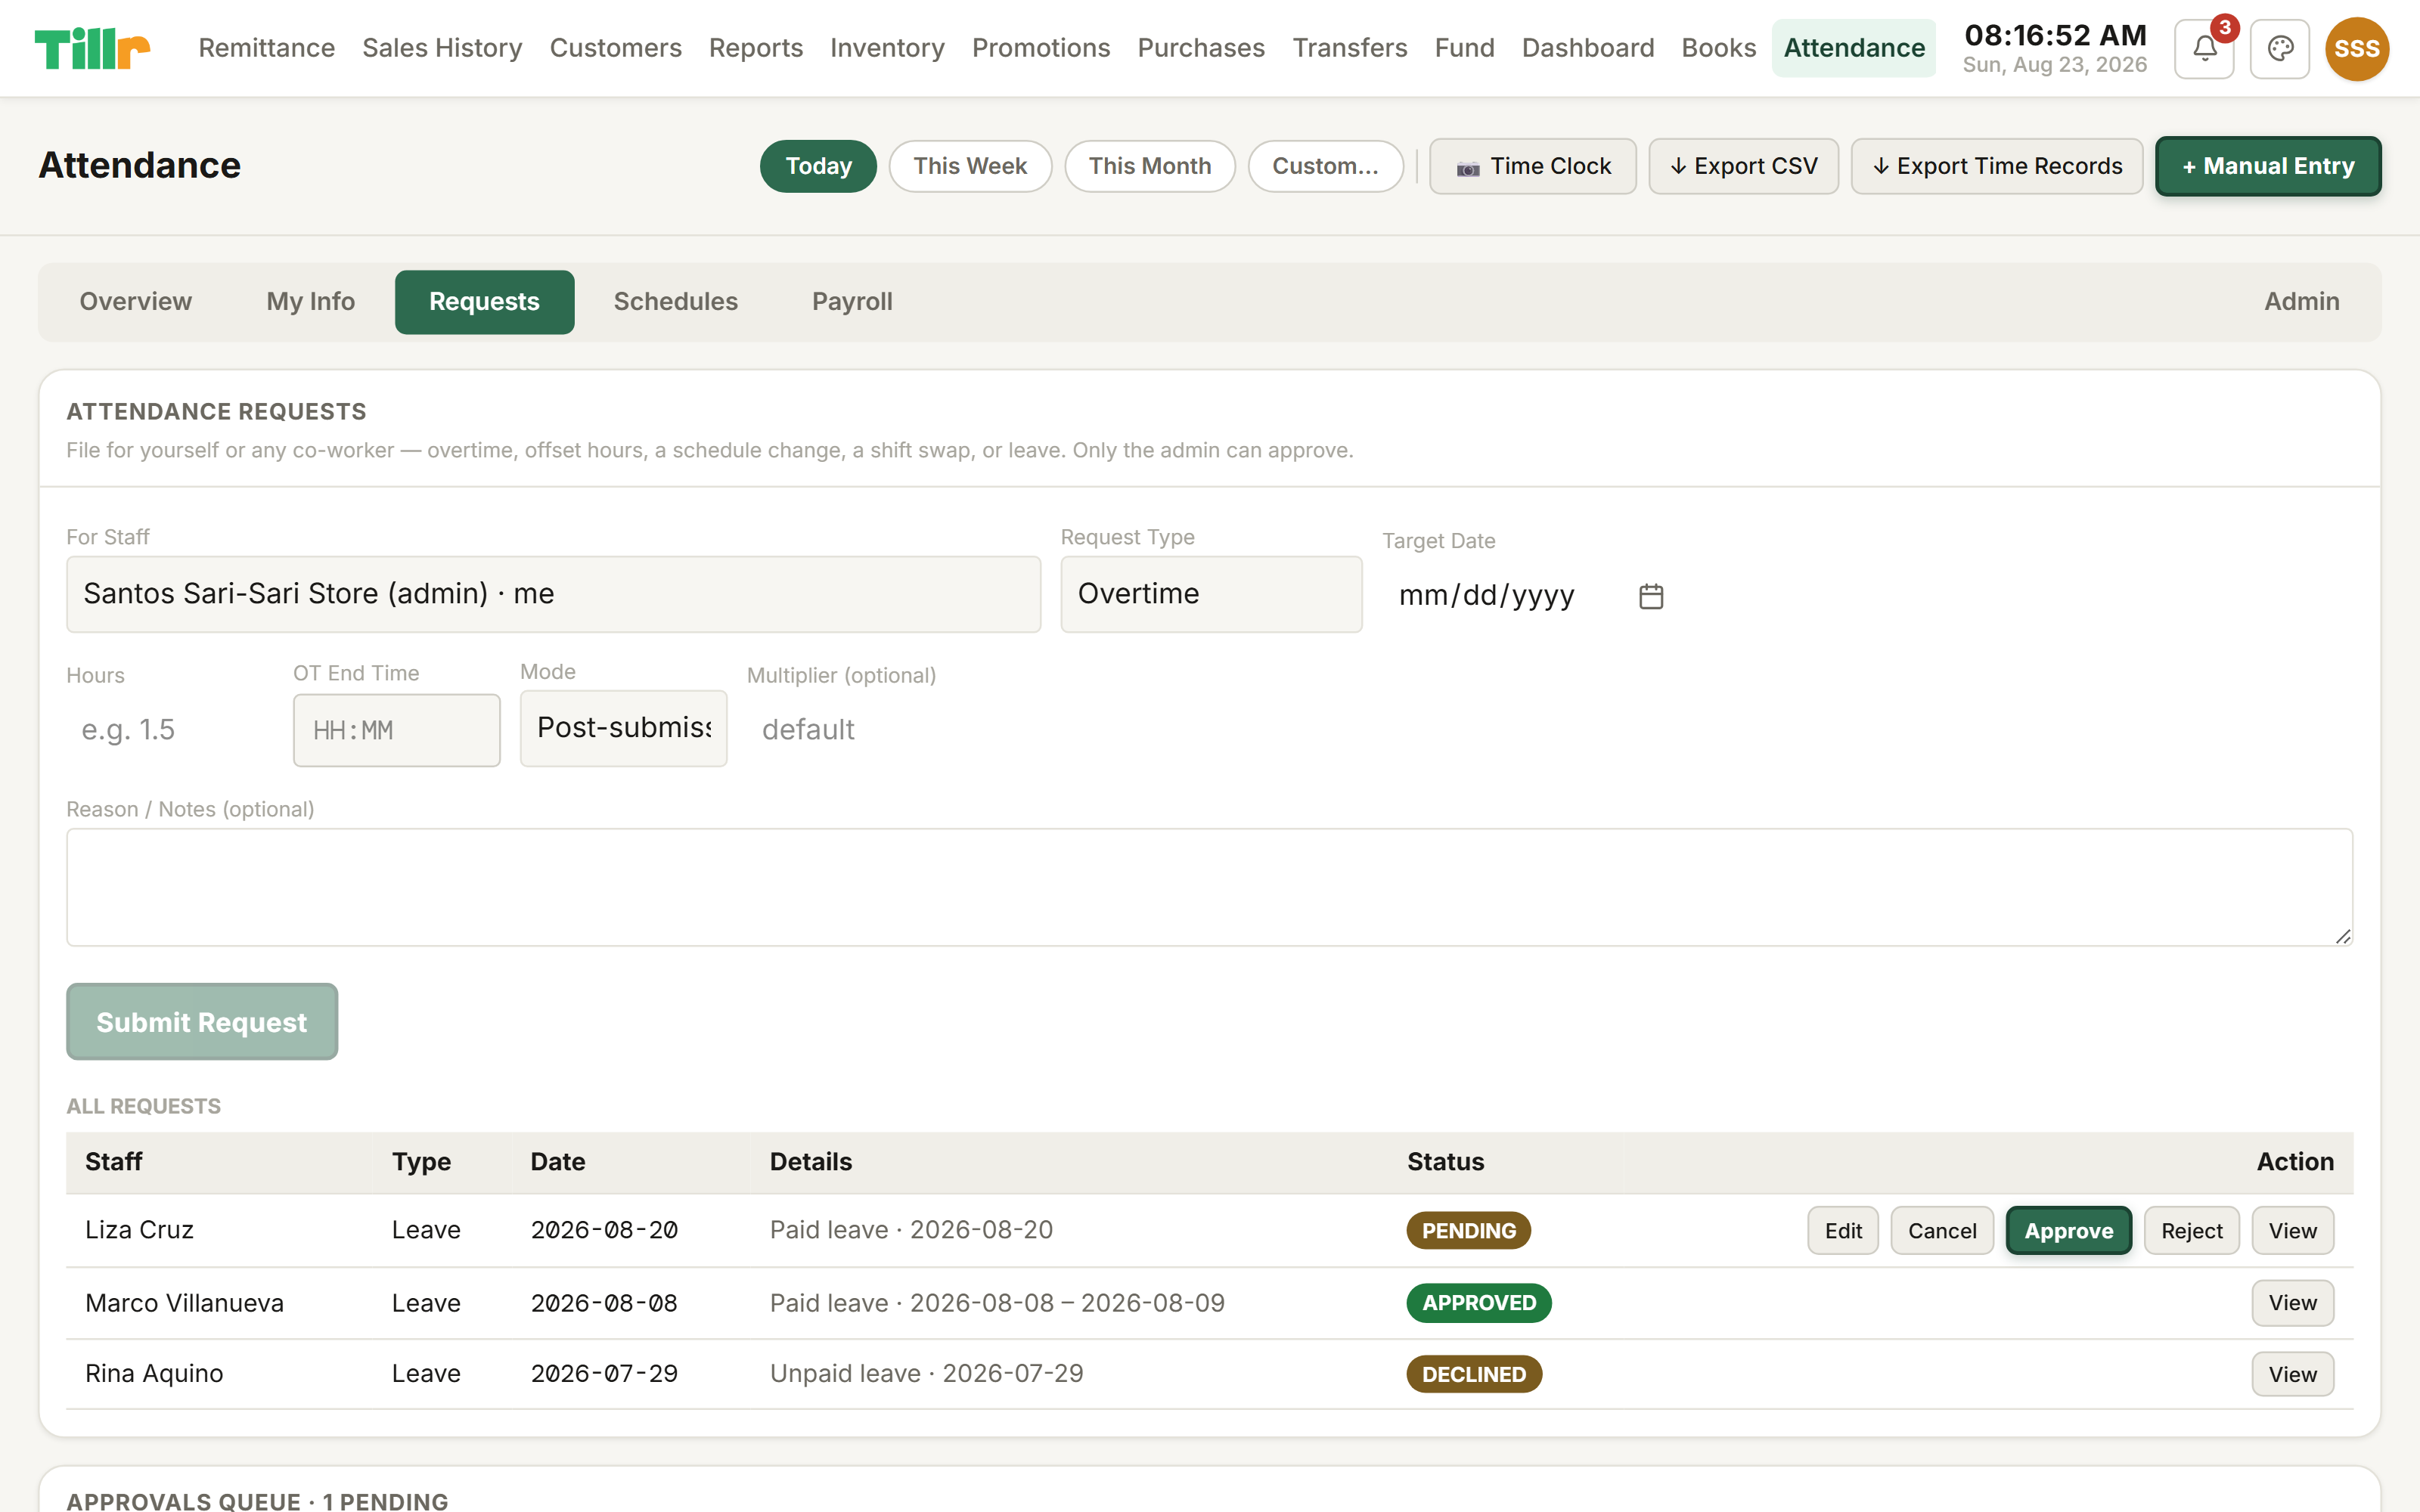
Any staff member can file one of these for themselves, or on behalf of a co-worker who only ever clocks in by barcode and rarely logs into the app directly. A manager proposes it, and only an admin (or a Multi-Branch Manager, for their own branches) actually approves or declines it: the same two-step process leave requests use.
Requests: the same form adapts per type, and every request's status is visible at a glance.
Checking your own schedule and payslip
Staff don't need to ask a manager just to see their own hours.
From any login, open the My Info tab.
My Schedule shows the full week with today highlighted, plus anything coming up that's already been approved as a change.
My Payslip shows the current pay period's breakdown, the exact same view an admin sees when printing it for you.
Recent Clock Activity lists the last 30 days of clock-ins and clock-outs, handy for catching a missed punch before payday.
Every bit of it is locked to that person's own data. Nobody can page through someone else's info from this tab, whatever they type in the address bar.
My Info: schedule, payslip, and recent clock activity, all scoped to the logged-in person.
06
Reporting & Money
Reading your dashboard
If you only check one screen a day, make it this one.
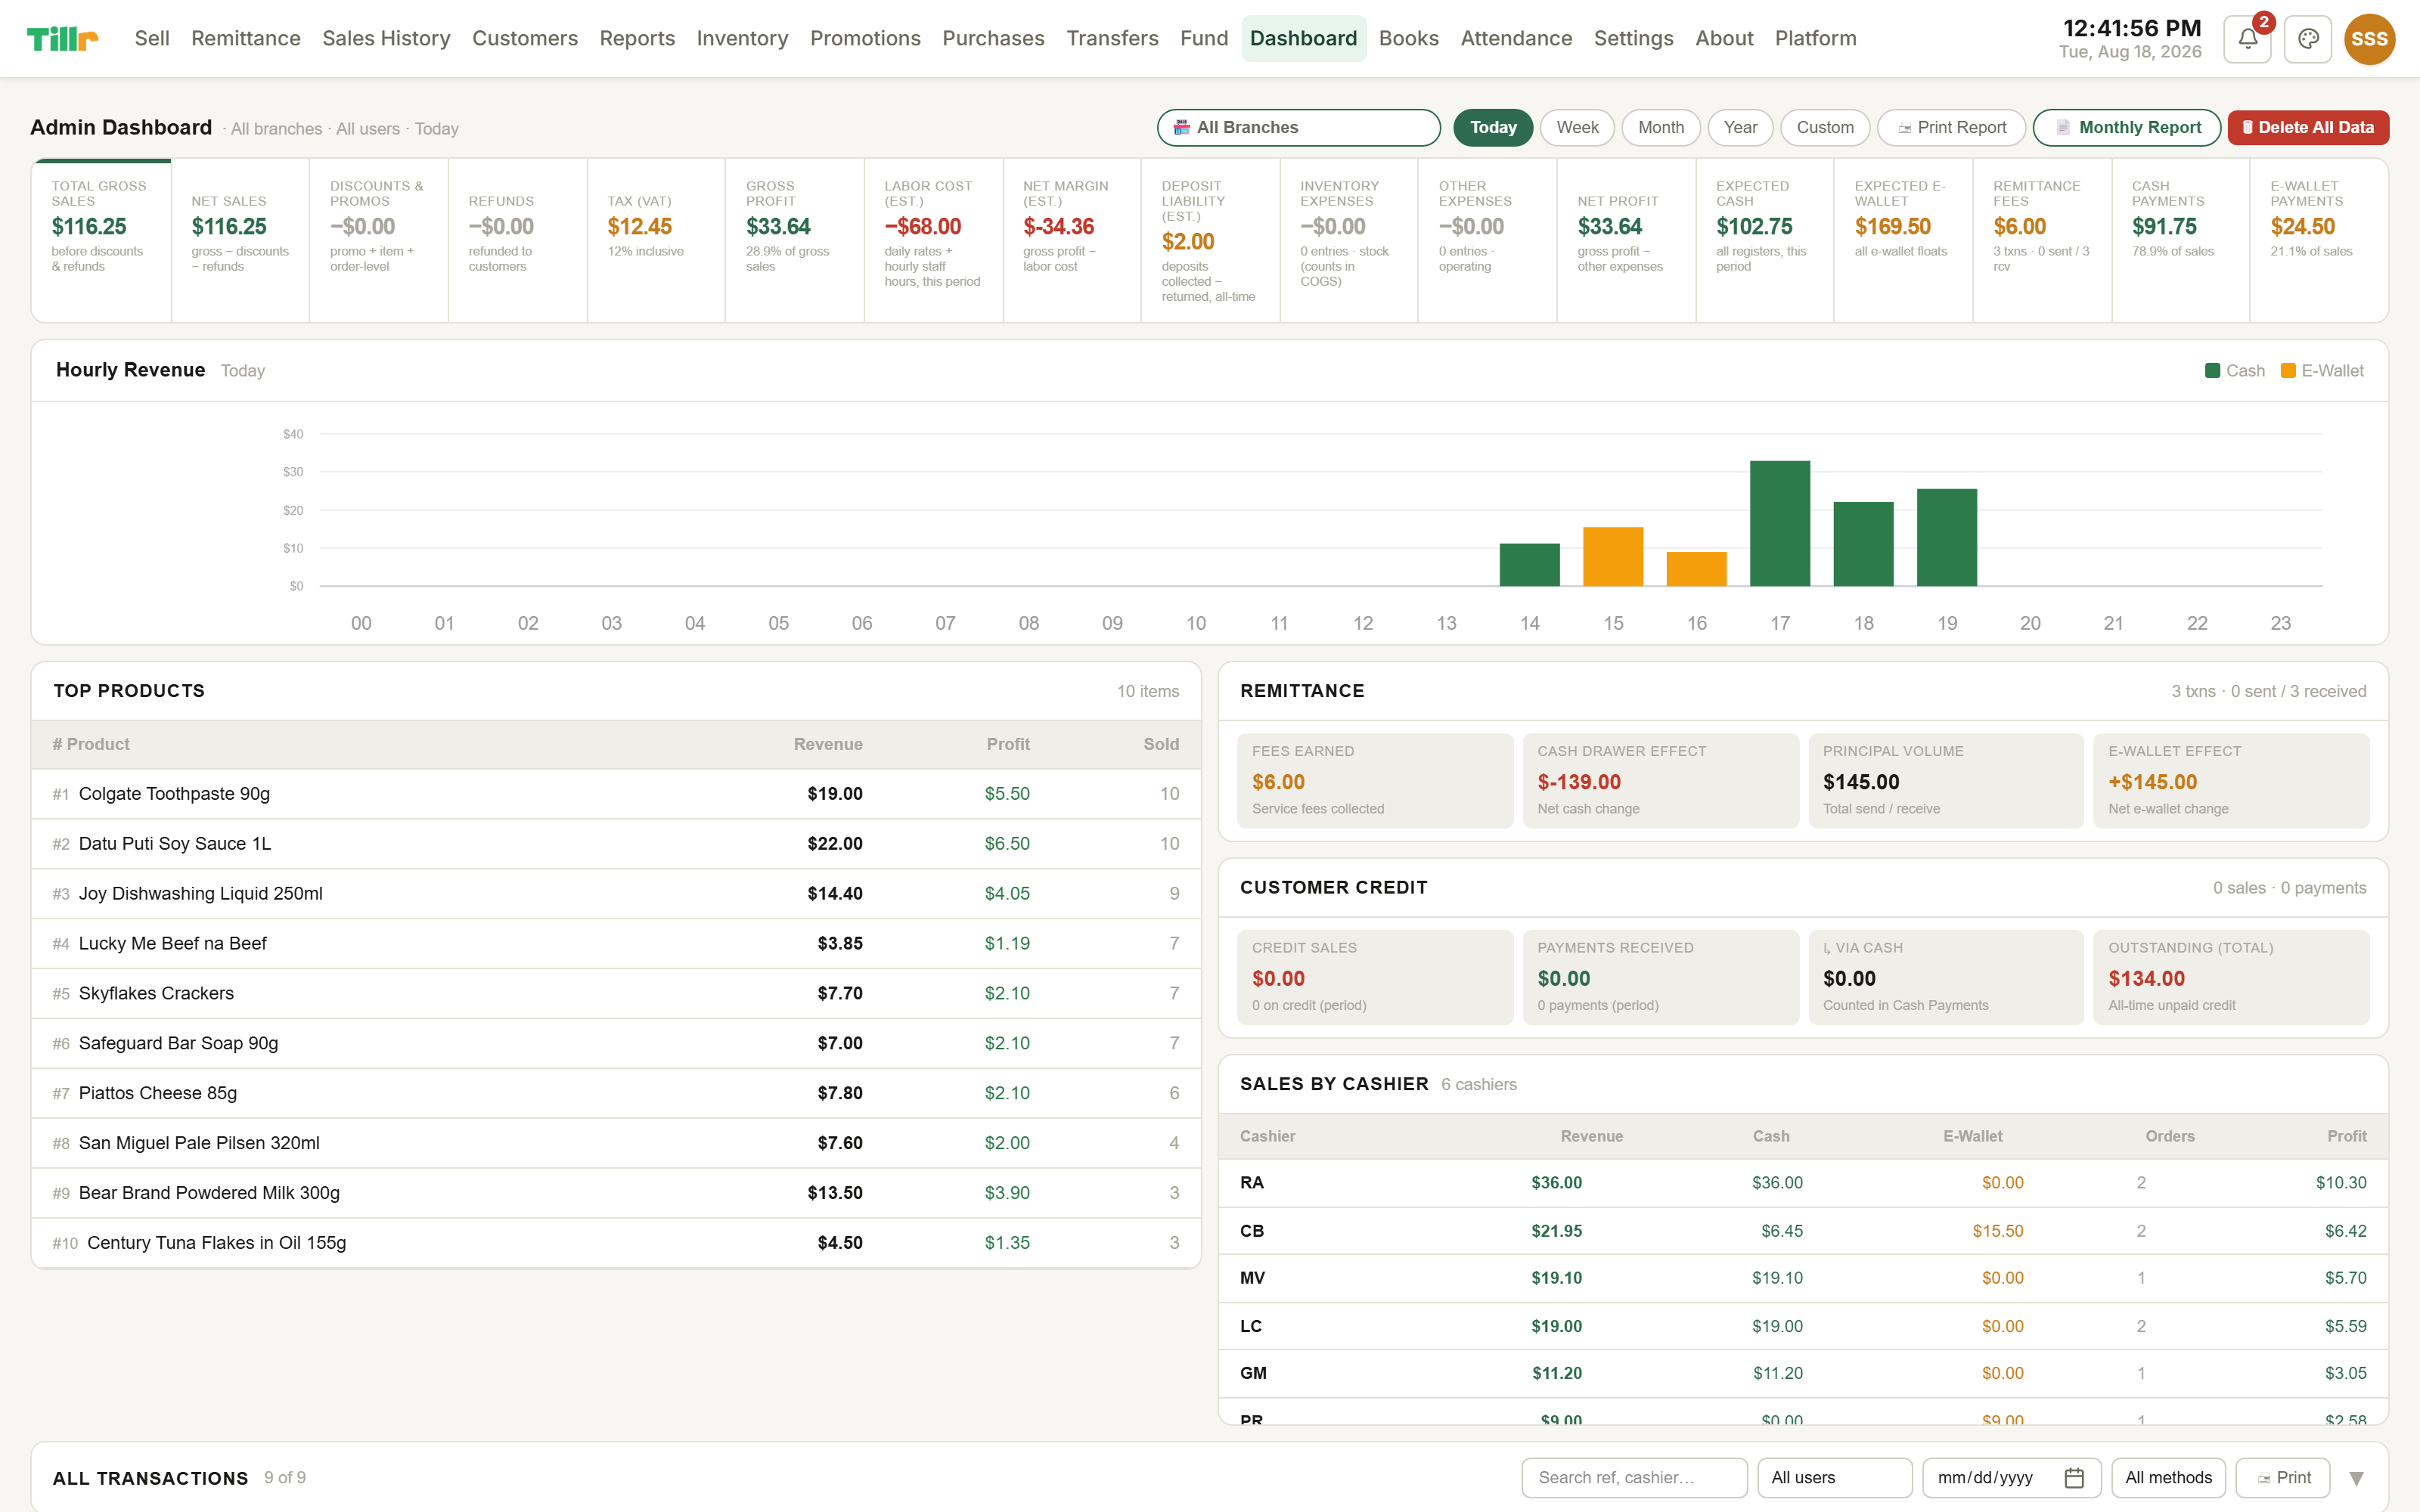
Revenue: your top-line sales.
Labor CostPremium: pulled straight from your actual payroll data, not a guess.
Net MarginPremium: what you're actually keeping after paying staff, not just after cost of goods.
Deposit Liability: how much of your cash position is really just container deposits waiting to be returned.
Outstanding customer credit: how much is currently out on store tabs.
A branch filter (if you run more than one location) lets you view any single store's numbers or the combined total. Nearly every table on this page exports to CSV.
The real Tillr dashboard: sales, top products, and cashier breakdown at a glance.
Cash fund & handling shortages
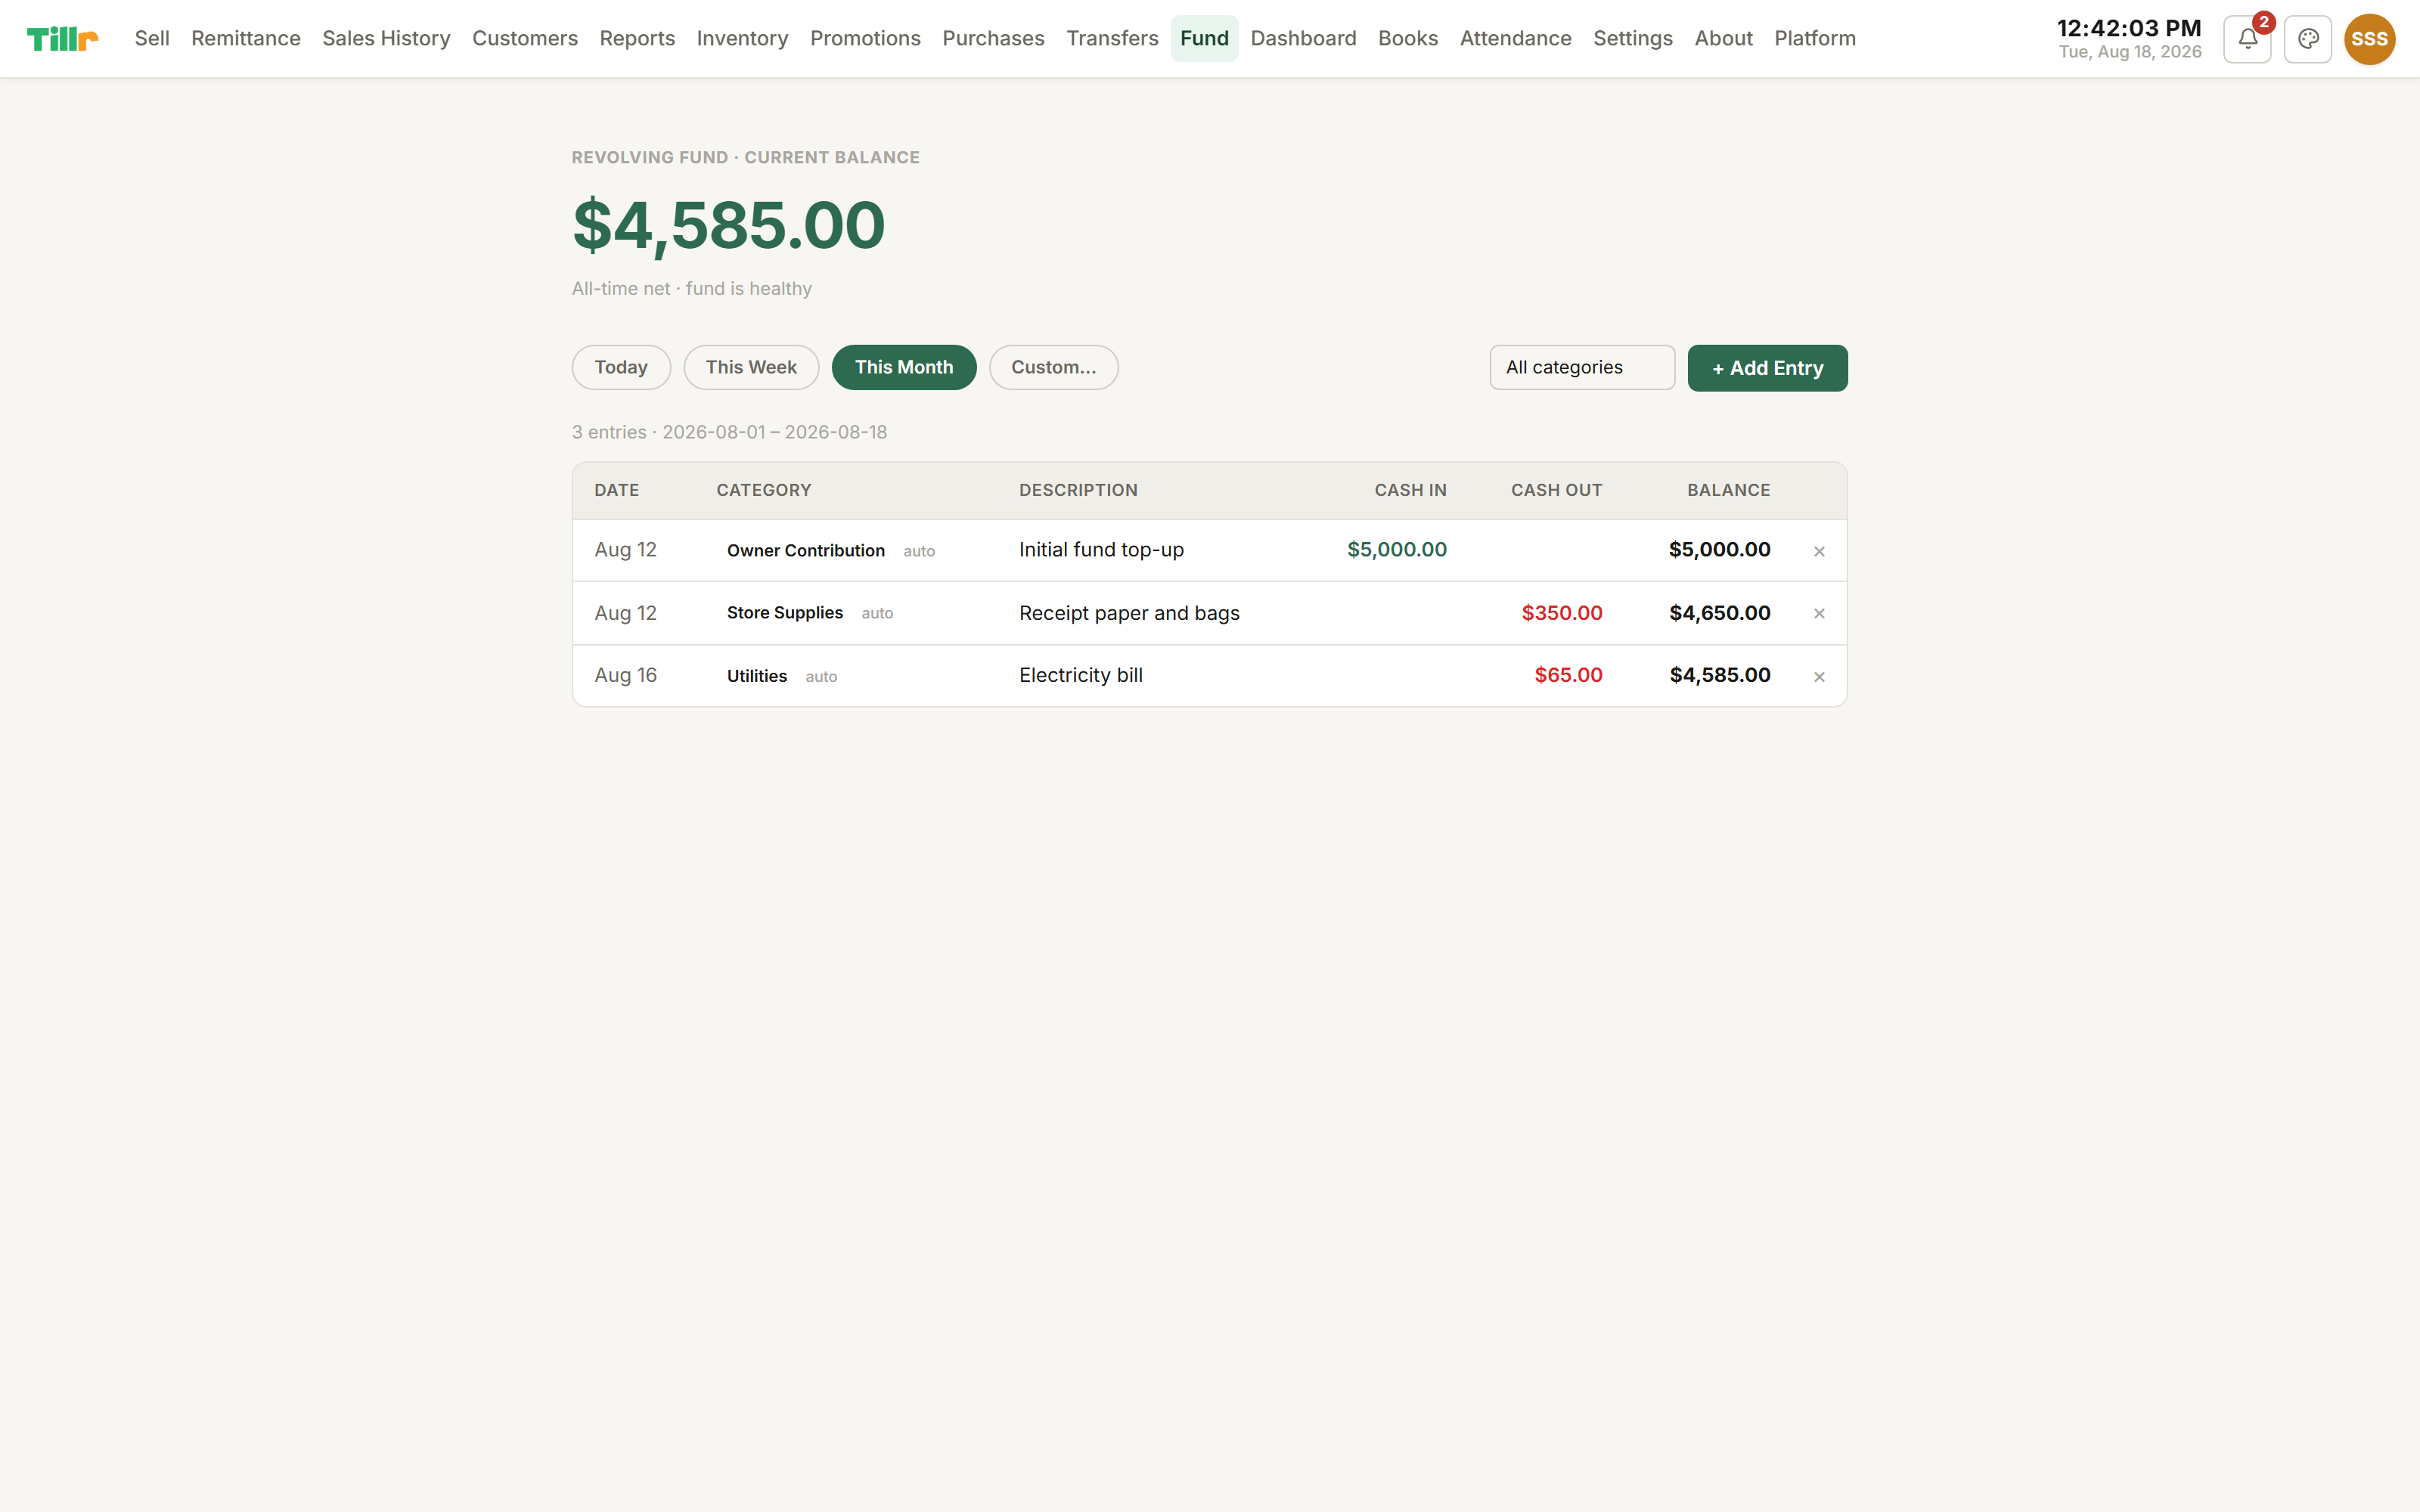
Tillr also tracks your store's actual cash float: not just sales, the physical cash moving in and out of the drawer.
When you top up the register with cash from your own pocket or the bank, log it as a fund top-up. The running balance updates.
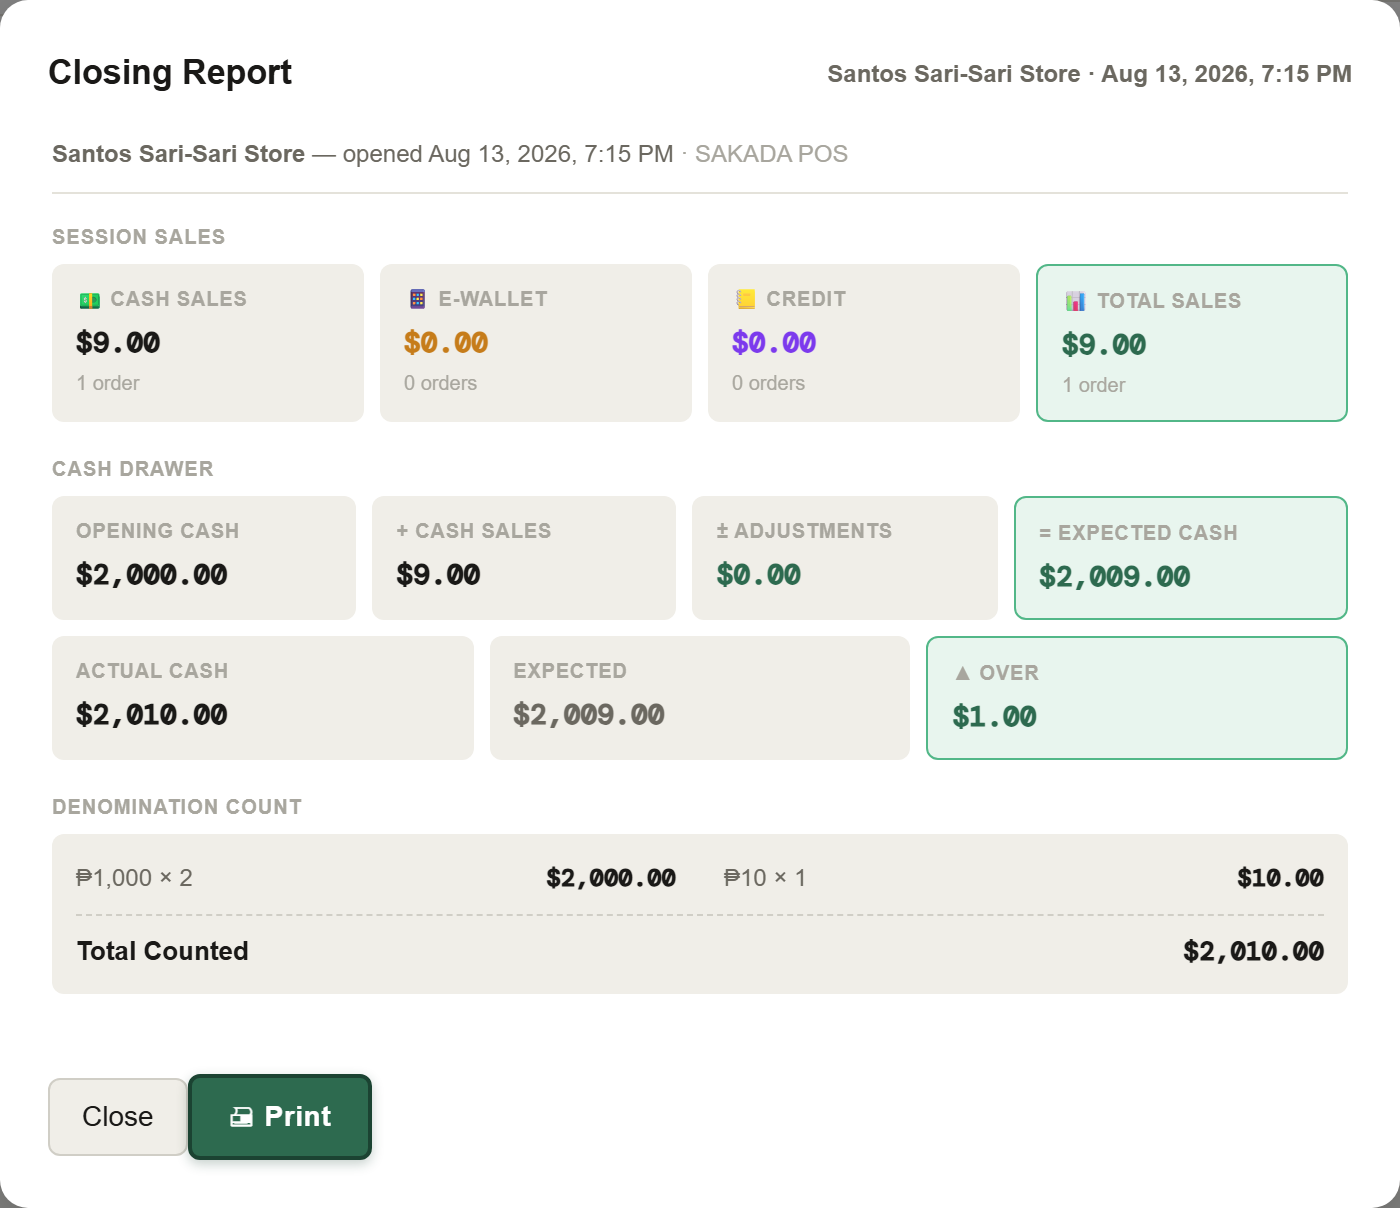
At the end of a shift, the closing report compares what the drawer should hold against what's actually counted. A shortage is flagged right there instead of quietly absorbed.
If a shortage needs to be addressed with the responsible cashier, a manager can propose a deduction: it goes through an approval step, not a silent paycheck adjustment.
Once approved, it flows into that employee's payroll automatically.
The Fund page: your actual cash float, tracked separately from sales.
Closing out your shift (Z-report)
Closing out properly at the end of the day is what makes tomorrow's opening number trustworthy.
Start a closing report. Count your physical cash and enter it: e-wallet balances and remittance totals pull in automatically from everything logged through the day.
Tillr compares what the drawer should hold against your count. Any variance shows immediately.
The Z-Report breaks the day down: sales by category, by payment method, your VAT summary.
Print it, confirm, and the shift is closed: a clean record and a fresh start for whoever opens tomorrow.
The finished Closing Report: sales by method, cash drawer math, and the variance if any.
Books: your profit & loss statement
The Dashboard tells you what's happening today. Books steps back and shows whether the business as a whole is actually profitable.
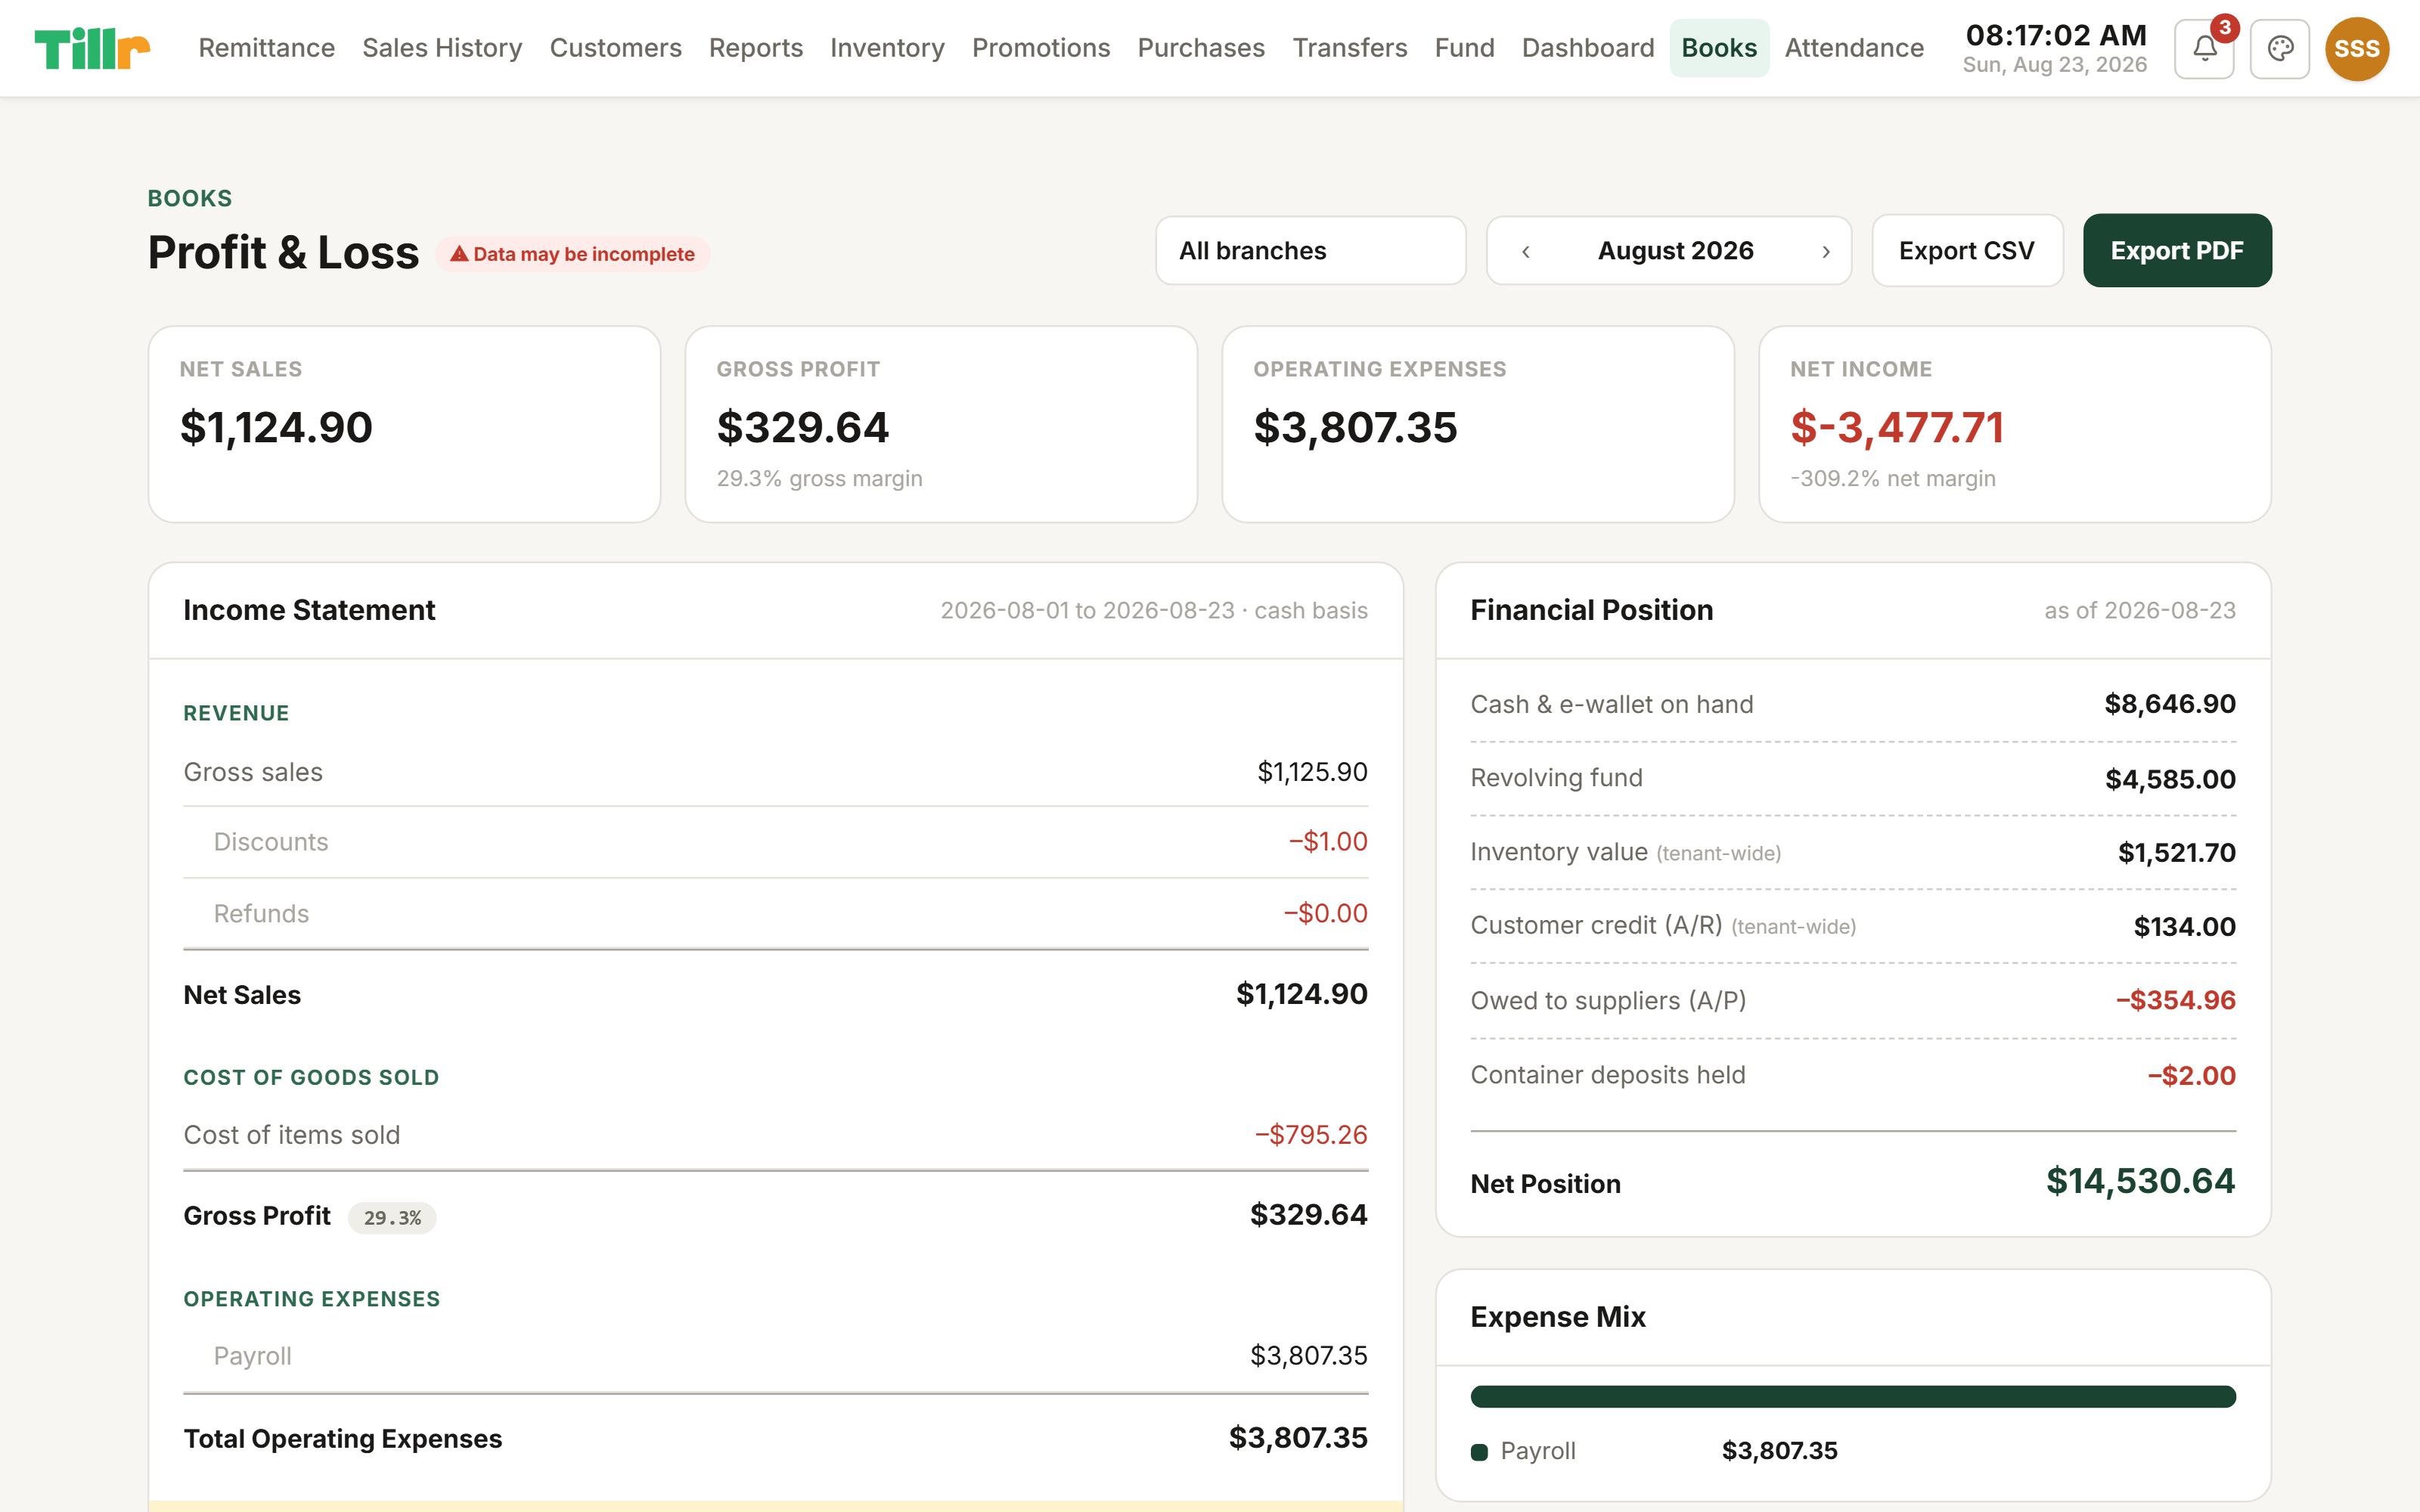
Pick a month. Tillr lays out a proper income statement: gross sales, discounts and refunds taken out, cost of goods sold, gross profit, operating expenses by category, and net income at the bottom.
The Financial Position panel shows a snapshot as of today: cash and e-wallet on hand, what customers owe you, what you owe suppliers, deposits you're holding, and your net position overall.
Export the income statement to CSV, or print the whole report for an accountant or a loan application.
It's deliberately not full bookkeeping, there's no chart of accounts or tax filing here, just a clear, honest profit-and-loss view built from data you're already generating at the register.
Books: a full income statement next to your Financial Position, for any month.
Printing a monthly report from the Dashboard
Need one document covering a whole month, sales, remittance, and expenses together, not three separate exports stitched together by hand?
On the Dashboard, tap Monthly Report and pick any past month; the current month isn't finished yet, so it isn't offered.
Tillr pulls that month's sales figures, remittance activity, and expenses together behind the scenes and lays them out as one combined document.
It opens straight into your browser's print dialog: print it, or save it as a PDF from there.
For just the numbers on your screen right now, Print Report next to it does a simpler one-period summary without pulling the extra data together.
Understanding the Reports page
The Dashboard gives you the big picture. Reports is where you go for the actual numbers behind it, down to a single transaction.
Pick your period. This Session scopes everything to your current shift: exactly what a cashier wants when checking their own numbers mid-shift.
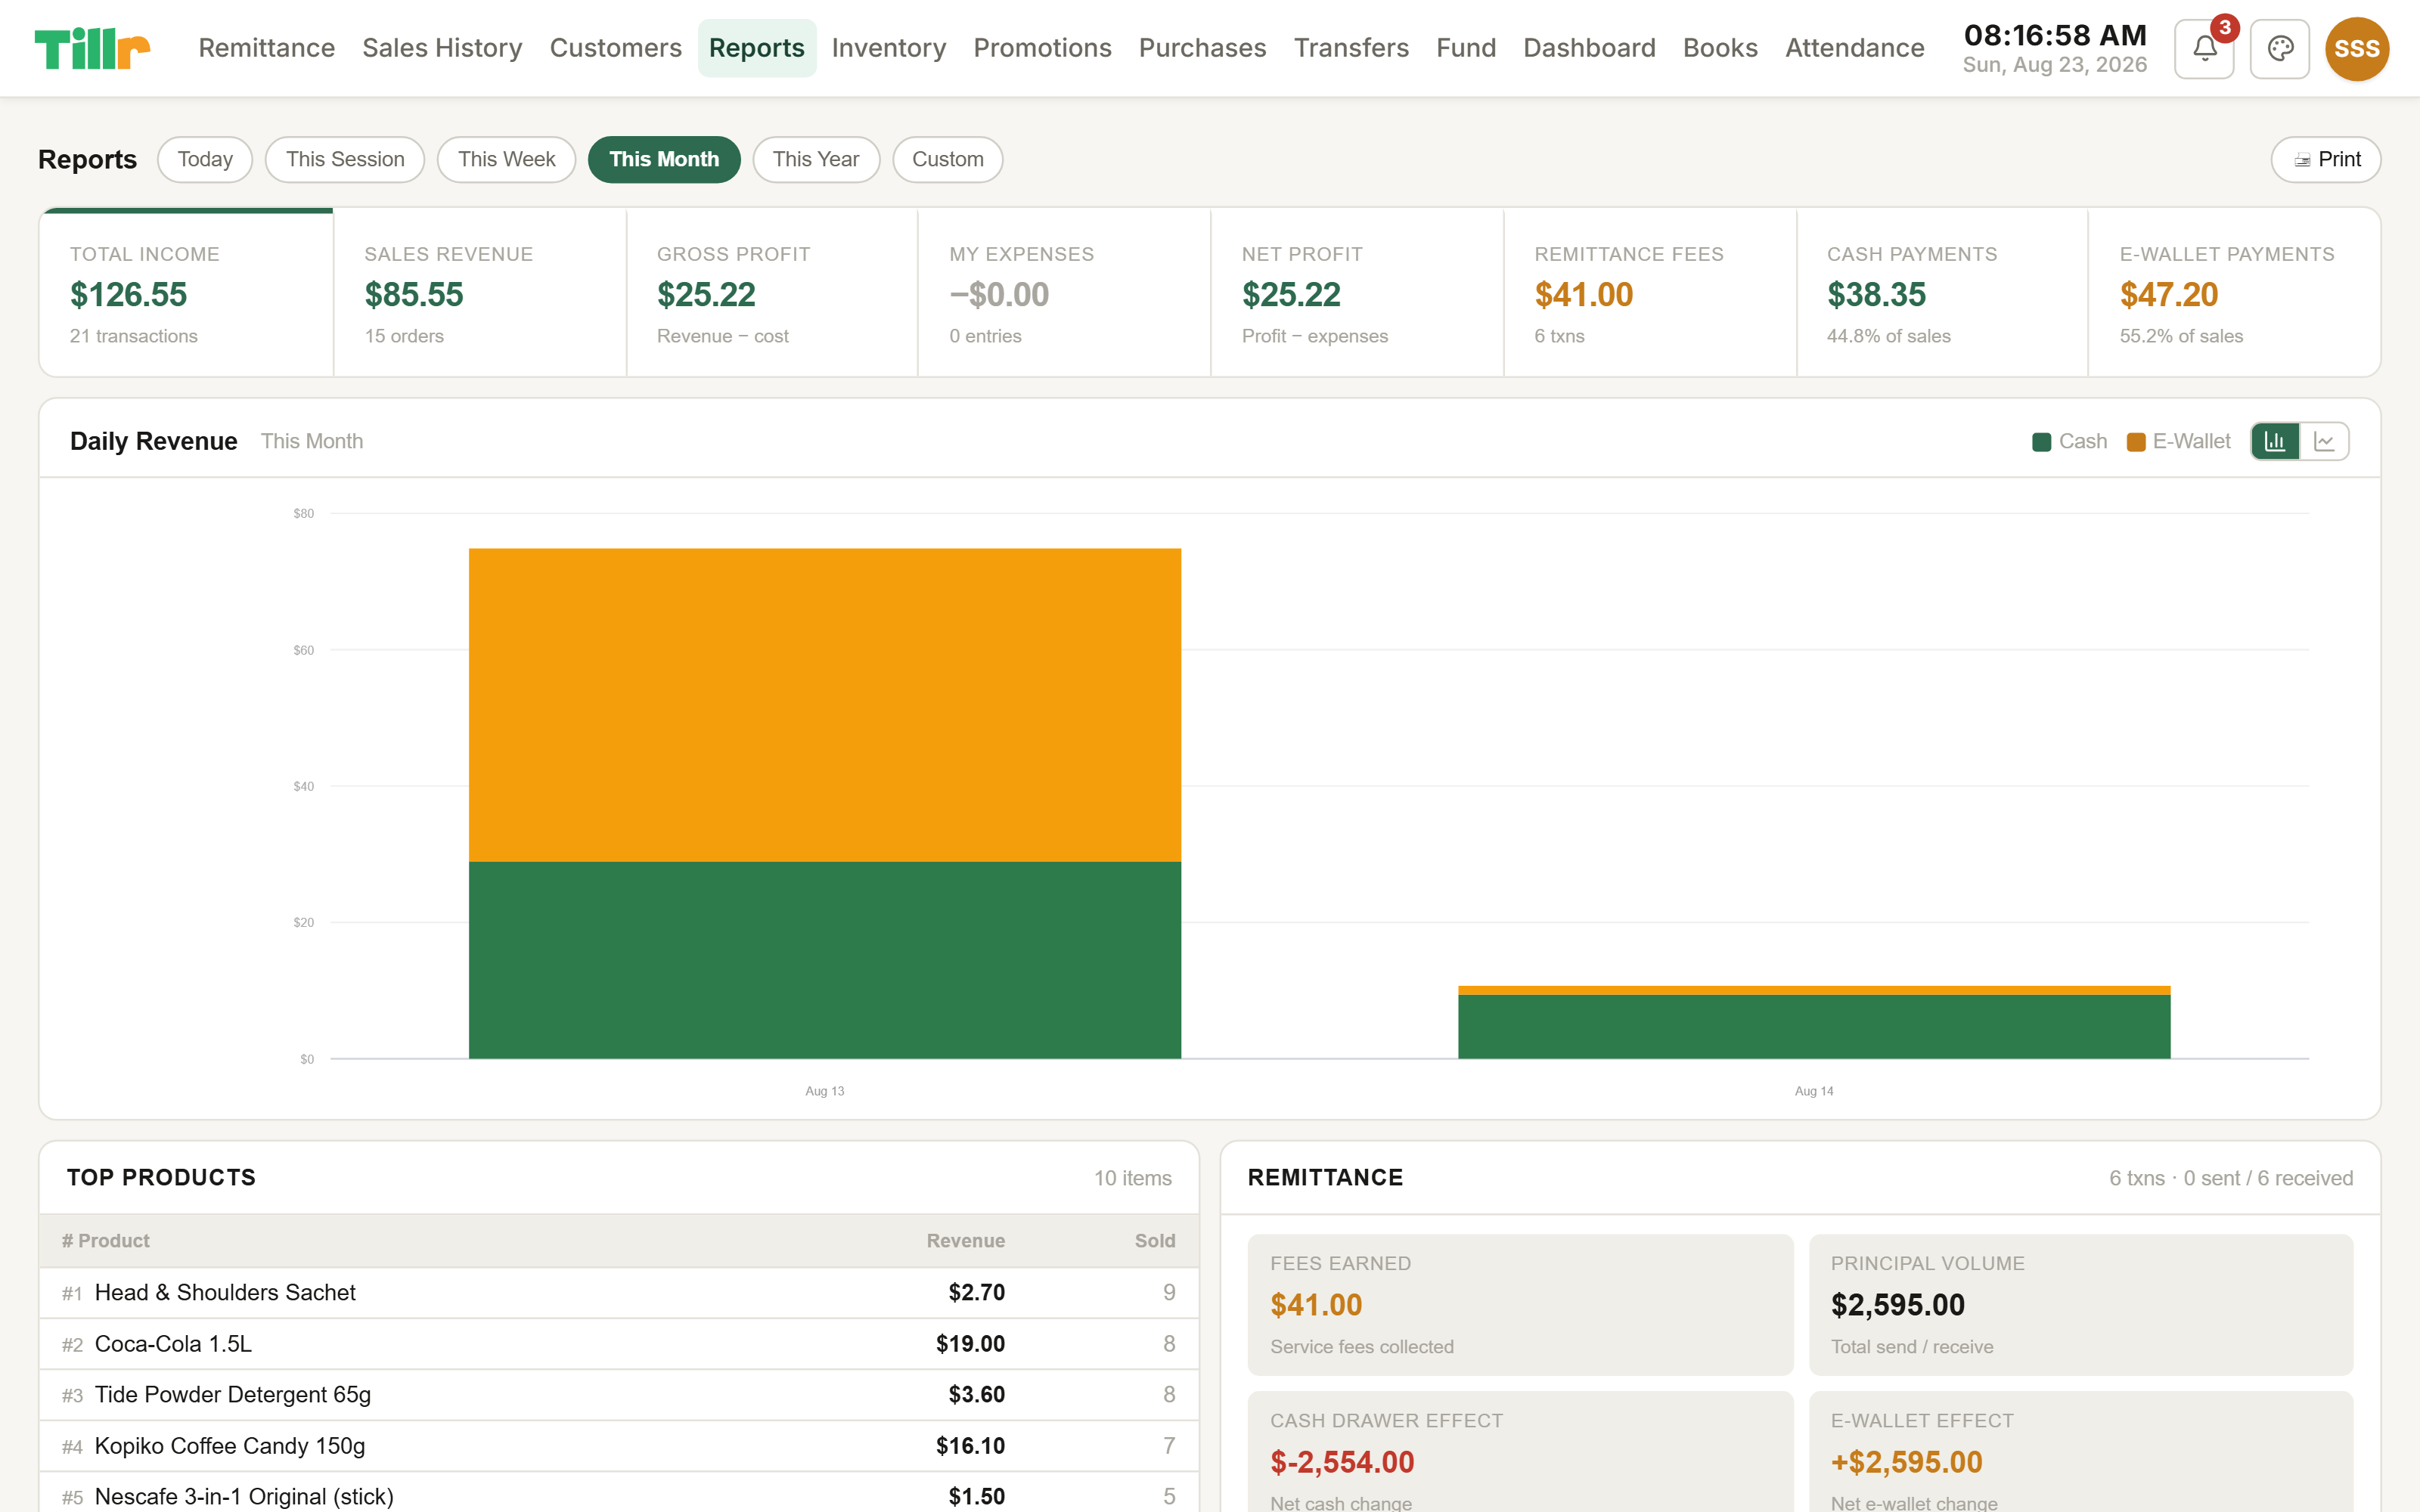
Eight KPI tiles break your money down: Total Income, Sales Revenue, Gross Profit, My Expenses, Net Profit, Remittance Fees, Cash Payments, E-Wallet Payments.
The Remittance and Customer Credit summary cards show fees earned and how much was charged to store tabs versus paid back.
Logged expenses show up broken down by category with actual receipt numbers attached.
The full Transaction History is searchable and filterable: find any past order and reprint the receipt straight from here.
Tap Print Report for a printable summary of everything on the screen.
The Reports page: the numbers behind the Dashboard, down to a single transaction.
Building a custom report Premium
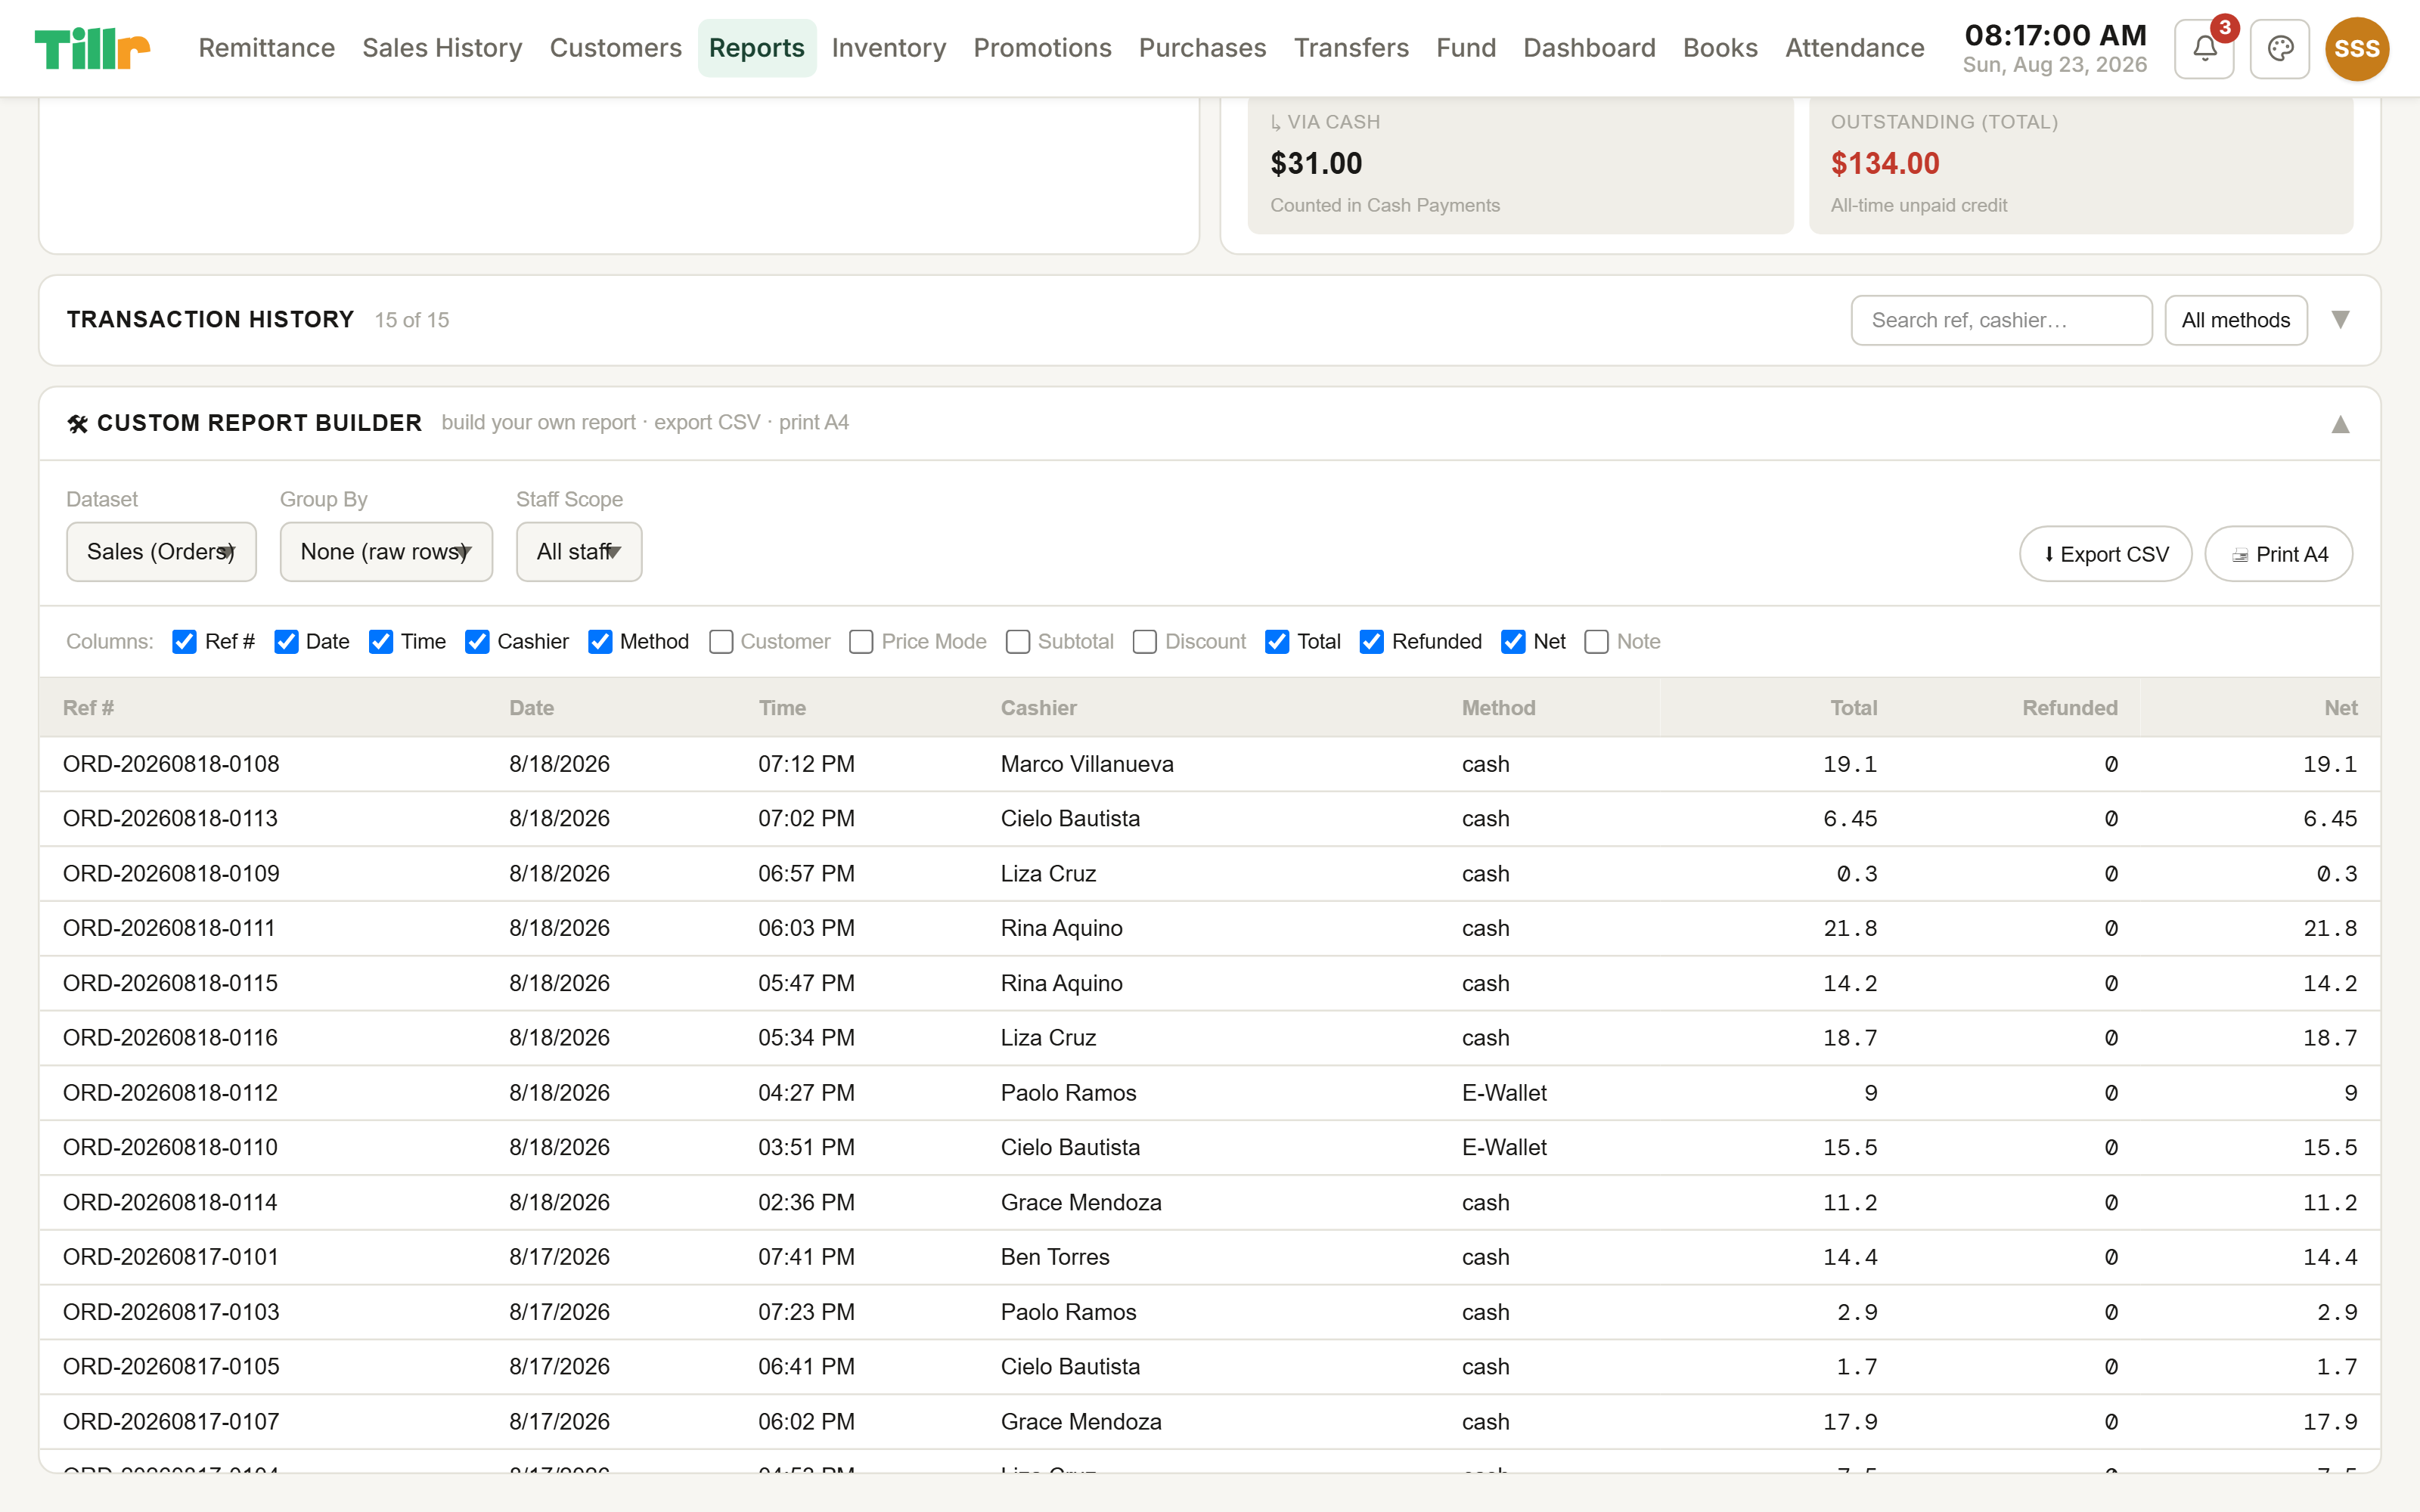
The Reports page covers the common questions. For anything more specific, the Custom Report Builder at the bottom of that page lets you build your own.
Pick a dataset: Product Sales, Sales, Expenses, or Remittances.
Choose which columns to show, and optionally group the results, by day, by category, by cashier, whatever fits the dataset you picked, and Tillr totals each group automatically.
If you manage staff, a Staff Scope toggle switches between everyone's data and just your own.
Export to CSV to work with it further, or print an A4 copy straight from the preview.
Custom Report Builder: pick a dataset, pick your columns, export or print.
07
Admin & Account
Devices & device-locked branches
Every device that's ever logged into your Tillr account shows up in Settings → Devices, useful for keeping track of what's actually running your business.
See each device's type (web, desktop, Android), a rename-able label, and when it was last active. Investigate anything unfamiliar.
For multi-branch stores: assign a specific device to a specific branch. From then on, that PC or tablet can only open registers and process transactions for that one branch, even if someone logs in with a manager account that technically has access to others.
On a locked device, staff see their Open Register screen automatically pre-filled and locked to the correct branch.
Admin accounts are the one exception: they can switch between any branch or the warehouse from any device.
Devices: every login, its type, and when it was last active.
Choosing your plan (Free / Premium / Enterprise)
Tillr's pricing is simple by design: three flat tiers, no per-seat fees.
Free, a genuinely working single-counter register: 1 branch, 1 device, 1 staff login, no time limit.
Premium ($15/mo flat): up to 3 branches, 10 devices, 10 cashiers, plus attendance, payroll, loyalty, and warehouse transfers.
Enterprise ($49/mo flat): every one of those caps removed entirely, for multi-outlet operations.
Tillr is in Alpha Test right now, so every account gets full Enterprise-level access for free, no card required and no time limit — Free, Premium, and Enterprise stay listed above for when real billing resumes. When that happens, tap Upgrade, pick monthly or annual: checkout runs through Paddle, our payment processor, which handles taxes and invoicing on your behalf. Your Settings page always shows your current plan and renewal date, and you can cancel anytime; access continues through the end of whatever period you already paid for.
Tillr on web, desktop & Android
One account, three ways to run it.
Web: open your browser, sign in, and you're running the full POS. Nothing to install, updates itself automatically.
Desktop: built for the actual counter PC, including older, low-spec machines (4GB RAM, an Atom or Celeron processor is genuinely enough). Runs a local copy of your database, so it keeps selling, clocking staff in, and printing receipts with zero internet connection, and syncs the moment it's back online.
Android: a second cashier on a phone, a line-buster during a rush, or a backup register if your main PC goes down. Uses the phone's own camera as a barcode scanner.
Ring up a sale on any one of the three, and once it's connected, it shows up everywhere else automatically: one inventory count, one set of sales numbers, no matter which device made the sale.
08
Business & Receipt Setup
Store info, logo & custom positions
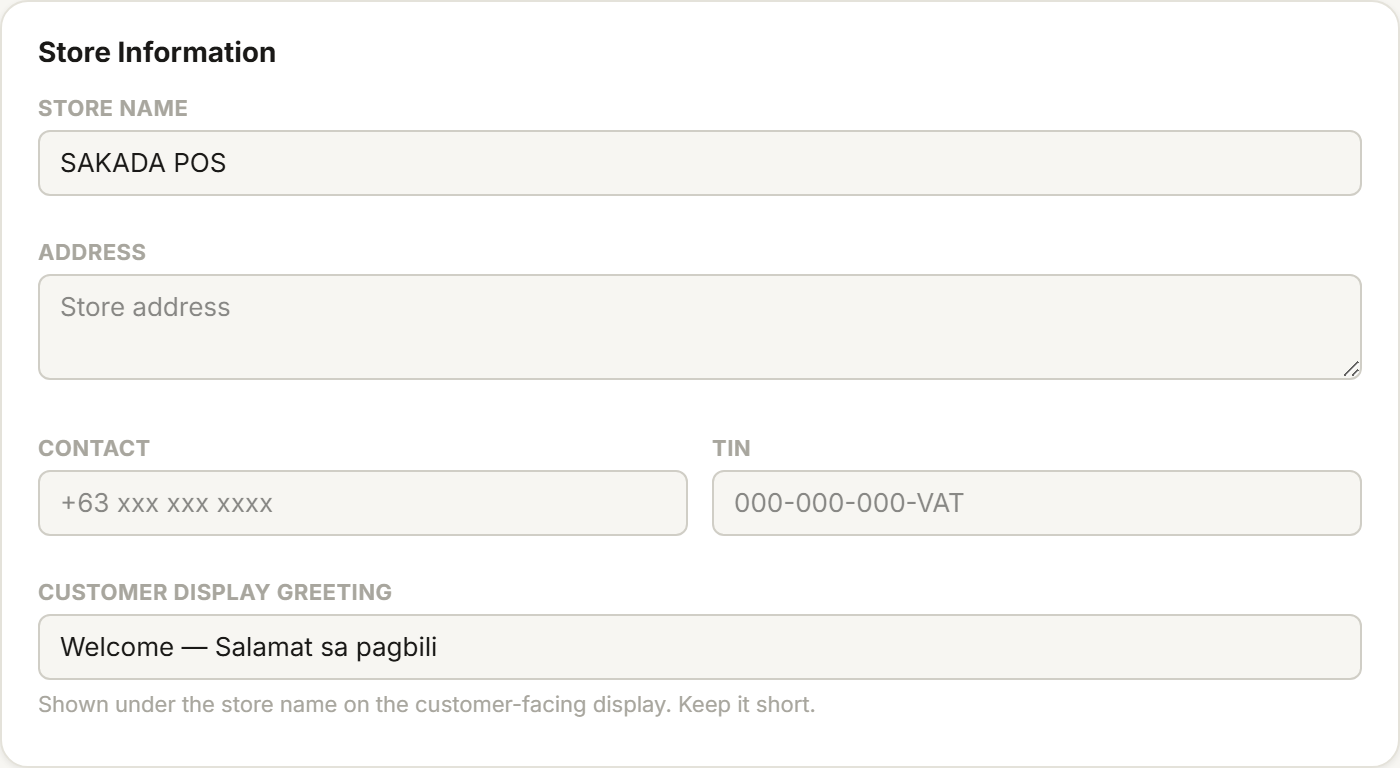
Under Store Information, fill in your business name, address, contact number, and TIN if VAT-registered: this feeds your printed receipts and customer display's greeting message.
Upload your store logo: once set, it prints on every receipt automatically.
The currency symbol is configurable too, applying across the whole app.
If the four default roles (Cashier, Manager, Admin, Staff) don't match how your team is organized, the Positions Manager lets you create your own (like "Inventory Clerk") with its own specific access level. Every new hire assigned to it inherits the same settings.
Store Information: feeds your printed receipts and customer display automatically.
VAT compliance & receipt templates
If you're a VAT-registered business, your receipts need to follow your local tax authority's rules, Tillr handles that without you needing to design anything.
Set your VAT type and rate, and pick your receipt paper width to match your printer (58mm or 80mm thermal rolls are both supported).
Under BIR Compliance, choose the receipt template that matches your registration: a plain Tillr-standard receipt, a full BIR VAT format, or a BIR Non-VAT Sales Invoice.
Whichever template you pick unlocks the specific compliance fields it needs: TIN, Machine Identification Number, Permit to Use number, and serial number. Fill these in once, and every receipt from then on carries them automatically.
Print a test receipt to confirm everything lines up before your first real customer sees one.
BIR Compliance: pick your template, fill in your registration fields once.
Setting up remittance fees & e-load markup
If you earn a small fee on every e-wallet cash-in, cash-out, or mobile load sale, this is where you set exactly how much.
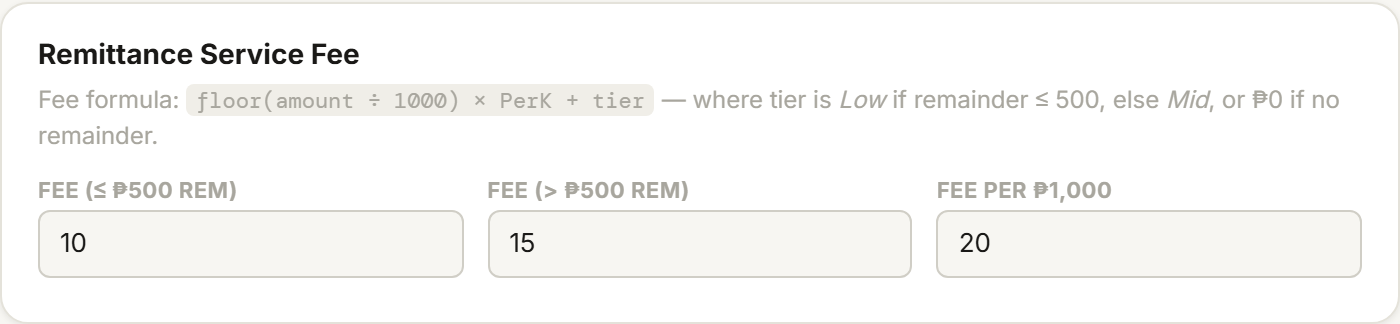
The Remittance Service Fee panel lets you set up to three tiers: different fee amounts depending on how much the customer is sending or withdrawing.
Prepaid Load Service Charges works the same way, with its own two-tier markup for mobile top-ups.
From then on, every relevant transaction calculates your fee automatically, no manual math at the counter, and it rolls into your Reports page's Remittance Fees total.
Remittance Service Fee: up to three tiers, set once, applied automatically.
E-wallet accounts & expense categories
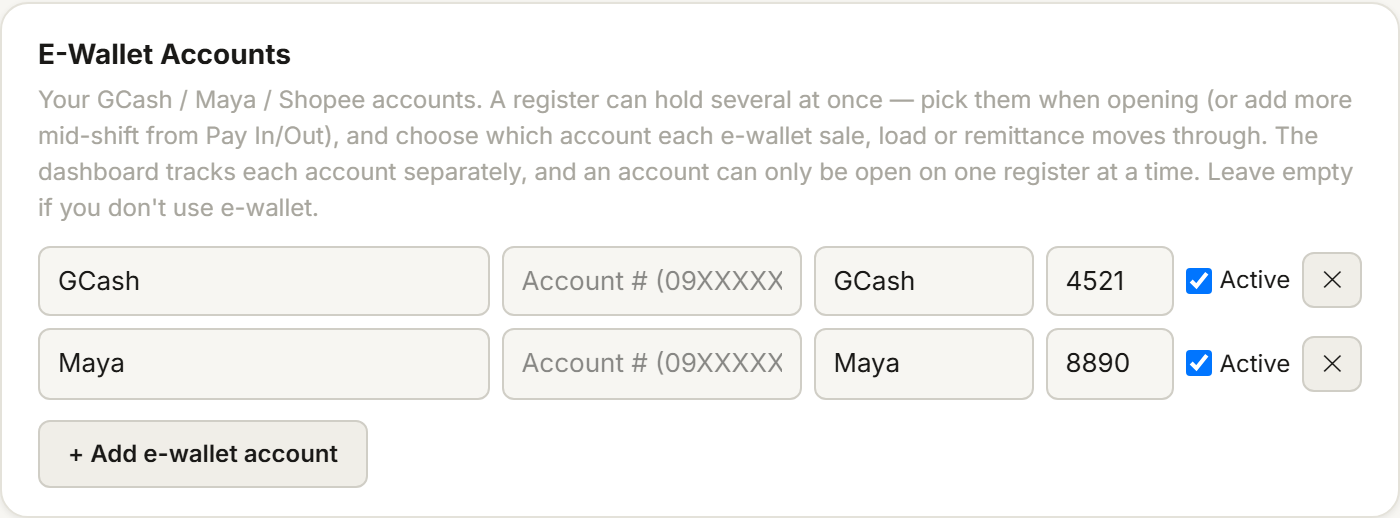
If you hold more than one e-wallet account (one per branch, or one personal and one business), register each separately under E-Wallet Accounts. Every remittance transaction ties to the specific account it moved through.
That's what lets your Cash Fund and Reports pages show a separate running balance per account instead of one blurred-together number.
Set up Expense Categories that match your actual spending (Utilities, Supplies, Rent) so every expense you log later is properly bucketed.
E-Wallet Accounts: one running balance per account, not one blurred-together number.
09
Troubleshooting & Support
Login problems: forgot password & device conflict
Three login issues come up more than any other — and the first one is really a mix-up between two different logins, not a bug.
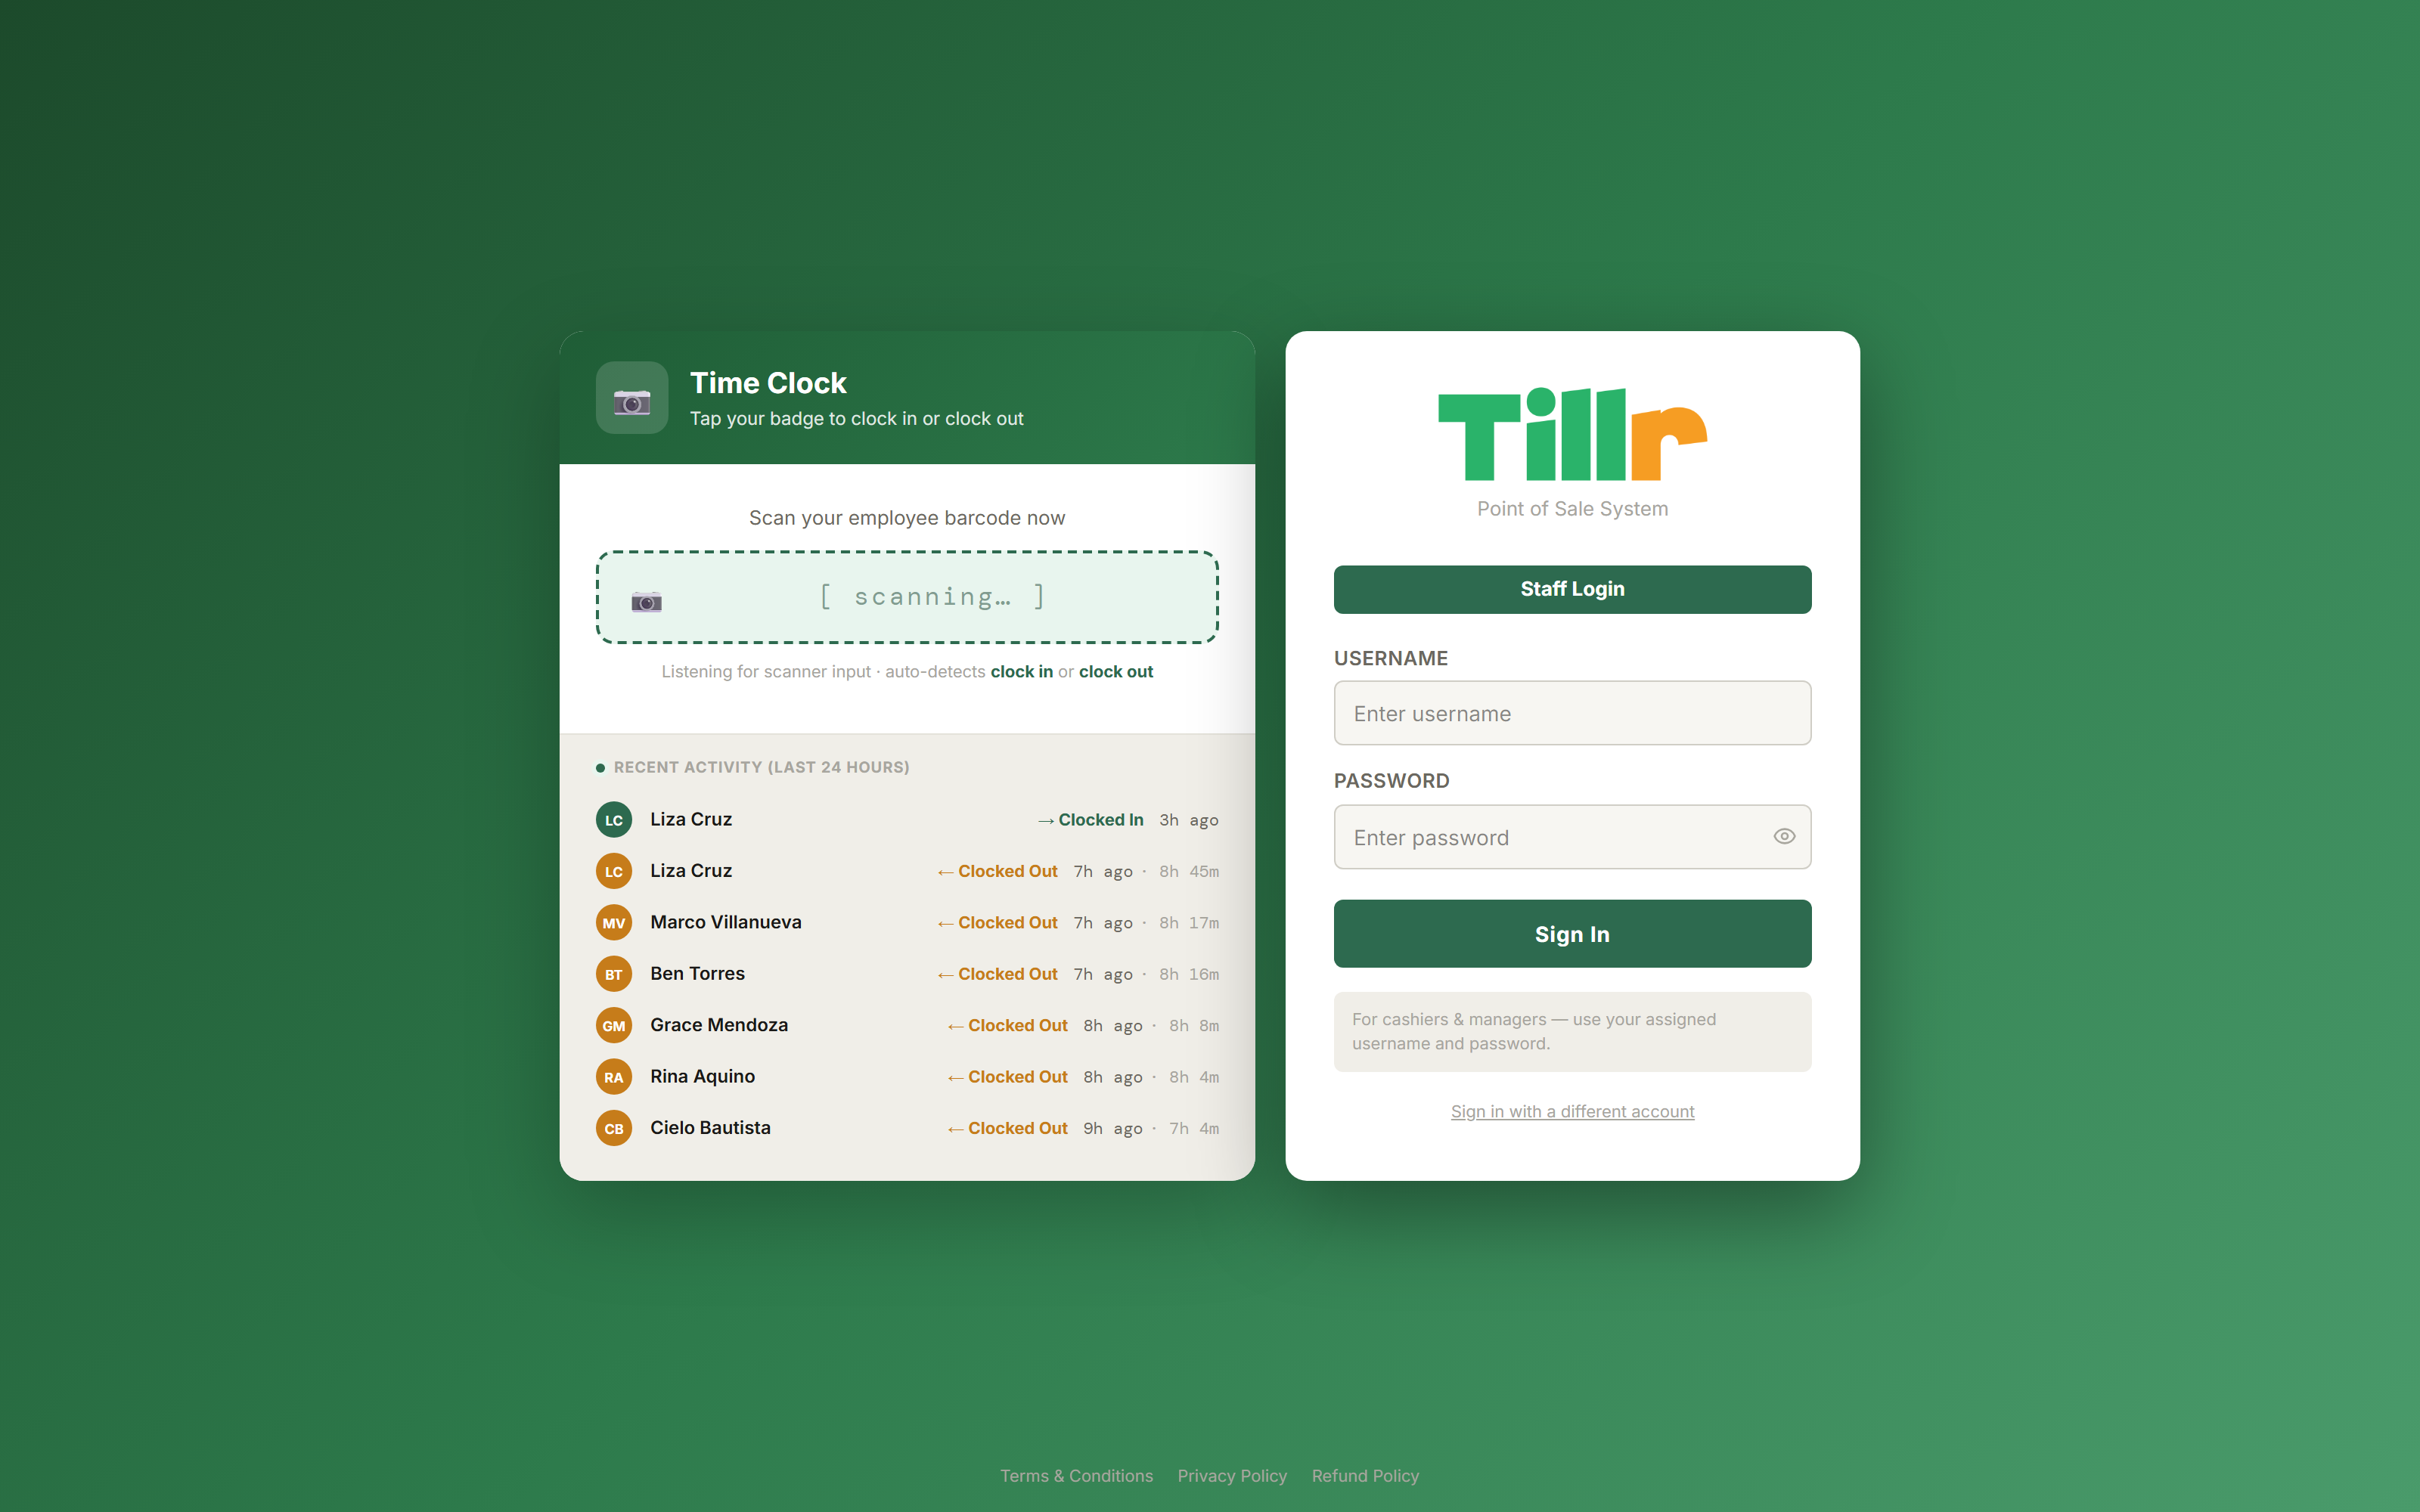
"Invalid username or password" on the Staff Login screen: that screen takes your POS login (a username and password), not your Tillr Account email. If you're not sure what your POS login is, see Finding your POS login.
Forgot password (Tillr Account only): tap Forgot Password, enter your account email, submit. You'll always see the same confirmation message whether or not that email is registered (a deliberate privacy protection, not a bug). If an account exists, a reset link lands in that inbox and stays valid for one hour.
Device conflict: a Tillr Account only allows one active device at a time. If you log in somewhere new while another device still holds the session, you'll see a red "Device Conflict" box. Tap Use This Device Instead, re-enter your password to confirm it's you, and this device takes over: the old one signs out automatically.
All three are quick fixes once you know what they're telling you: none of them mean anything's actually broken.
The login screen: where both Forgot Password and Device Conflict start.
Fixing an abandoned or stuck register
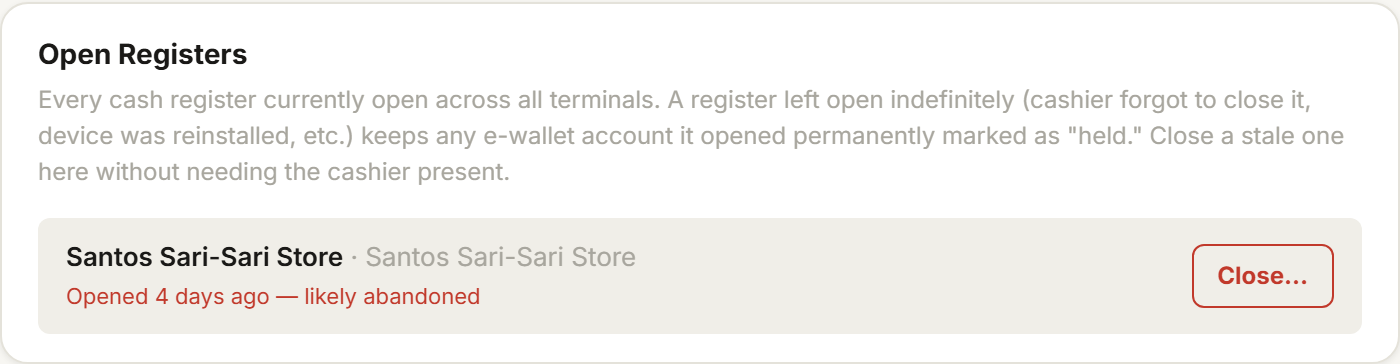
If a cashier forgets to close out (goes home, phone dies, whatever the reason), that register stays open, and it can hold an e-wallet account hostage until it's dealt with.
As an admin, go to Settings → Open Registers. You'll see every register currently open, who opened it, when, and which branch. One open unusually long is your culprit.
Tap into it to start a Take-over Close. If the cashier's reachable, walk through the close with them present. If not, a supervisor override lets an admin close it out directly, counting the drawer and logging the reason.
Once closed, that e-wallet account and register free up immediately for whoever opens next.
Open Registers: every session still open across your terminals, with a Close action on each.
What to do when sync gets stuck
Tillr syncs constantly in the background, but every now and then a connection hiccup can leave it silently stuck.
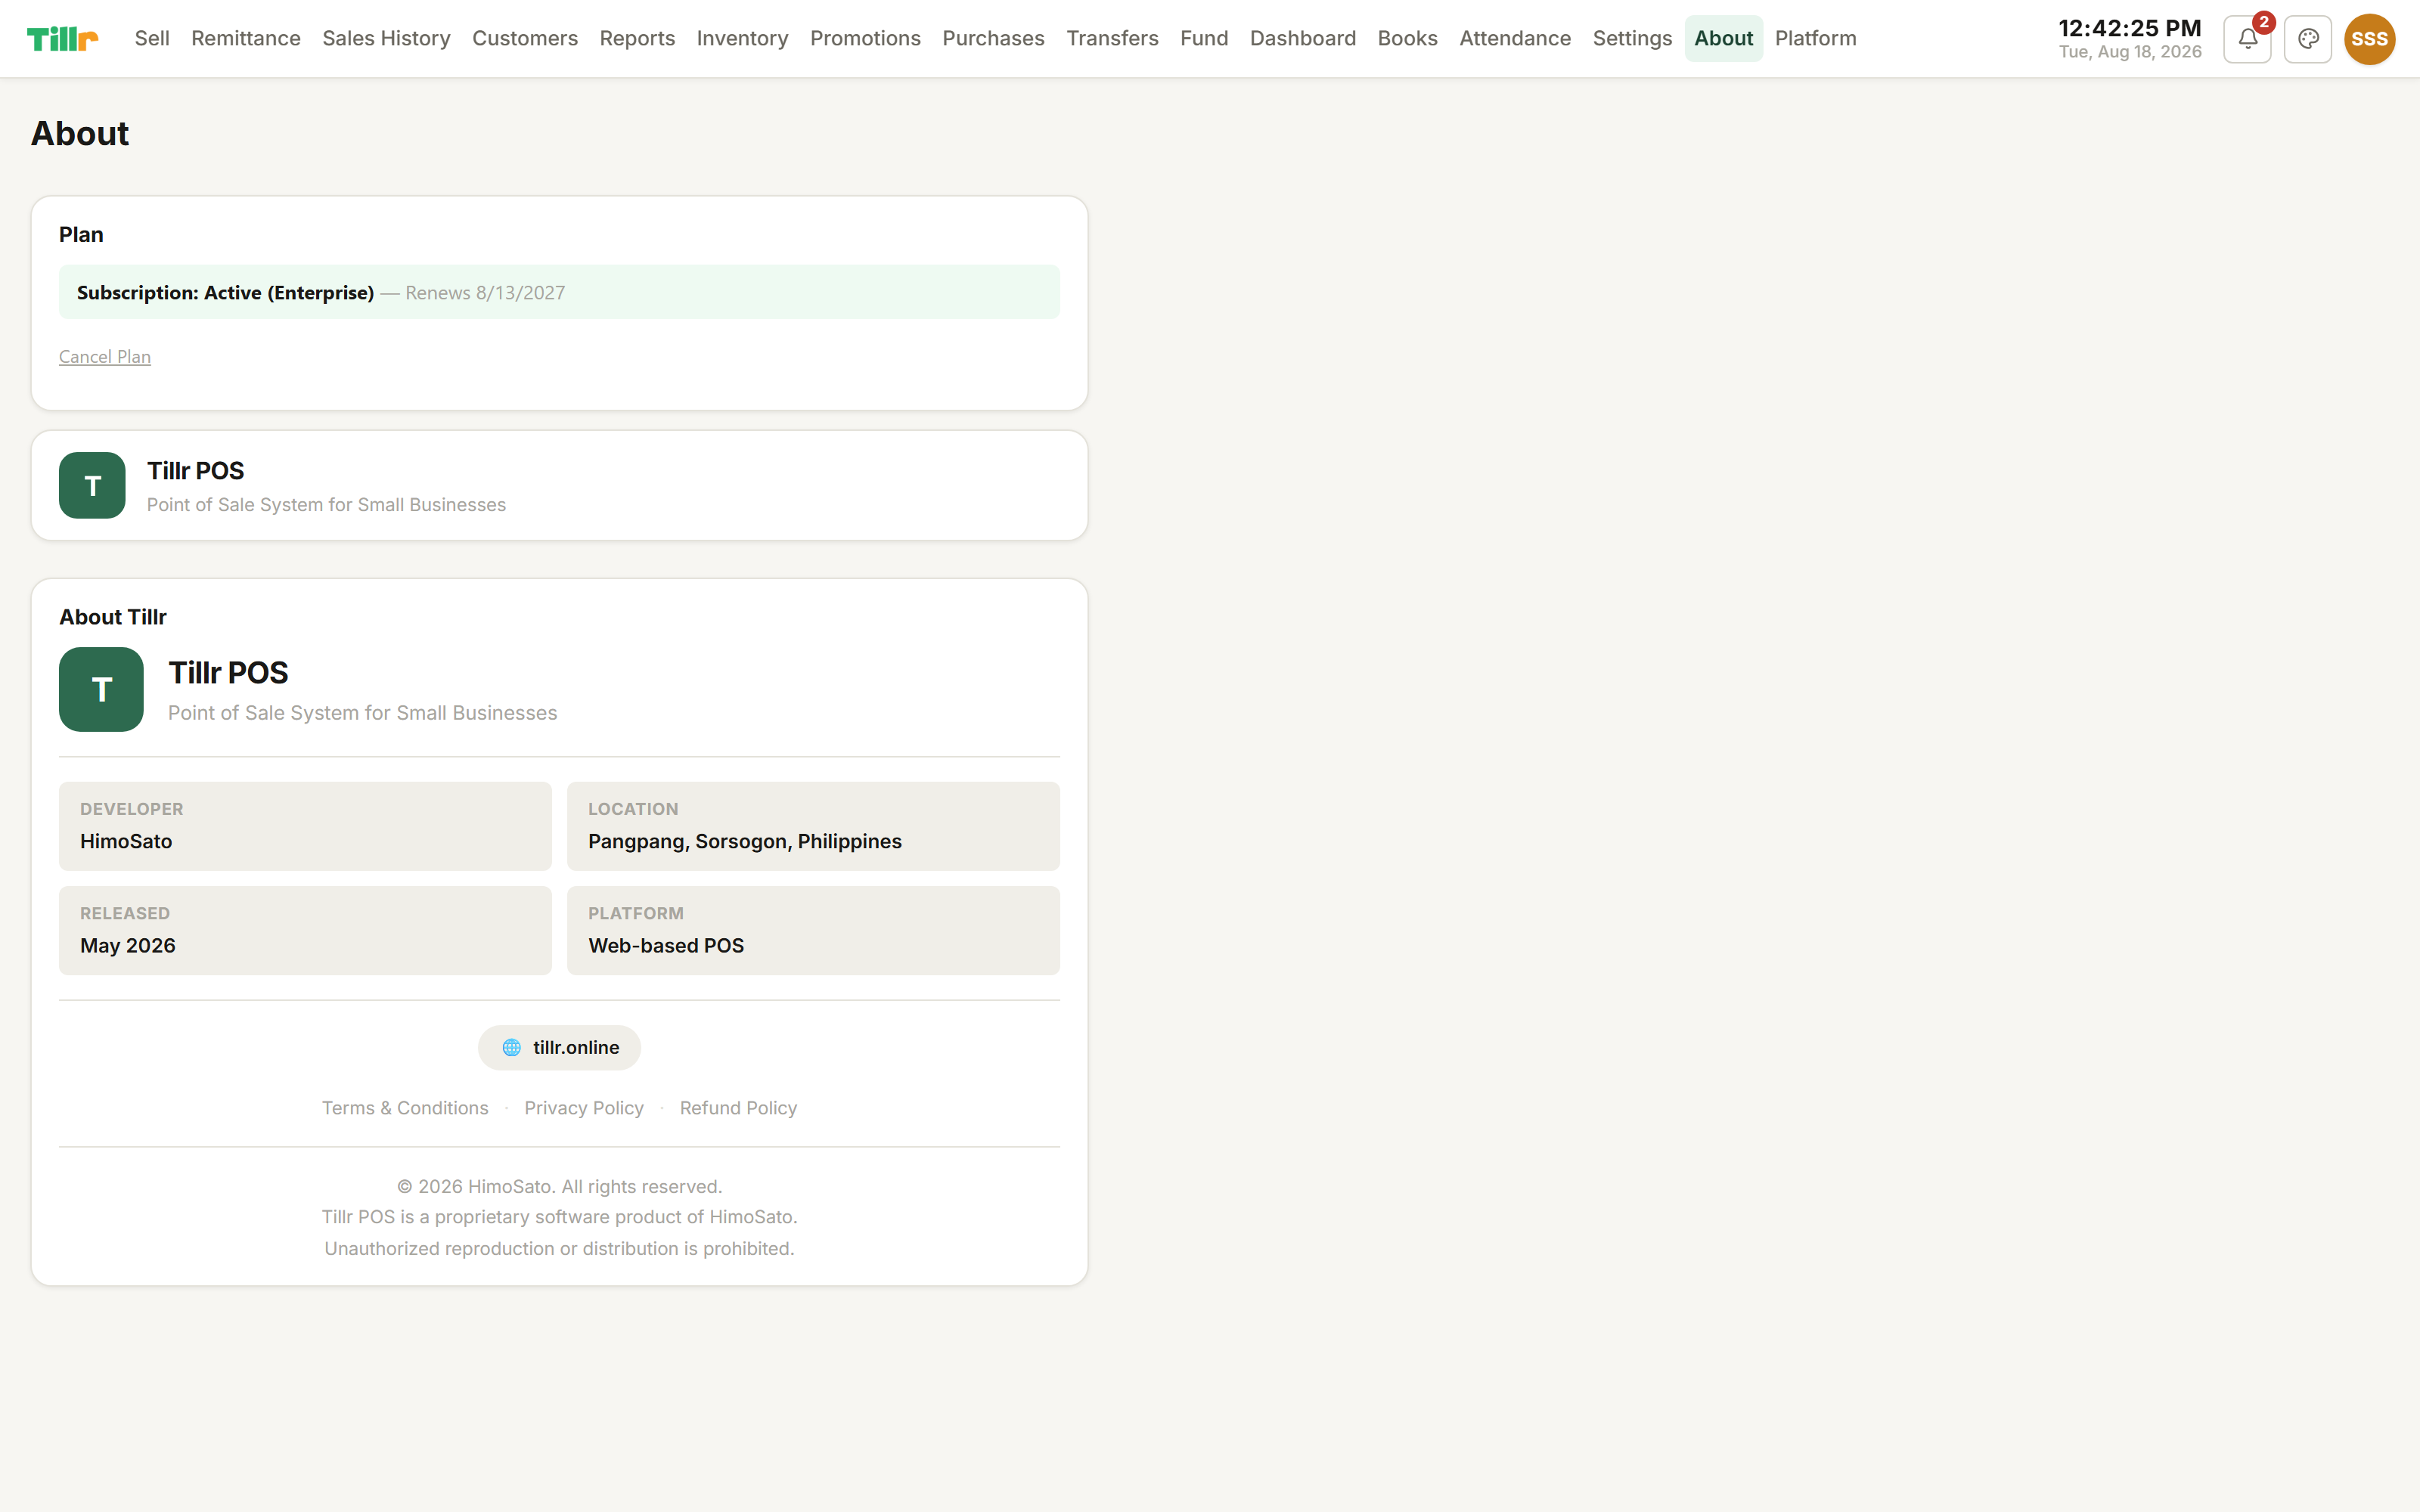
Go to the About page and open Sync Diagnostics. It shows how many items are waiting to sync and when the last successful sync happened, if that time looks old, something's stuck, not just slow.
On desktop, if the background sync worker has quietly died, you'll see a Cloud Reconnect prompt. An admin re-enters their login to restart the connection: this doesn't touch any local data, it just re-establishes the link to the cloud.
Watch the pending count in Sync Diagnostics drop back to zero: confirmation everything's caught up.
Working offline itself is completely normal and expected. This is specifically for the rarer case where you're clearly back online but the numbers still aren't moving.
Sync Diagnostics: pending count and last successful sync, at a glance.
Keeping your data safe: export & device sign-out
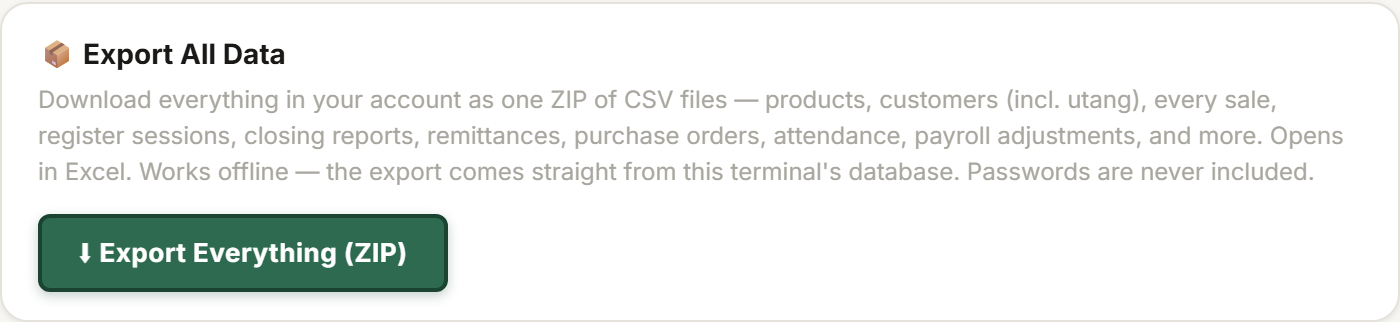
Export Everything (Settings) builds a ZIP of your entire business: every product, customer, sale, register session, closing report, remittance, PO, and payroll record, as CSVs you can open in any spreadsheet. Works fully offline; passwords are stripped automatically.
Sign Out / unpair a device is a different action: it permanently wipes the local copy of data on that specific device. Read the confirmation dialog carefully.
Your cloud copy is untouched. Sign into the same account on any device (this one again, or a new one entirely) and everything re-syncs down automatically.
Use Export when you want your own copy in hand. Use Sign Out when retiring or handing off a device: either way, your business data isn't going anywhere.
Export Everything and Sign Out: two different actions, side by side in Settings.
Reporting a bug or getting help
If something's not working right, or you've got an idea, you don't need to leave the app to tell us.
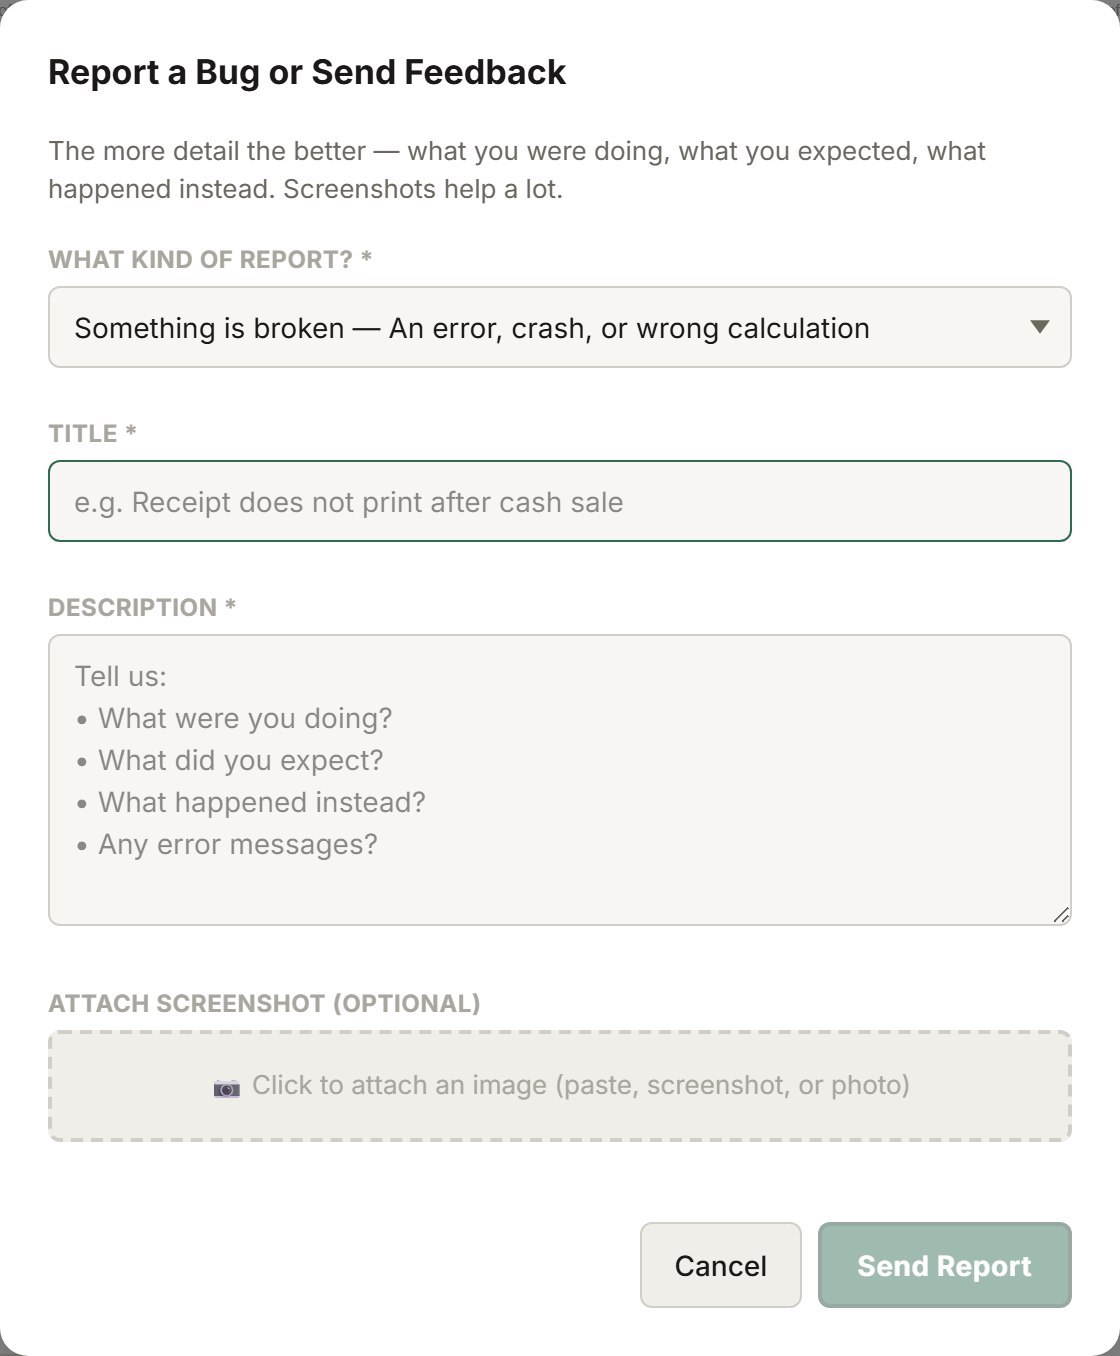
Tap the feedback icon anywhere in the app, and pick a category: bug, UI issue, performance, feature request, question, or other.
Describe what happened in your own words, and attach a screenshot if it helps.
Submit: it goes straight to us with your account and device context already attached, so you don't need to explain what version or device you're on.
Report a Bug or Send Feedback: pick a category, describe it, attach a screenshot if it helps.
10
Hidden Time-Savers
Bulk-importing products via CSV
If you're setting up a store with a few hundred products, adding them one at a time isn't realistic.
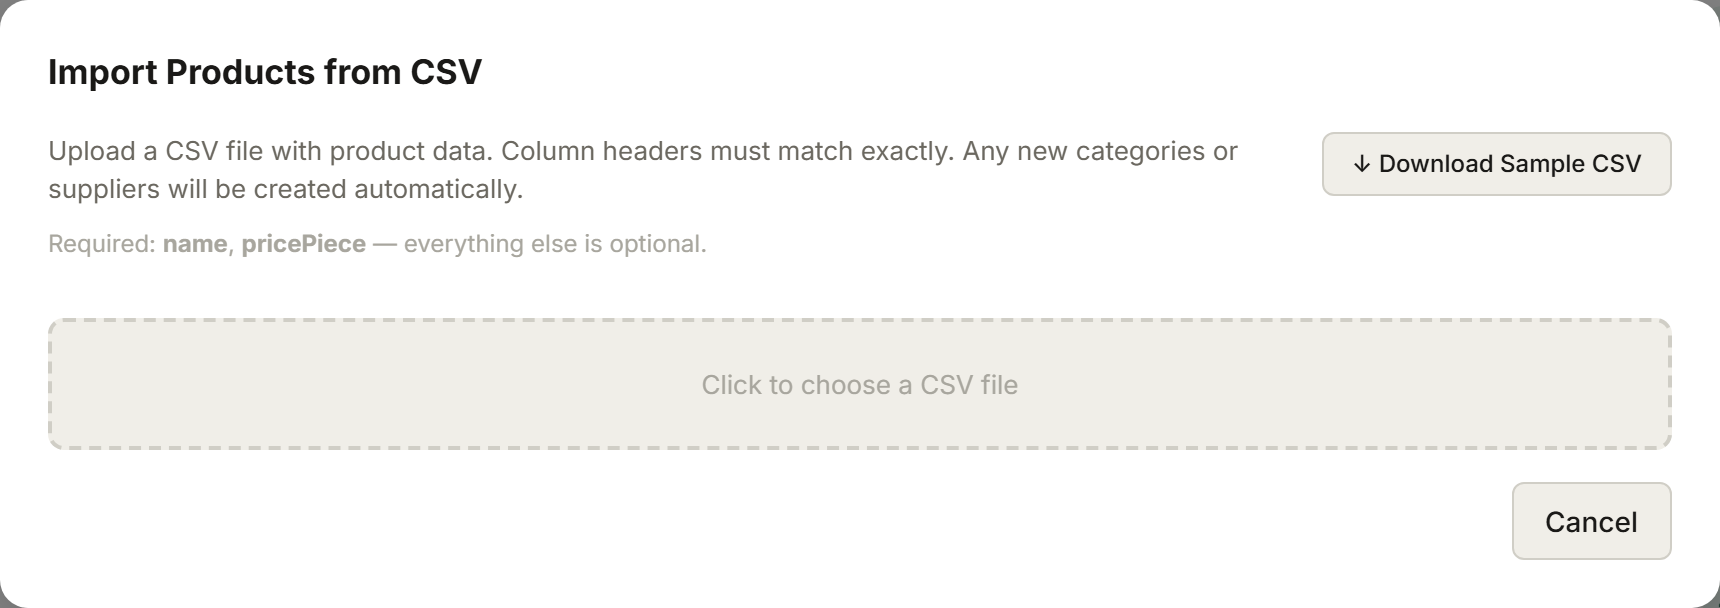
Tap Import CSV on the Inventory page. Download the template if you don't already have your catalog in a spreadsheet: it lays out exactly which columns Tillr expects.
Fill it in, upload it, and you'll get a preview of every row before anything's created: a chance to catch a typo or missing price first.
Confirm, and your whole catalog lands in Inventory in one shot. Categories and suppliers match up automatically if they already exist, or get created fresh.
You can run this again any time (say a supplier sends a new price list) and it updates matching products instead of creating duplicates.
CSV Import: download the template, fill it in, preview before anything's created.
Finding & merging duplicate products
A catalog that's grown over months (added by different staff, imported a few times) tends to pick up duplicates.
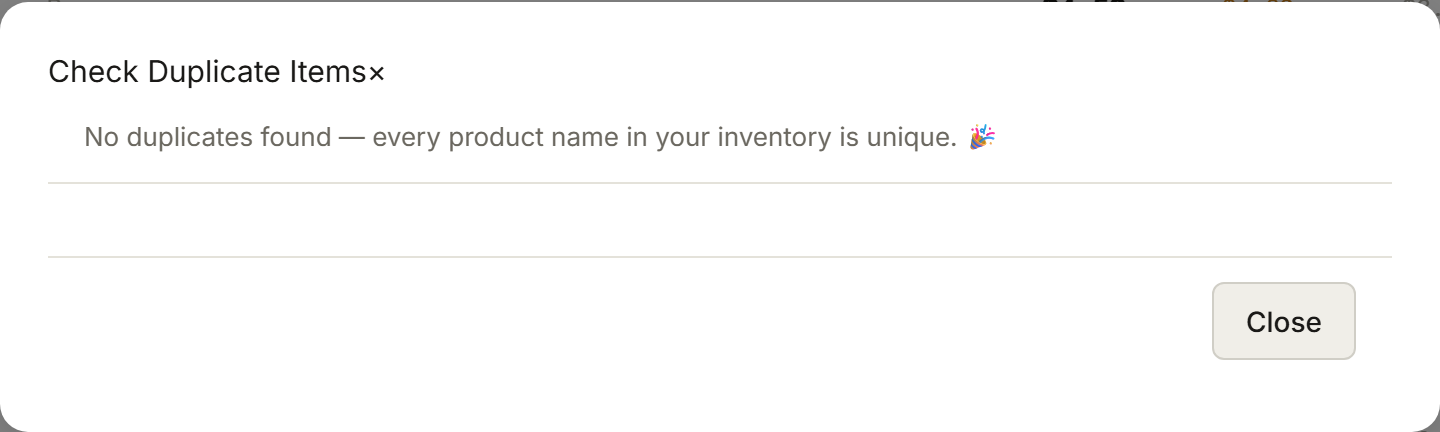
Tap Check Duplicates, and Tillr groups together products that share a name (or something very close) so you're not hunting manually.
Open a group to compare entries side by side: different stock counts or prices from being entered twice.
Merge them into one: Tillr combines the stock counts and keeps the sales history intact.
Run this check every so often, especially after a big CSV import or bringing on new staff.
Check Duplicates: grouped automatically, so you're not hunting manually.
Instant price check (F8) without touching the cart
A customer asks the price of something, you don't need to leave whatever screen you're on.
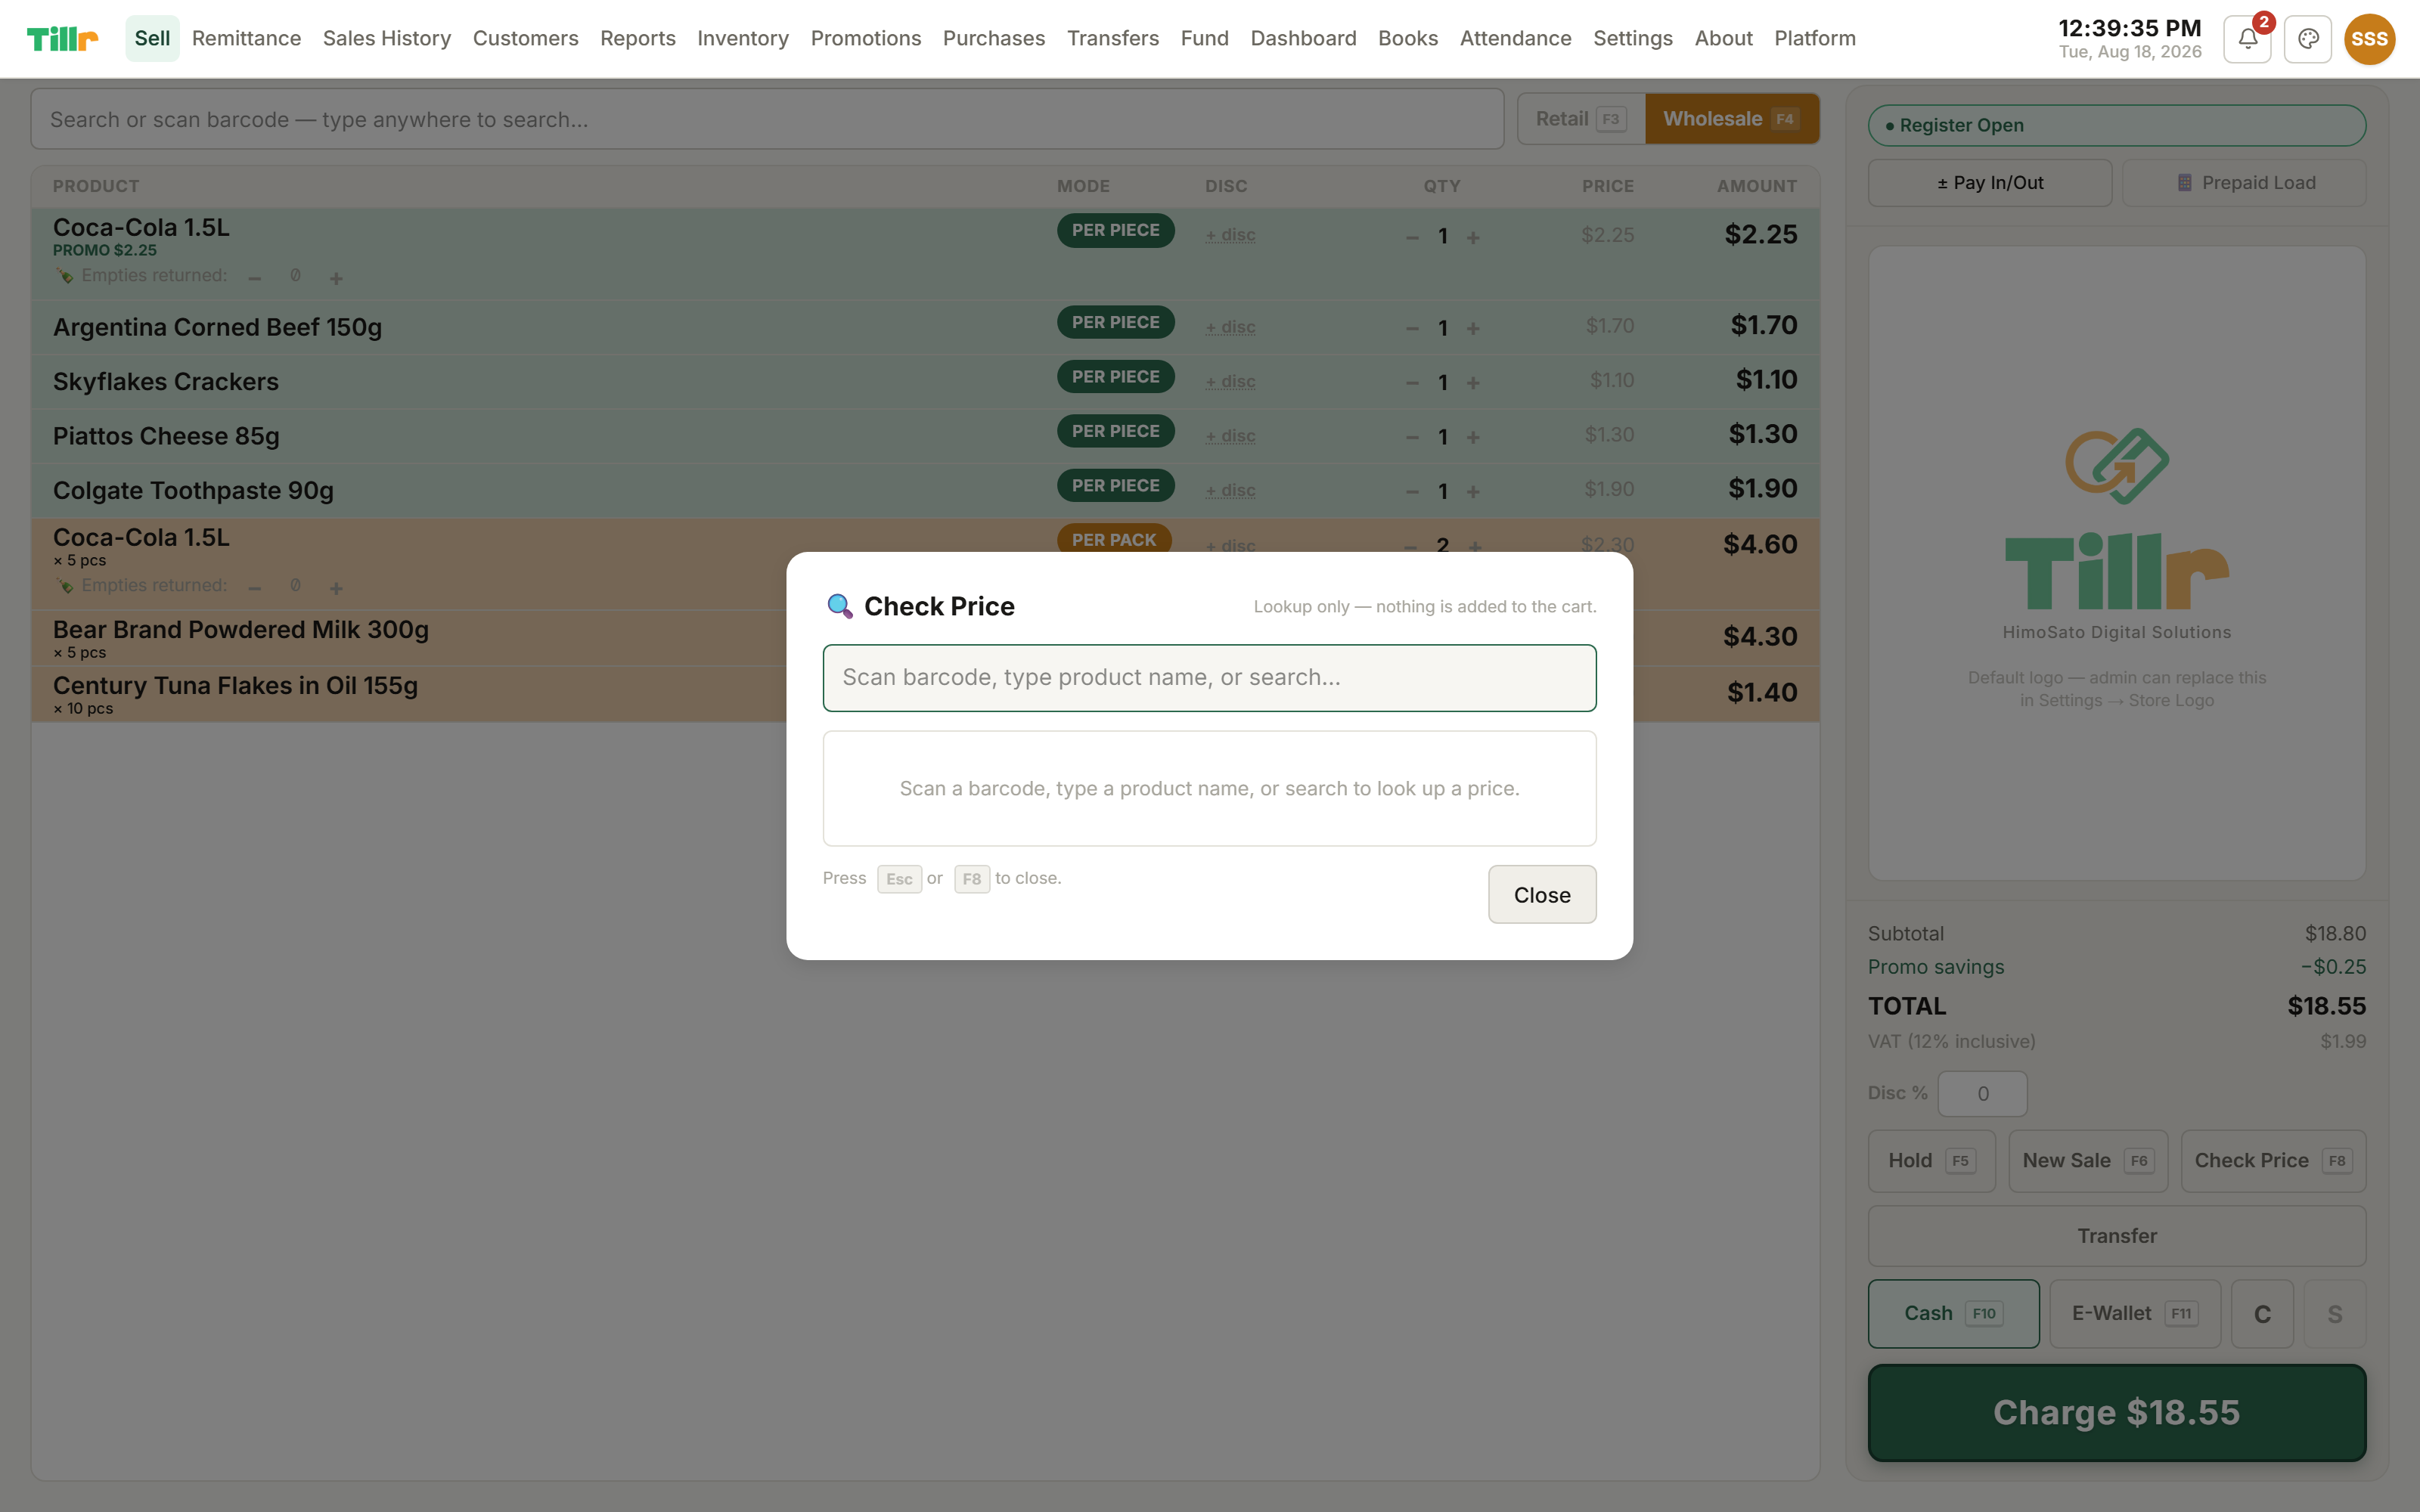
Press F8 from anywhere in the app (Reports, Inventory, mid-way through Attendance, doesn't matter) and a quick price-check overlay pops up.
Type the product name or scan its barcode for the price and current stock instantly.
Close it with Escape, and you're back exactly where you were: nothing about your cart gets touched.
Especially handy mid-sale, to check a second item's price before committing it to the current transaction.
Price check: pops up over any screen, closes with Escape, cart untouched.
11
Devices & Hardware
What hardware works with Tillr
"What do I actually need to buy?" Good news: probably less than you think.
Tillr runs on hardware you likely already own: 4GB of RAM and an older Atom or Celeron processor is genuinely enough. No gaming PC required.
For the main register: install the Windows desktop app on an existing PC, use any modern browser for the web app, or run it on an Android phone or tablet.
Optional extras: a USB barcode scanner speeds up the register considerably, a thermal receipt printer (58 or 80mm) handles receipts, a spare monitor becomes a customer-facing display, and a cash drawer can be wired to kick open automatically after a cash sale.
None of this is required to start: the Free plan runs on just a browser and nothing else. Add hardware as your store actually needs it.
Where to buy: all of this is affordable and easy to find on Lazada or Shopee:
USB barcode scanner (Lazada · Shopee),
thermal receipt printer (Lazada · Shopee),
cash drawer (Lazada · Shopee).
Any generic model works: Tillr doesn't require specific brands.
Tested with Tillr, running daily in real sari-sari stores:
Register PC: budget Windows desktops with 4GB RAM and Intel Atom or Celeron processors, Tillr's design target, no upgrade needed.
Barcode scanner: generic wired USB scanners in keyboard mode, plug in and scan, no drivers, no setup. Also used daily for staff clock-in badges.
Receipt printer: generic 58mm USB thermal printers, no ink, just paper rolls.
Android: ordinary Android phones using the built-in camera as the scanner, no extra hardware at all.
Customer display: any spare second monitor connected to the register PC.
Setting up a receipt printer & cash drawer
Getting your printer talking to Tillr correctly takes about two minutes.
In Settings → VAT & Receipt, set your paper width to match the actual roll in your printer (58 or 80mm). Get this wrong and your receipt text will run off the edge or waste paper.
On the desktop app, tap Printer Settings for a native Windows dialog listing every printer your PC can see and which one's currently selected.
To actually switch which printer Tillr uses, tap Open Config: it opens the settings file directly, where you set the printer name. A one-time setup step per device.
A cash drawer typically connects through your receipt printer or a serial port: once wired, Tillr sends the open signal automatically the instant a cash sale finishes. Run a test sale to confirm it kicks.
Buying tips: look for a 58mm or 80mm thermal printer (Lazada · Shopee): thermal means no ink, ever, just paper rolls. For the drawer, pick one with an RJ11 (phone-jack) cable so it plugs straight into the receipt printer's kick port (Lazada · Shopee).
Barcode scanners: USB vs. phone camera
There are two completely different ways to scan a barcode in Tillr, depending on the platform.
Desktop or web: a standard USB barcode scanner works immediately, zero configuration. It acts like a keyboard, typing the barcode into whatever field is focused and pressing Enter for you. Plug it in and start scanning.
Android: no USB scanner needed. Tap the scan icon and the phone's own camera becomes the scanner. Line the barcode up in the frame and it reads automatically. This works the same way for staff clocking in with a barcode ID badge from the Time Clock panel.
Different mechanism, same result: whichever device is in your hand, scanning is always the fastest way to find a product.
Buying a scanner? Any generic USB model sold as "plug and play" or "keyboard mode" works with Tillr, wired models start very cheap on Lazada or Shopee. If your products use QR codes too, pick a "2D" scanner; a basic "1D/laser" model reads ordinary retail barcodes only.
12
Restaurant Mode
Switching a device to Restaurant Mode Premium
Tillr can run table service and a retail counter under the same account, tables and a kitchen queue on one device, a normal register on another.
As an admin, open the operating-mode switcher and choose Restaurant for the device it should apply to. The first time you do this, Tillr turns Restaurant Mode on for the account automatically, there's no separate setup step first.
That device now shows Tables, Kitchen, and Recipes instead of the usual retail navigation. A second device left on Retail keeps working exactly as it always has.
Only an admin can change which mode a device runs; everyone else's login follows whatever's already been assigned to that terminal.
Managing tables & reservations
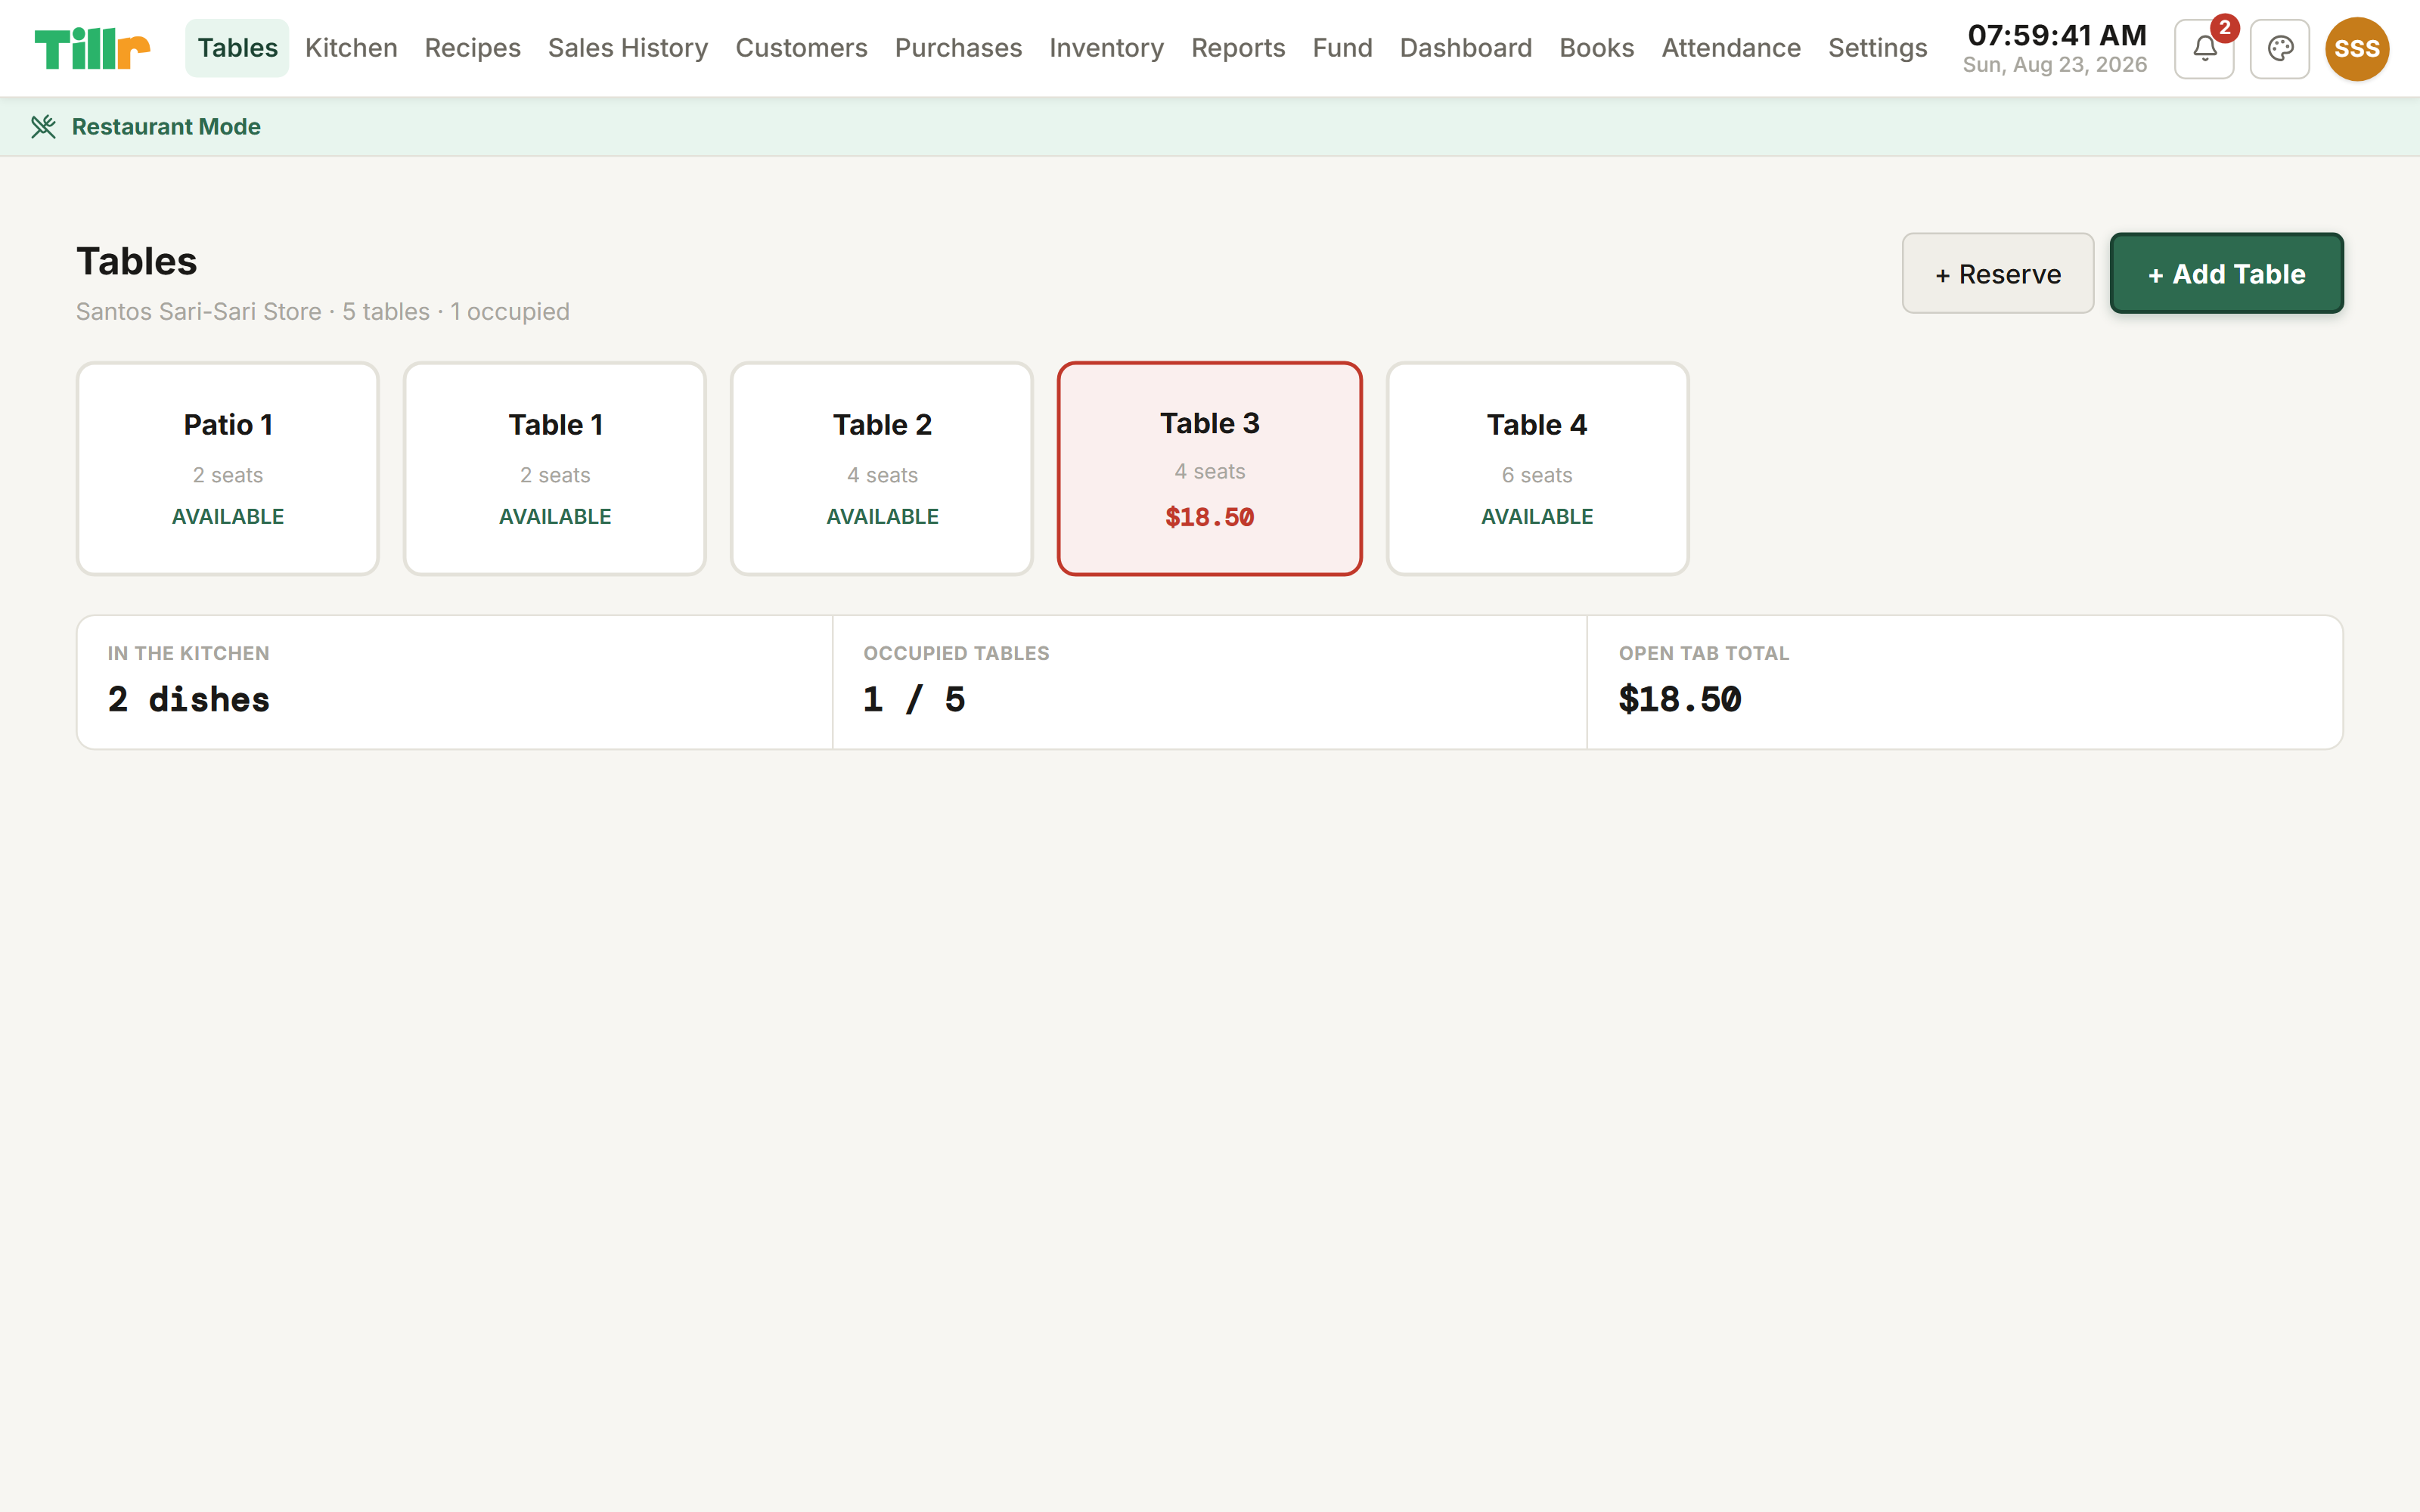
The Tables screen is your floor plan: every table, its real-time status, at a glance.
Tap an open table to seat a walk-in. It opens a real order right then, no separate "start a ticket" step.
A table with an order running shows red with its current running total; an available table shows green.
To take a booking ahead of time, add a Reservation: guest name, phone, party size, and time. A reserved table shows amber until you tap Seat Now, which opens the order for it exactly like a walk-in would.
Tables: every table's real-time status, plus what's in the kitchen and today's open tab total.
Taking orders & settling the bill
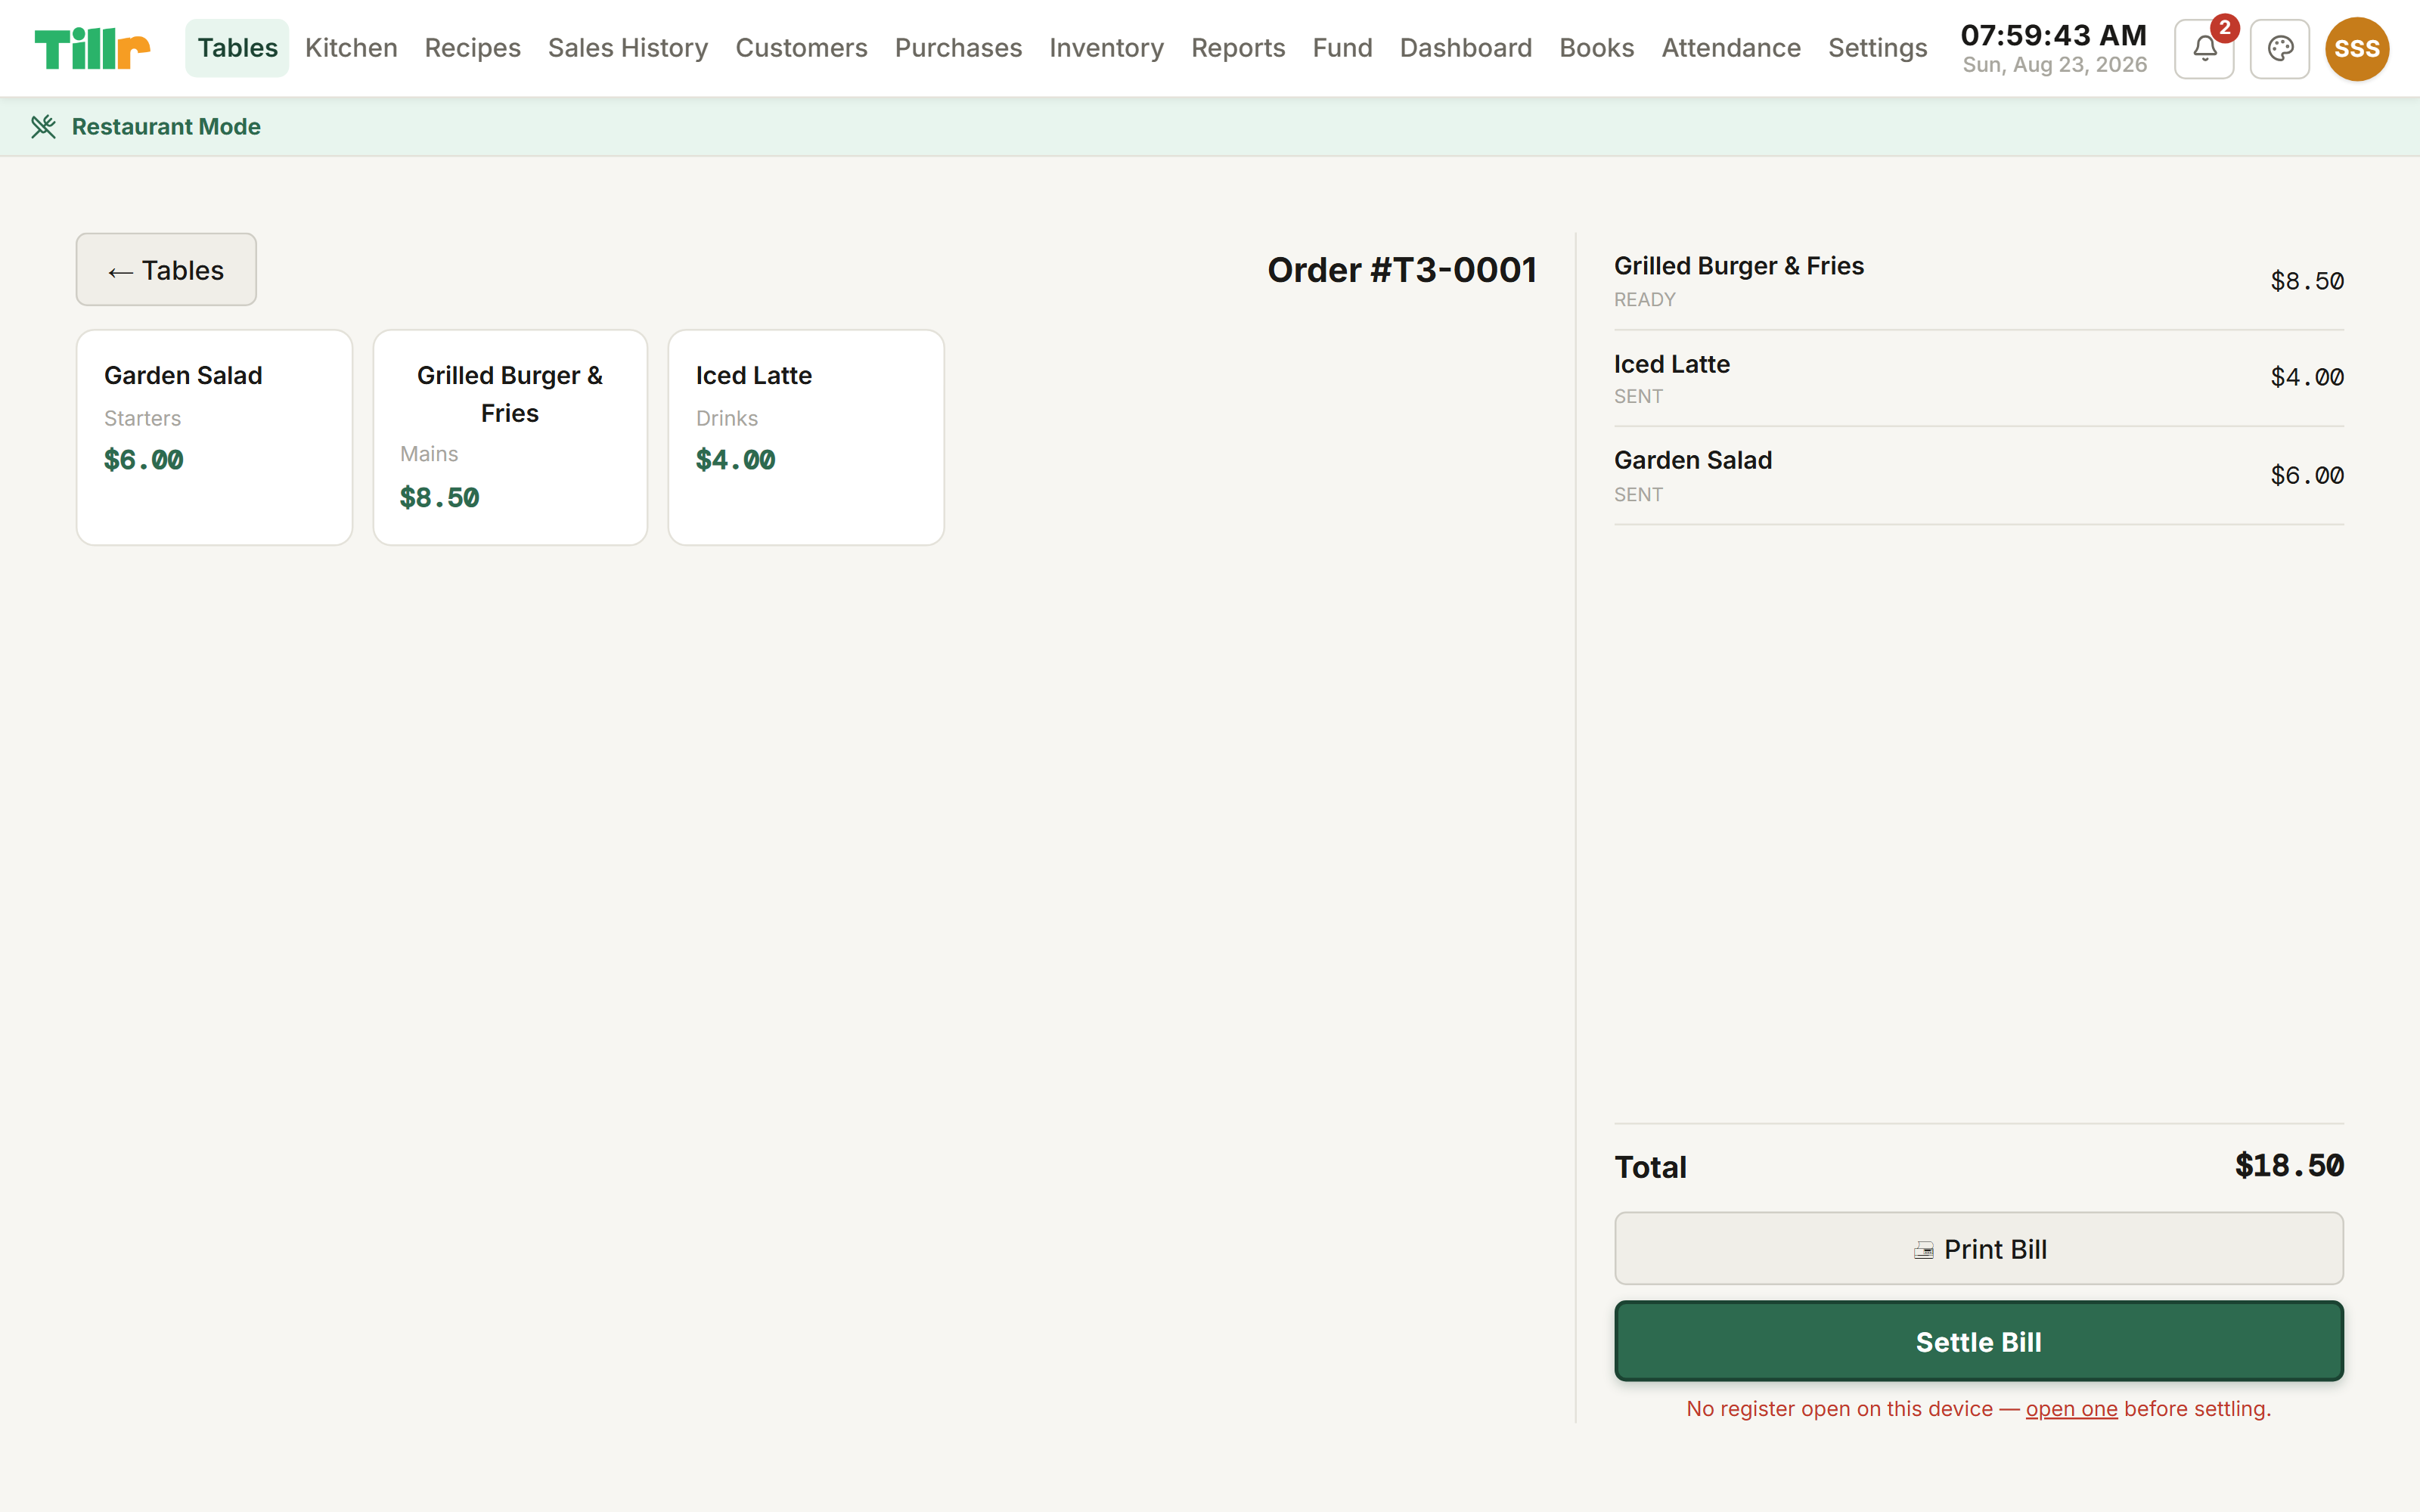
Tapping a table opens its order screen, where you build up what the table's eating as it's ordered.
Tap a dish and it's sent straight to the kitchen immediately, there's no separate cart to confirm first.
Keep adding dishes throughout the meal. The running total and each dish's kitchen status stay visible the whole time.
When the table's ready to pay, tap Print Bill for an itemized statement to bring to the table (it's deliberately not printed as an official receipt, since money hasn't changed hands yet).
Once they've paid, tap Settle Bill and choose cash or e-wallet, the same way checkout works anywhere else in Tillr. This needs an open register on the device, just like a normal sale.
Settling closes the order and frees the table for the next guest.
Order Entry: tap a dish to send it, watch its status update, then settle when the table's ready to pay.
The Kitchen Display
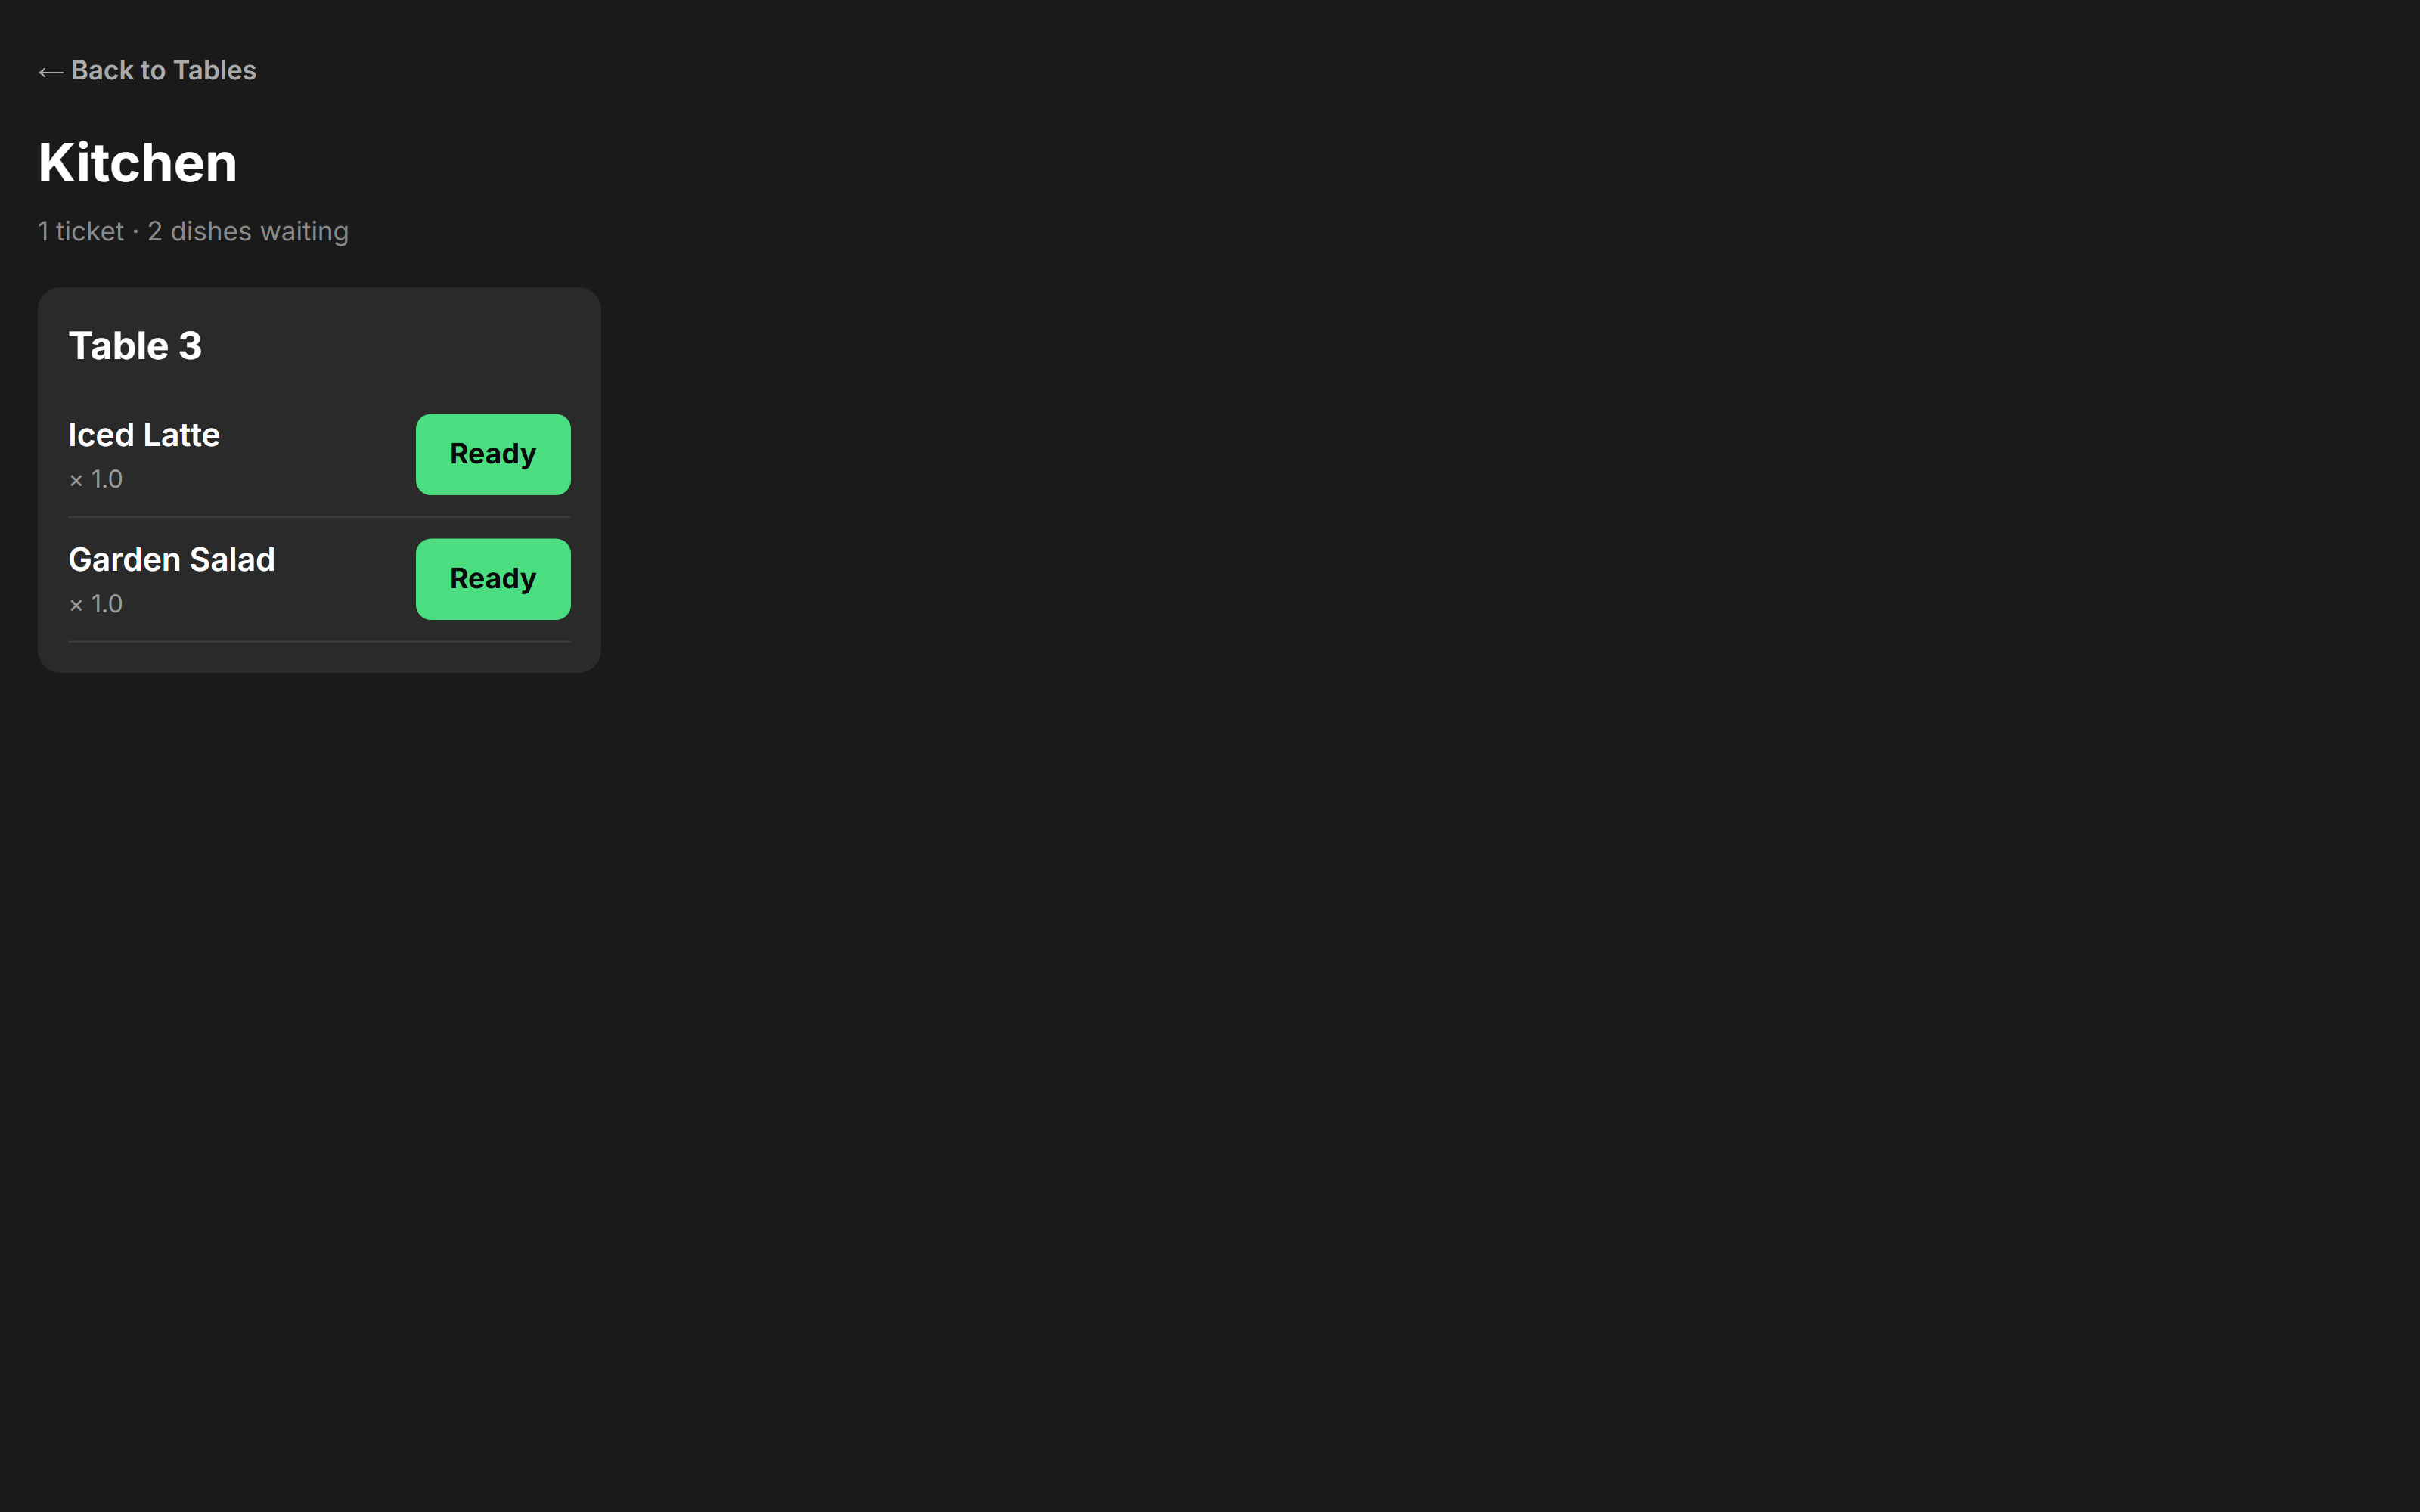
Put a spare tablet or monitor in the kitchen and it becomes a live ticket board, no printer, no paper slips.
Every dish sent from a table's order lands here immediately, grouped by table.
Kitchen staff tap Ready on a dish once it's done. It updates on the server's order screen in real time, not on a delay.
The screen is built to be read from across a kitchen: large type, high contrast, nothing else competing for attention.
The Kitchen Display: large, high-contrast, built to be read from across the room.
Building a recipe-based menu
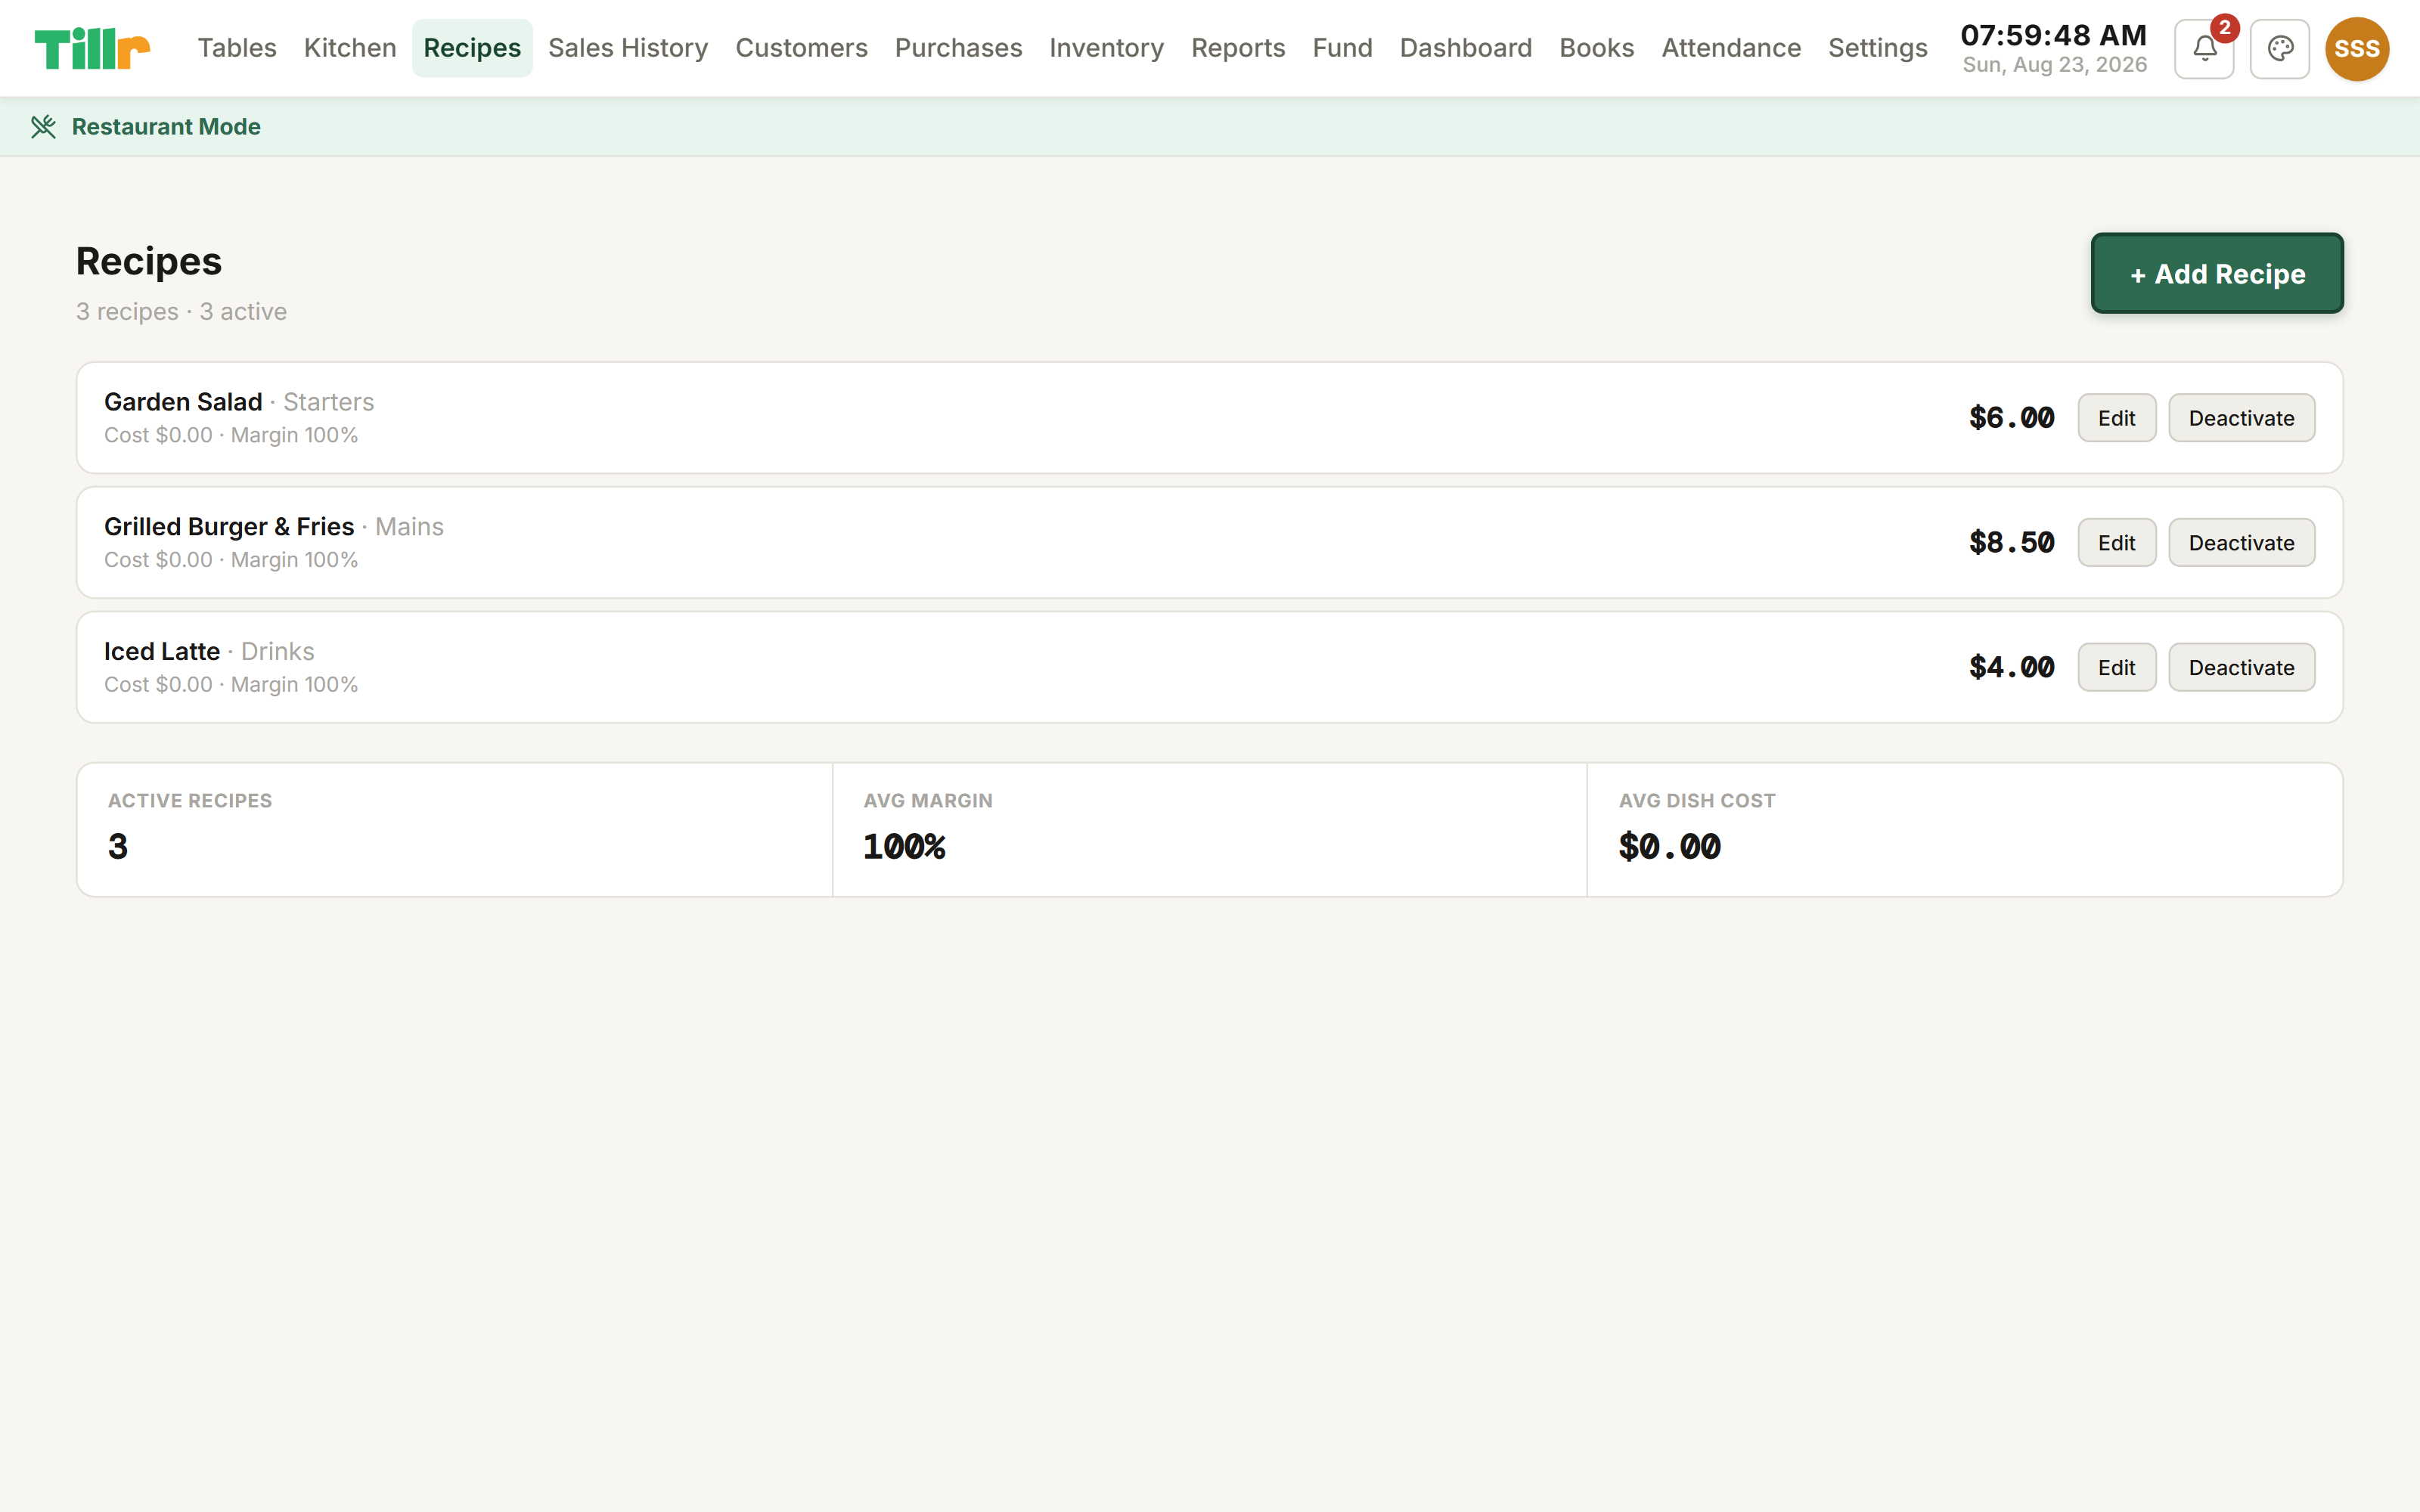
A menu item in Tillr isn't just a name and a price, it's built from the actual ingredients that go into it, so your stock counts stay honest.
Add a recipe: name, category, menu price, and how many servings one batch makes.
List its ingredients, each one is a regular product already in your Inventory, with how much of it goes into a single serving. Add a waste percentage if a bit of each ingredient normally gets trimmed or spilled.
Tillr calculates the dish's cost and margin for you, live, straight from that ingredient's current cost price, so it's never a stale, manually-typed number.
Every time the dish is ordered, the ingredient stock it used deducts automatically. No separate step to "use up" inventory for a recipe.
Recipes: menu price next to a live-computed cost and margin for every dish.
No results. Try a different search term, or browse the sidebar.